background image

MK1 PRO - User Manual

26

ENG

ATTENTION:

Remember before each take-off to check that the bridle is secured to the 
shackle and in the correct position.

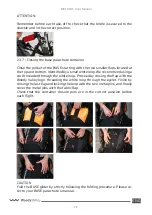
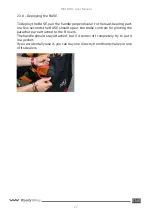
2.3.7 - Closing the base parachute container

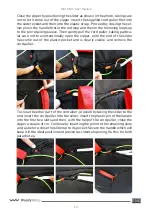
Close the pocket of the BASE starting with the two smaller flaps located at 
the top and bottom, identified by a small white loop. We recommend using a 
cord threaded through the white loop. Proceed by closing the flap with the 

Woody Valley logo, threading the white loop through the eyelet. Finish by 

closing the last flap and locking the loop with the two metal pins, and finally 
cover the metal pins with the fabric flap.

Check that the container closure pins are in the correct position before 

each flight.

CAUTION
Fold the BASE glider by strictly following the folding procedure. Please re-
fer to your BASE parachute’s manual.

Summary of Contents for MK1 pro

Page 1: ......

Page 2: ......

Page 3: ...nd you that all our products are the result of meticulous research in constant collaboration with pilots from all over the world That s why your opinion is so important to us Your experience and collaboration help us constantly improve our har nesses to always get the best out of every Woody Valley creation ...

Page 4: ...50811 Web www woodyvalley eu E mail info woodyvalley com DATA CONTAINED ON THE HARNESS LABELS Manufacturer infor mation Harness name Approved load code Production batch Size Approval code Barcode Serial number Reference standard for harness certifica tion Reseller distributor information Date of sale of the harness ...

Page 5: ... control per formance and enjoyment in flight We are well aware that reading a user manual may not be the most exciting thing to do However please remem ber that this product is not a simple citrus juicer or a mobile phone and that correct use of the harness helps reduce the risk of flying accidents This manual contains all the information necessary to assemble adjust fly and store your harness Th...

Page 6: ... 3 rings 2 3 4 Connecting the BASE parachute to the harness 2 3 5 BASE brake handles 2 3 6 Freebag installation 2 3 7 Closing the base parachute container 2 3 8 Deploying the BASE 2 4 Harness adjustments 2 4 1 High and low back adjustment 2 4 2 Shoulder pad adjustment 2 4 3 Chest strap adjustment 2 4 4 Leg strap adjustment 2 4 5 ABS stabiliser adjustment 2 4 6 Seat depth adjustment 2 4 7 Speed bar...

Page 7: ...STICS AND INSTALLATION OF OPTIONAL EQUIPMENT 5 1 Relax bar 6 MAINTENANCE AND REPAIR 6 1 Maintenance on the 3 rings 6 2 Periodic dorsal protection checks 6 3 Maintenance in the case of ditching 7 WARRANTY 8 APPROVAL CERTIFICATES 9 WARNING LABEL 10 TECHNICAL DATA ...

Page 8: ... 09 CE 2016 425 This equipment must contain Harness Wooden board 2 Harness shackles mounted 2 Mounted reserve parachute deployment handles 2 Separate reserve parachute deployment handles 1 Base extraction handle 2 Base parachute brake handles 1 Y bridle 2 Marillon for fixing Y bridle 6 O Rings 4 already mounted and 2 separate 4 high tenacity loops for release 3 rings 2 already mounted and 2 separa...

Page 9: ...ASE to be opened The MK1 PRO s high safety features let you refine your aerobatic routine with greater confidence enabling you to improve this speciality 1 2 T LOCK safety system Leg straps and chest straps are equipped with the T LOCK safety system to prevent the pilot from slipping out if they forget to fasten the leg straps Proceed by fastening the buckles of the leg straps and then fasten the ...

Page 10: ... of 16 5 cm Low back protection foam triangle positioned behind the lumbar region of the pilot High back protection small foam triangle positioned behind the pi lot s neck Once the protections are assembled in the harness there is no need to re move them we suggest removing them in order to be able to check them after a particularly hard impact or to dry them out in case of a water landing To be a...

Page 11: ...MK1 PRO User Manual 10 ENG ...

Page 12: ...d range of values with a probability of 95 3 Maximum peak of impact should be less or equal to 50 g 4 If any the maximum duration in at 38 g should be less or equal to 7 ms 5 If any the maximum duration in at 20 g should be less or equal to 25 ms 6 The test should be done twice and the 2nd test the maximum peak should not differe more than 20 from the first test maximum peak 2 The dummy is lifted ...

Page 13: ...o provide better load distribution and to ensure a correct landing position in case the parachute is deployed This helps to minimize the risk of injury The built in bridge has a central slot to which the parachute connects 2 2 1 Reserve parachute handles MK1 PRO is supplied complete with four parachute extraction handles identified by No 24 Do not use other handles adapted for this purpose The bla...

Page 14: ... important at this stage to take care not to cross the Y bridle with the risers of the BASE so we suggest that you first attach the Y bridle ends of the reserve parachute and then connect and fit the base The two connections should be made using screw lock maillons with a breaking strength of at least 1 400 kg It is important to make sure that the bridle is long enough to position the reserve para...

Page 15: ...MK1 PRO User Manual 14 ENG ATTENTION To prevent abnormal side loads the bridle must be attached to both loops on their respective shoulder straps Do NOT attach both bridles to one side ...

Page 16: ...ral ly instead of vertically The maillon s screw lock should be tightly screwed shut to avoid any possibility of it opening accidentally This type of connec tion can absorb a higher opening shock than the second system and for this reason this is without doubt the recommended system Second system for non pilot controlled parachutes The parachute deployment bag strap should be passed through the lo...

Page 17: ...pped with a split bridle you can connect it to the harness using the two red loops in the padded shoulder pads Open the zipper on the shoulder straps and from the rectangular recess pull out the red loops to which the maillons and the supplied Y bridle are connected Proceed by replacing the supplied Y bridle with that of your par achute In case of doubt refer to paragraph 2 2 2 Y bridle connection...

Page 18: ...ction under the base parachute container Close the long zipper paying attention to where the zipper splits so that the Y bridle reaches the two shoulder straps After having connected the reserve to the harness with one of the previ ously described systems Insert the parachute with the lines into the har ness container taking care to place the reserve s lines towards the bottom of the harness to fa...

Page 19: ...ot to unintentionally open the zipper until the end of the slider has come out of the elastic pocket and is clearly visible and remove the cord puller To close the other part of the container proceed by taking the slider to the end insert the cord puller into the slider insert the plastic pin of the handle into the first two slots and then with the help of the cord puller close the zipper a couple...

Page 20: ...agliding harness and reserve parachute deployment system is not suitable for use in free fall and during strong shocks Its bearing structure has been designed tested and certified to withstand reserve parachute opening shock in accordance with standard paragliding requirements This does not exclude the possibility that other parts of the harness may be damaged by the shock resulting from the openi...

Page 21: ...tion throw the reserve parachute away from yourself and the glider After opening keep the paraglider from interfering with the reserve parachute as follows If the leading edge is facing upward pull the D risers or the brakes and deflate your paraglider If instead the leading edge of the glider is facing down ward pull one of the D risers or one brake to make the glider rotate with the leading edge...

Page 22: ... para chute is strongly discouraged In the event of the pilot falling into the para glider wing the BASE deployment system will not function The only possi ble action is to use one of the two reserve parachutes The MK1 PRO harness is designed for paragliding only Do not use it for Base Jumping or Skydiving The BASE deployment handle is red and is located on the front left side of the harness When ...

Page 23: ...e installation or folding procedure we rec ommend that you get help from qualified and experienced personnel Check the release system before each take off 2 3 2 Assembling the BASE launch handle To mount the handle identified by No 22 insert the two yellow release ca bles of the handle into the red slots sewn on the strap Proceed by engag ing them in their respective flexible metal housings leadin...

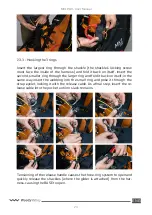
Page 24: ...h the larger ring and fold it back on itself in the same way insert the webbing into the small ring and poke it through the strap eyelet locking it with the release cable As a final step insert the re lease cable into the pocket until no slack remains Tensioning of the release handle causes the three ring system to open and quickly release the shackles where the glider is attached from the har nes...

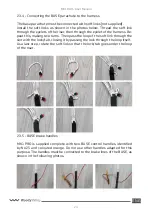
Page 25: ...s making two turns Then pass the loop of the soft link through the slot with the lock tab closing it by passing the lock through the loop itself As a last step rotate the soft link so that the lock tab goes under the loop of the riser 2 3 5 BASE brake handles MK1 PRO is supplied complete with two BASE control handles identified by No 25 and coloured orange Do not use other handles adapted for this...

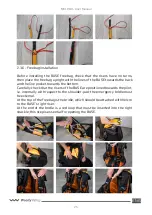
Page 26: ...cket towards the bottom Carefully check that the risers of the BASE are positioned towards the pilot i e internally with respect to the shoulder pad the emergency bridle must be external At the top of the freebag is the bridle which should be attached with Velcro to the BASE s right riser At the end of the bridle is a red loop that must be inserted into the right shackle this step is essential for...

Page 27: ...ll white loop We recommend using a cord threaded through the white loop Proceed by closing the flap with the Woody Valley logo threading the white loop through the eyelet Finish by closing the last flap and locking the loop with the two metal pins and finally cover the metal pins with the fabric flap Check that the container closure pins are in the correct position before each flight CAUTION Fold ...

Page 28: ...oad bearing part In a few seconds the BASE should open the brake controls for piloting the parachute are attached to the B risers The handle should stay attached but if it comes off completely try to put it in a pocket If you accidentally lose it you can buy one directly from Woody Valley or one of its dealers ...

Page 29: ...1 High back adjustment strap paragraph 2 4 1 2 Low back adjustment strap paragraph 2 4 1 3 Shoulder adjustment strap paragraph 2 4 2 4 Chest adjustment strap paragraph 2 4 3 5 Leg strap paragraph 2 4 4 6 ABS Stabiliser strap paragraph 2 4 5 6 6 1 4 2 5 3 3 ...

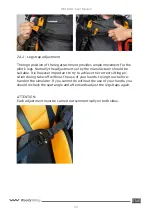
Page 30: ...he factory settings by making reference to the red marks on all adjustment straps Please remember that the size of your MK1 PRO must be chosen accord ing to your height and not according to the width of the seat To find the optimum position we recommend hanging with the harness simulating flight position and conditions Therefore it is best to place all the material which you normally take into fli...

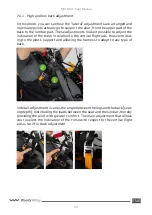
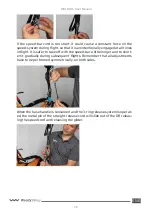
Page 31: ...tion of the torso in relation to the vertical flight axis thus contribut ing to the pilot s support and allowing the harness to adapt to any type of back In detail adjustment 1 varies the angle between the legs and the back seat ing depth distributing the loads between the seat and the lumbar thereby providing the pilot with greater comfort The main adjustment that allows you to select the inclina...

Page 32: ...Manual 31 ENG To facilitate back adjustments we recommend disconnecting the Ly cra from the main strap following the sequence illustrated in the pho tos below To reconnect the Lycra follow the steps in reverse order ...

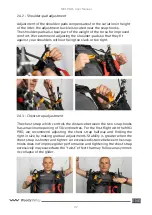
Page 33: ...lack or too tight 2 4 3 Chest strap adjustment The chest strap which controls the distance between the two snap hooks has a maximum opening of 50 centimetres For the first flight with the MK1 PRO we recommend adjusting the chest strap halfway and finding the right in size by making gradual adjustments Stability is greater when the chest strap is shorter and tighter An excessive distance between th...

Page 34: ...turer should be suitable It is however important to try to achieve the correct sitting po sition during take off without the use of your hands trying it out before hand on the simulator If you cannot do without the use of your hands you should recheck the seat angle and afterwards adjust the leg straps again ATTENTION Each adjustment must be carried out symmetrically on both sides ...

Page 35: ...ess dynamic by releasing or tightening pulling the strap We recommend that once the stabiliser has been adjusted as desired you lock the strap back into the two light buckle It is not possible to adjust the ABS in flight 2 4 6 Seat depth adjustment The seat depth can be adjusted by means of two adjustment devices locat ed under the seat To access them the seat must be turned upside down Metal buck...

Page 36: ...of the release cord must be equal to the distance between the speed hook on the riser and the 3 ring system Basically once the cord is attached the straight pin and the hook must be at the same height CAUTION The release cord with the pin must be about 1 5 cm shorter than the loop made at the end of the speed loop To do this it is important to check and if necessary shorten the cord by moving the ...

Page 37: ... It is safer to take off with the speed bar a little longer and to short en it gradually during subsequent flights Remember that all adjustments have to be performed symmetrically on both sides When the base handle is tensioned and the 3 ring release system is operat ed the metal pin of the straight release cord will slide out of the OR releas ing the speed cord and releasing the glider ...

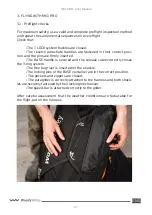
Page 38: ...s are firmly inserted The BASE handle is secured and the release cable correctly closes the 3 ring system The free bag riser is inserted on the shackle The locking pins of the BASE container are in the correct position The pockets and zippers are closed The paraglider is correctly attached to the harness and both shack les are securely fastened by their locking mechanism The speed bar is attached ...

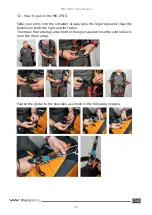
Page 39: ...arms into the shoulder straps take the leg straps and close the buckles on both the right and left sides Then take the red strap attached to the leg strap and close the central buck le on the chest strap Fasten the glider to the shackles as shown in the following images ...

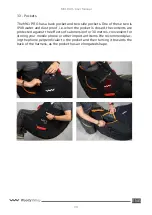
Page 40: ...st proof i e when the pocket is closed the contents are protected against the effects of submersion for 30 metres convenient for storing your mobile phone or other important items We recommend plac ing the phone perpendicular to the pocket and then turning it towards the back of the harness as the pocket has an elongated shape ...

Page 41: ...ever land in the seated position it is very dangerous for your back even if you have foam dorsal protection which provides exclusively passive protection Standing upright before landing is an active safety system and is much more effective 3 7 Disposing of the harness The materials used in a paragliding harness must be disposed of correctly Please return the equipment to us at the end of its life ...

Page 42: ...ecially away from UV exposure If your harness is wet we recommend that you dry it thoroughly before storing it The dorsal protection should be stored inside the harness should not be compressed and should not be removed During transport protect the harness from any mechanical damage we recommend using a backpack or bag Avoid long transports in conditions of excessive humidity or heat ...

Page 43: ...x bar The relax bar is used to keep the legs outstretched and feet resting This flying position is considered by some pilots to be more comfortable than the classic sitting position with dangling feet For assembly on the harness follow the instructions in the manual enclosed with the relax bar ...

Page 44: ...n a well ventilated area away from direct sunlight If your reserve parachute ever gets wet e g in a water landing remove it from the harness dry it and repack it before putting it back in the container Harness component repairs or replacement cannot be carried out by the user but only by the manufacturer or staff authorised by the manufacturer The manufacturer and authorised service staff alone ca...

Page 45: ... lubricant and check that they are not damaged or bent at any point Then check the rings themselves for any deformations cracks or traces of corrosion the same should be done for the eyelet The release rings must be cleaned and lubricated with a silicon lubricant and we recommend cleaning the sheaths as well to avoid dust accumulation Then move on to inspect and clean the straps where the rings ar...

Page 46: ...e seam is and thus where the strap overlaps As illustrated in the following photos Take care that both ends of the overlap of the strap come out of the loop and are visible also check that the knot is properly tightened Specifically take care that the overlap does not get caught on the white loop ...

Page 47: ... have been inspected reassemble everything Otherwise contact Woody Valley dealers for replacement of the protection 6 3 Maintenance in the case of ditching In the event that your harness ends up in salt water we recommend wash ing it well with fresh water as salt water is corrosive and could damage the harness materials The most important parts to clean are all the metal elements i e the 3 ring sy...

Page 48: ...DY VALLEY of the discovery of the alleged manufacturing defect by sending the harness identification code and a detailed description of the problem encountered To restore the defective product you will need to send it to WOODY VALLEY or parties authorised by them WOODY VALLEY reserves the right to decide the best method for restoring the harness repair replacement of parts or the product The warra...

Page 49: ...MK1 PRO User Manual 48 ENG 8 APPROVAL CERTIFICATES 9 WARNING LABEL ...

Page 50: ...or all the latest news on the MK1 PRO Latest update DECEMBER 2022 Distance between snap hook and seat M cm 49 L coming soon Distance between snap hooks min max M cm 39 53 L coming soon Total weight MK1 PRO M 7 7 Kg L coming soon Type of dorsal protection Foam protection Type of straps T lock with rigid seat Variable volume reserve parachute hous ing min max 5000 10000 cm3 Reserve parachute housing...

Reviews: