background image

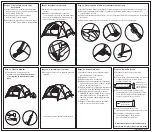
Step 11: Disassembly

Step 12: Packing the tent

Step 9: Secure guy lines

1) Secure tent using all guy lines and stakes. 
     Tent must be secured for proper function.

1) Spread tent flat, distribute evenly. 
2) Fold into quarters not to exceed the length 
     of pole bag.

3) Lay pole bag at opposite end from door. 
     Tightly roll bag, skin and fly forcing air 
     through unzipped door.

4) Secure with ties and place in carry bag with 
     stakes and accessories.
5) Tent must be clean and dry before storage. 
     Store off concrete floor.

Be certain campfires are extinguished. 

Dispose of trash appropriately.

Dimension A should
be close to but not
exceed the length
of the pole bag.

A

Fold tent into a

rectangular shape.

Front of tent

(door unzipped)

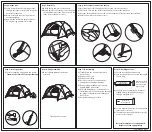
Step 6: Stake tent

1) Stake down the tent by inserting a stake 
     through the stake loops, located along the 
     perimeter of the tent.
2) Make certain the tent floor is pulled out 
     evenly and tightly.
3) Hammer the stakes into the ground at a 
     45˚ angle using a hammer or mallet.

Step 10: Fully assembled

Tent appears as shown.

Step 7: Attach fly

Step 8: Secure fly pole and fasten the fly

CTC181009-7   06/17

1) To take down the tent, disassemble in 
     reverse order.
2) Remove accessories.
3) Remove and fold fly.
4) Be sure to leave doors and windows 
     unzipped to avoid zipper damage.
5) Remove stakes with hammers or stake 
     puller. DO NOT pull on tent.
6) Carefully disengage poles from fast feet. 
     carefully push pole away from you through 
     the hanger to minimize risk of damage to
     tent or poles.
7) Keep stakes in bags provided.

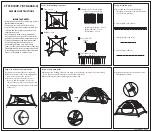
1) Gear loft with tablet pocket can be 
     attached.

1) Unfold the fly and place over the tent.
2) Attach the fly to the tent by connecting the
     adjustable buckles at the fly corners and the
     stake loops at the back corners.

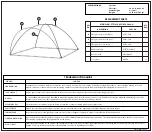
1) Insert the fly pole (C) through the sleeve found over the front door.
2) Place pole ends into the fast feet at the outer corners of the tent front. 
3) Wrap the hook and loop fasteners sewn on the underside of the fly around the tent frame. 
4) Attach fly buckles at front tent corners.

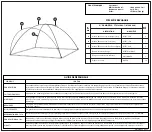
Summary of Contents for Creekside 6

Page 1: ... occupants Have a minimum of two adults for assembly During assembly poles are under tension If not held firmly in place during assembly poles could break or flip up possibly causing serious injury Exercise care when using electric devices in and near tents 2 YEAR REPLACEMENT PARTS LIMITED WARRANTY This product carries a replacement parts warranty against defects in materials and workmanship for a...

Page 2: ...the campsite free of debris and sharp objects away from any natural watercourse Use of a ground cloth is recommended to prolong the life of the tent floor and provide additional insulation and moisture protection To prevent damage to the zippers unzip the doors and windows of the tent prior to disassembly allowing air to move freely Seam seal the inside stitched seams of the tent This will improve...

Page 3: ... 3 Hammer the stakes into the ground at a 45 angle using a hammer or mallet Step 10 Fully assembled Tent appears as shown Step 7 Attach fly Step 8 Secure fly pole and fasten the fly CTC181009 7 06 17 1 To take down the tent disassemble in reverse order 2 Remove accessories 3 Remove and fold fly 4 Be sure to leave doors and windows unzipped to avoid zipper damage 5 Remove stakes with hammers or sta...

Page 4: ...any local sporting goods store To avoid mildew store tent screen house ONLY when thoroughly dry However if mildew occurs use a soft bristle brush or sponge with mild dishwashing soap or Fels Naptha soap to clean Let dry thoroughly and a tent approved water repellent compound may be applied For small tears use a self adhesive patch kit We recommend a canvas or awning repair shop for larger tears Zi...

Page 5: ...ntre les objets qui se trouvent à l intérieur et les parois car cela pourrait causer des fuites aux points de contact En cas de fuite au niveau d une couture appliquez un scellant pour coutures Quoique nos produits soient fabriqués conformément à des normes rigoureuses les piquets peuvent se relâcher par temps venteux et pluvieux et l armature risque alors de s enfoncer dans le sol ce qui en affai...

Page 6: ...r la durée utile du plancher de la tente de même que pour fournir une isolation supplémentaire et une protection contre l humidité Pour ne pas endommager les glissières ouvrez les portes et les fenêtres avant de démonter la tente pour permettre à l air de s échapper librement Afin d améliorer la résistance aux intempéries appliquez un composé de renforcement sur les coutures internes de la tente q...

Page 7: ...tachez les fermetures à bouclettes du double toit aux coins avant de la tente Étape 12 Emballez la tente 1 Étendez la tente sur le sol de façon uniforme 2 Pliez la tente en quatre de façon à ce que sa longueur ne dépasse celle du sac de rangement des mâts 3 Posez le sac de rangement des mâts à l extrémité opposée de la porte Enroulez le sac la toile et le double toit de façon à évacuer l air par l...

Page 8: ...uaire contre la moisissure rangez la UNIQUEMENT lorsqu elle est bien sèche Toutefois en cas de moisissure nettoyez la à l aide d une brosse souple ou d une éponge et d un savon à vaisselle doux ou d un savon Fels Naphta Laissez la sécher complètement avant d appliquer au besoin un scellant hydrofuge S il s agit d une petite déchirure utilisez une rustine autocollante Nous vous conseillons de confi...

Reviews: