3 Repairs
Copyright © WOODLEY EQUIPMENT COMPANY LTD.
82
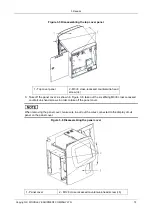
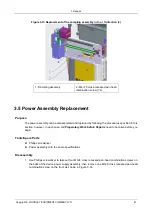
Figure 3-14 Replacement of power assembly (1)
1 - Power assembly
2 - M3×8 cross-recessed pan-head
combination screw (×5)
2. Unplug all the connectors attached to the lead wire of the power assembly.
3. Take off the power supply required to be replaced from the power supply assembly, and replace
with a new power supply, fix it with screws.
3.6 Hydraulics Components incl. Valves, Pumps, and
Pressure Chambers Replacement
3.6.1 Replacing the valve assembly
Purpose
The valve assembly can be disassembled and replaced by following the procedures specified in this
section; however, in each case,
3.2 Preparatory Work before Repairs
begin.
Tools/Spare Parts
⚫
#2 (Ph2) Phillips screwdriver
⚫
The replacement valve with the same specifications
Preliminary Steps
1. Turn off the power switch on the left side of the device.
2. Pull out the power cord plug from the rear panel of the device.

