


page 12
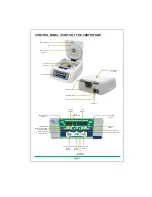
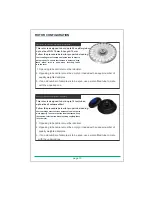
ROTOR INSTALLATION
Rotor Removing and Replacing Process
Upon reception of centrifuge, the HCT rotor comes pre-installed. In case if you want
to remove or replace the rotor, follow the below mentioned procedure.
Removing Rotor
1. The rotor lid MUST BE TIGHTENED securely to facilitate removal of the rotor.
2. Using T - Allen Key, loosen the rotor nut by turning it anti-clockwise. Do not try to
pull the rotor, rotor will come up automatically.
3. Once the rotor nut is loosen completely, lift the rotor vertically.
Replacing Rotor
1. To replace or install the rotor, take rotor
and load vertically on the motor shaft.
2.Place the rotor nut in the center hole of
the rotor onto the motor shaft.
3. Put T -Allen Key in rotor nut & turn
clockwise
to tighten and anti-
clockwise to loosen rotor.
4.After properly fastening rotor, place
rotor lid on the rotor lid nut by hand
by rotating the rotor lid nut clockwise.
Note: 1) Check the rotor is firmly tightened
before running.
2) Do not remove or loosen the rotor lid before
removing rotor.
Removing Rotor Lid
1. Turn rotor lid nut anti-clockwise to loose and turn clockwise
to tighten rotor lid.
2. Rotor nut is free and can also be removed after removing
rotor lid.
3. Make sure to replace the rotor nut while tightening the rotor
lid.
T - Allen Key
To Loosen
Rotor
Motor Shaft
Rotor
Lid nut
Rotor
nut
Rotor
chamber
To Loosen
Summary of Contents for Clinispin MPC
Page 1: ...Operator s Manual CLINISPIN MPC Multi Purpose Centrifuge Rev 1 0...
Page 2: ......
Page 19: ......


