wolfappliance.com
|
9
INSTALLATION
Gas Supply Line
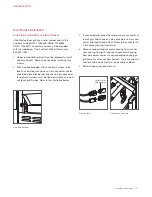
NATURAL GAS CONNECTION
Install the natural gas pressure regulator supplied with the
outdoor product with the arrow on the regulator pointing
towards the unit. Refer to the illustrations below for a typical
natural gas installation.
REGULATOR
REAR GAS
CONNECTION
BOTTOM GAS
CONNECTION
SHUT-OFF
VALVE
FROM GAS
SUPPLY
REGULATOR
TO GRILL
ADAPTER
CLOSE
NIPPLE
VENT
Natural gas connection
Natural gas regulator
LP GAS CONNECTION
For whole house LP gas connection, the LP gas pressure
regulator is not provided. It can be purchased from an
authorized Wolf dealer. For local dealer information, visit the
find a showroom section of our website, wolfappliance.com.
For connection to LP gas cylinder, use only the LP gas pres-
sure regulator and hose supplied with the outdoor product.
Use only a 20-lb LP gas cylinder with an approved overfilling
preventive device (OPD) and shut-off valve terminating in
the cylinder valve outlet.
1
Connect the
3
/
8
" flare end of the hose to the unit cou-
pling. Do not apply pipe sealant to the flare connection.
2
Install the LP gas cylinder, pull out the shelf and place
the cylinder on it. Refer to the illustration below.
3
Ensure the gas valve on top of the cylinder is closed.
4
Connect the LP gas regulator to the cylinder and hand-
tighten only. Open the cylinder valve. Check for gas
leaks. Refer to the illustration below.
5
Tighten the LP tank retention screw to secure the cyl-
inder to the shelf.
WARNING
Perform a gas leak test each time the LP gas cylinder is
changed. Do not place more than one LP gas cylinder
in an enclosure at a time.
LP TANK
RETENTION SCREW
GRILL
COUPLING
COUPLING
NUT
REGULATOR
VENT
TO GRILL
LP tank shelf
LP gas cylinder connection


