


Operating Instruction – Lawnmower with IC engine
English
13
This is not a fault with the appliance
but occurs for technical reasons.
Remedy (depending on model):
Without pulling the drive handle,
push appliance forwards a little,
then backwards.
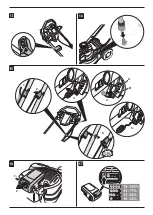
Detaching and emptying the
grass sack
(for appliances with grass catchers)
Fig. 11
If cut grass is left lying on the
ground or if the level indicator
(optional, fig. 12) indicates that the
basket is full:
Release the safety lever and wait
until the engine stops.
Lift the deflector flap and unhook
the grass sack.
Empty out the contents.
Working without the grass sack
Whenever you detach the grass
sack, the deflector flap drops down.
When working without a grass
catcher, the mowed grass is
ejected directly downwards.
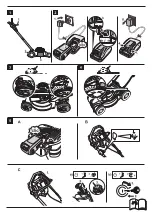
Retrofitting for mulching
(for appliances with optional
mulcher)
Appliances with rear discharge:
Fig. 8A
Lift the ejection flap.
Remove the grass catcher.
Insert mulch key (depending on
model).
Lower the ejection flap.
Note
Models with integrated mulching
function do not require a separate
mulch key – a specially shaped rear
flap assumes this function (fig. 8B).
Changing appliances over to
side discharge
(depending on model)
If fitted:
Remove grass catcher and lower
the rear discharge flap.
Lift impact protection/mulch lock
and attach side discharge (fig. 9).
After finishing work
Remove the ignition key (if used).
Wait until all moving parts have
come to a complete stop and
the engine has cooled down.
Turn off the fuel tap (if fitted – see
engine manual).
Disconnect the spark plug
terminal on the engine.
Empty grass catcher.
Remove the starter accumulator
from the engine – Fig. 16.
Recharge accumulator if
required.
Fig. 17
To check the accumulator
charge, press the button (1) on
the accumulator. The LEDs (2)
indicate the approximate battery
charge.
If an LED is flashing, recharge
the accumulator immediately.
Note
Leave engine to cool down before
placing the mower in an enclosed
space.
Tips on lawn care
Here are some tips to help you
keep your lawn looking healthy and
ensure uniform growth.
Mowing
A lawn is made up of various dif
-
ferent types of grass. If you mow
your lawn frequently, those types of
grass which form strong roots and
a firm turf surface will grow better.
If you only rarely cut the grass, you
will encourage the development of
high-growing types of grass and
other weeds, such as clover and
daisies.
The normal height of a lawn is
approx. 4–5 cm. Only
1
/
3
of the total
height should be mown; therefore
cut 7–8 cm long grass to normal
height.
Preferably do not cut the lawn
shorter than 4 cm, otherwise the
turf will be damaged in a dry period.
If the grass has grown particularly
high (e.g. during a holiday period),
cut it back to its normal height in
stages.
When mowing, always overlap the
mown swaths slightly.
Mulching (using the
accessories)
During mowing the grass is cut into
small pieces (approx. 1 cm) and is
left on the ground. A lot of the
nutrients in the cut grass are
retained for the benefit of the lawn.
For the best possible result the
grass must always be kept short,
see also section ”Mowing”.
Observe the following mulching
instructions:
– Do not mow wet grass.
– Never mow more than 2 cm.
– Drive slowly.
– Use the maximum engine speed.
– Regularly clean the cutter deck.
Transporting
Short distances by hand
Danger
Solid objects may be hit/propelled
by the rotating cutter deck causing
damage.
First stop the engine before moving
it over surfaces other than grass.
When using a vehicle
Danger
Before transportation, always stop
the engine and leave to cool down.
Remove the spark plug terminal,
The mower must not be tilted when
it is transported.
When transporting the scarifier in
or on a vehicle, ensure that it does
not move around unintentionally.
Empty the fuel tank before trans
-
porting the device. The filler cap
must be closed tightly.
Appliances with collapsible bars:
Fig. 10
The steering handle can be
folded down to facilitate storage.
!
!
Summary of Contents for A 460 A SP HW IS
Page 1: ...www WOLF Garten com ...
Page 2: ......
Page 3: ......
Page 4: ...1 1 3 A B 2 2 2 1 5 4 2 3 2 1 ...
Page 5: ...1 2 3 4 5 6 A B 1 2 1 1 1 1 2 2 ...
Page 6: ......
Page 293: ......