background image

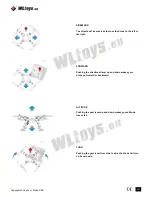
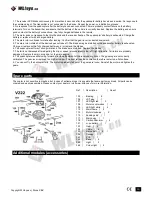
This model can be equipped with different modules. This is 
available from your retailer or on www.wltoys.eu.
A module may be included in some models.

1.        Camera
2.        Bubble
3.        Fountain
4.        Bullet
5.        Rescue

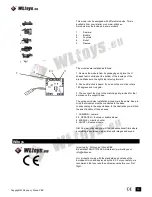
The modules are installed as follows:

1. Remove the module from its packaging and place the V-
shaped feet in stirrups at the bottom of the fuselage of the 
drone. Make sure the right side is facing forward.

2. Push until a click is heard. If you do not hear a click, rotate 
180 degrees and try again.

3. Then connect the plug to the matching slot provided for that 
purpose on the support base.

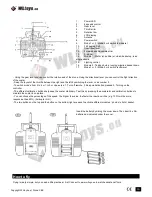
The various modules installation procedure is the same. Keep in 
mind that modules must be connected to the base 
corresponding to the support base. In the illustration you will find 
the exact location of these bases.

1. CAMERA = camera
2-3. SPRAYER = fountain or bubble blower
4. MISSILE = missile shooter
5. HOIST = Rescue module

NB: On www.wltoys.eu you will find the educational films where 
everything is explained step-by-step with images and sound.

Imported by:  WLtoys.eu / DroneX BV
Bloemstraat 86HS 1016 LE Amsterdam | www.wltoys.eu | 
[email protected]

Our products comply with the standards and criteria of the 
European Union and approved by the EC. For your safety, we 
recommend that you read the entire manual before your first 
flight.

Wltoys

Copyright WLtoys.eu | DroneX BV

Summary of Contents for V222

Page 1: ...isconnect the battery and remove it from the device The model and the transmitter must be switched off after use Always fly in an open and safe environment where you will not cause any danger to others For the remote control we recommend AA batteries with a voltage of 1 5 to 1 2 volts For people without experience we recommend that you learn to fly with an experienced user during your first flight...

Page 2: ...nd contribute to the protection of our environment DO NOT FLY Around people or animals Around large groups of people In limited visibility or dark conditions Winds above 2 Beaufort Near high voltage pylons and or other types of cabling During thunderstorms rain or high humidity The device is not water resistant Battery recycling recommendations For the sensitive and rational conservation protectio...

Page 3: ... Never damage the battery mechanically this could cause an explosion The battery should not be placed near children unless you have an adult supervision The technical design of the battery must not be changed Touching of damaged batteries can cause injury If there is contact with skin or eyes seek medical attention immediately Do not charge directly after the flight or when the battery is warm 1 C...

Page 4: ...ntrol the flight direction of the copter Swap the layout of the throttle between the right and the left by switching the lever on as number 9 To switch mode s from 2 to 4 or 1 to 3 or vice versa 1 Turn off remote 2 Keep model button pressed 3 Turning on the controller The different calibration buttons help keep the copter stationary Test this by pressing the accelerator and calibration buttons to ...

Page 5: ...t FORWARD Pushing the directional lever up and down makes your drone go forward or backward ALTITUDE Pushing the gear lever up and down makes your altitude rise or fall TURN Pushing the gear lever from side to side the drone will turn on its own axis Copyright WLtoys eu DroneX BV ...

Page 6: ...oting Ensure that the copter in flight is always within sight and under control Always use a fully charged battery When finished flying always turn off the copter first then the remote control Do not use the copter when it has visible or mechanical damage Always fly in an open and Jellyfished environment to avoid dangerous situations Always stay out of reach of rotors Remember to disconnect the ba...

Page 7: ...charged battery 4 The main rotor continues to rotate after landing Confirm that the gear lever is oriented downward 5 The main rotor rotates but the device does not take off The blades may be distorted or the quadcopter battery is exhausted Charge or replace with a fully charged battery and or replace the blades 6 The quadcopter suffers of strong vibrations The blades are distorted Replace the bla...

Page 8: ... support base The various modules installation procedure is the same Keep in mind that modules must be connected to the base corresponding to the support base In the illustration you will find the exact location of these bases 1 CAMERA camera 2 3 SPRAYER fountain or bubble blower 4 MISSILE missile shooter 5 HOIST Rescue module NB On www wltoys eu you will find the educational films where everythin...

Page 9: ...fore shipment If unfortunately a problem persists contact your dealer or visit www wltoys eu Your dealer can also assist you in getting replacement parts if the flight has created damage We hope you will enjoy your experience with our product You can contact us at any time on www wltoys eu info wltoys eu You can find instructional videos and buy spare parts on our website www wltoys eu For technic...

Reviews: