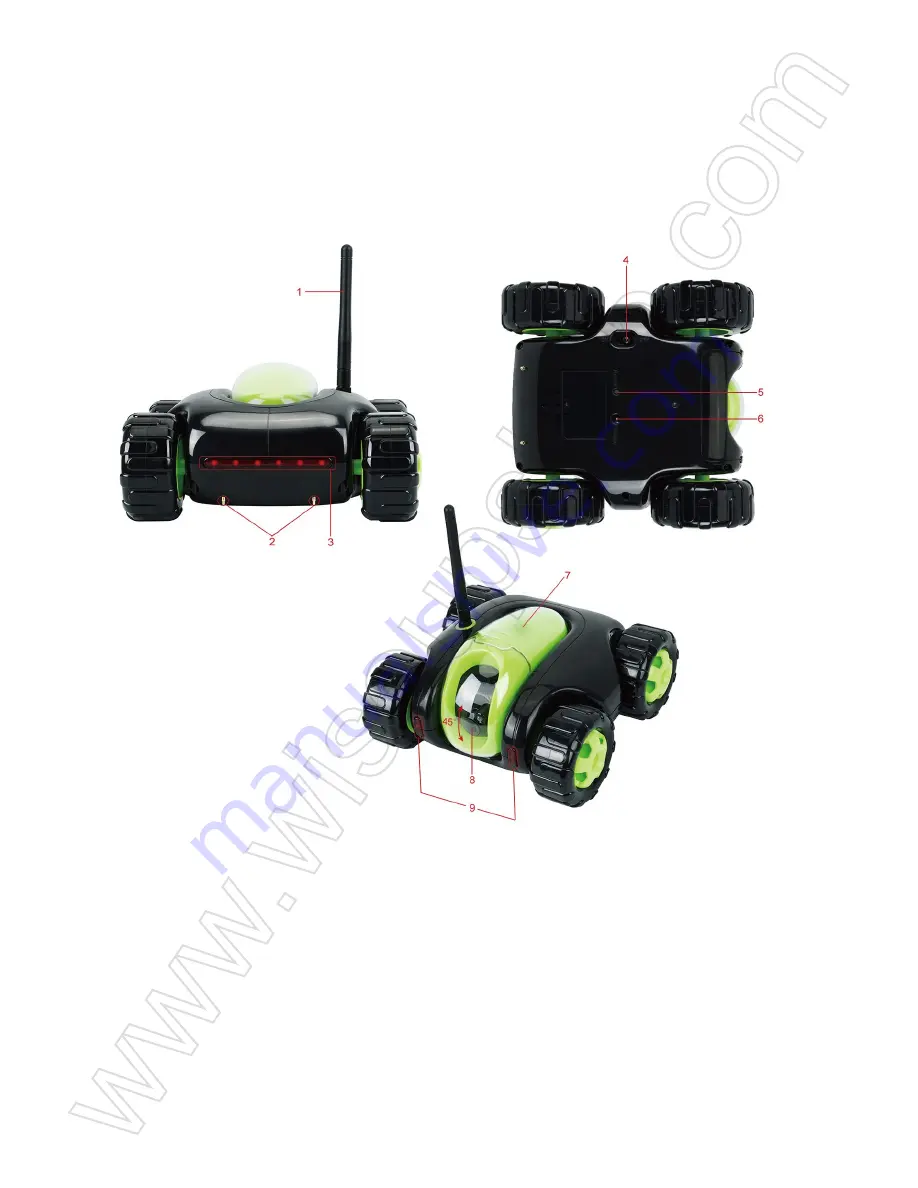
Wiseup WIFI33 User Manual Download Page 1

WIFI33

User Guide

I. Product Overview

1. Antenna
2. Electrode 
3. Battery Life LEDs
4. Power Switch
5. Reset Button 
6. Power Input
7. Indicator Light
8. Camera Lens
9. IR LEDs

II. What’s in the Box

-1× WIFI Camera Toy Car
-1× DC5V Power Adapter
-1× Charging Base

III. Getting Started

3.1. Please make sure your toy car camera is fully recharged before using.
3.2. Scan the QR code below to install the “

CloudRover4

” application on your Android or 

IOS device.
   

3.3. Slide the Power Switch to the ON position to turn on the camera. The indicator light will 
keep flashing green.

IV. Network Setup

4.1. P2P Connection Setup (LAN Mode)

4.1.1. Go to the WIFI or WLAN Setting page on your phone or mobile device, connect to 
the camera’s WIFI signal named “

CC-*****

”. Wait for the WIFI to be connected and your 

phone status bar will appear WIFI symbol as below:
 

4.1.2. Launch the application and the camera’s UID will show up automatically. Click the 
car icon, input default password “

admin

” and tap “

Connect

” to connect to the camera.


4.1.3. It will take a moment to enter into the live video page. Now P2P (LAN) mode is 
complete and you can view video locally, within 15 meters (49 feet) open range. Check the 
screenshot below to see an explanation of the live video page.
 

4.2. Remote View Setup (WAN Mode)

>> Before remote view setup, please make sure that the camera is successfully added to 
the APP in P2P (LAN) mode.

4.2.1. Launch the “

CloudRover4

” APP.

4.2.2. Click “

Configure the Cloud Companion

”. On the next page, select a desirable WIFI 

hotspot to enroll the camera in and then tap “

Next

”.

4.2.3. When the configuration is completed, the camera will say “

Configure Completed

”.


4.2.4. You will be prompted to the home page and the camera icon will be found orange. Click 
the camera icon and then input the default password “

admin

” to login the camera. The indicator 

light will remain solid green.
 

[Note]: 

1). When the configuration is complete, the camera’s WIFI signal named “CC-*****” will be gone on 

the WIFI settings page.

2). If the remote view setup failed and you need to reset the camera (See VI) and set up all over 

again.

V. Motion Detection & Continuous Video Recording

>> Before motion detection setup, please make sure that the camera is successfully added 
to the APP and it's online in the P2P (LAN) mode.

5.1. Launch the application and then login your camera.
5.2. Go to the live video page, then tap the gear icon and choose “

Motion Detection 

Recording

” on the next page. When motion is detected, the camera will record a video to the 

built-in 8GB internal memory automatically.
 

5.3. Go back to the settings page and then click “

PLAYBACK

”. On the next page, tap a video 

clip and then it will start recording. You can also download the video files and click           to check 
out the video clip.
 

5.4. For continuous video recording, go back to settings page and then choose “

Continuous 

Recording

” mode. The camera will start recording video continuously to the internal memory. 

You can follow 5.3. to check out the video clips.
 

VI. Resetting to Factory Default

If the camera fails to login or doesn’t work properly, a quick reset will restore it back to 
normal operation.

Operation:

 When the camera is powered on, use a pin or paper clip to press and hold the 

Reset Button (on the bottom of the camera) for 10 seconds until the camera says “

Waiting 

for configuration

”.

VII. Changing Password

>> Before changing password, please make sure that the camera is online in the application.

7.1. Launch the application and login the camera.
7.2. Go to the live video page, then click the gear icon. On the settings page, locate 

Change password

” section and then input a new password. Next time you login the 

camera, please enter the new password.
 

VIII. Charging

8.1. Slide the Power Switch to the OFF position and connect the camera to an outlet AC power 
supply through the DC5V power adapter and the charging base or using the DC5V power 
adapter directly.
8.2. It will take 4-5 hours to obtain a full charge. When the camera is fully charged, all 
Battery Life LEDs at the back of the camera will remain solid red.

Frequently Asked Questions

Q1: Why can’t I find the camera’s WIFI signal on my phone?

A1: There are 4 solutions to this problem:
1. The camera is running low on batteries and please recharge it before using.

2. Reset the camera (See VI) and wait for the WIFI signal SSID to show up.
3. Keep your phone or mobile device within the camera’s WIFI hotspot range, refreshing 
the WIFI signal page. It may take up to 2 minutes for the hotspot to become recognizable 
on your phone or mobile device's WIFI setting page.
4. Shut off your phone or mobile device’s WIFI function for a while, then turn it on to search 
again.

Q2: Why does the WAN mode setup fail?

A2: Please make sure your network is in a good condition. Plus, the WIFI network the 
camera is configured with can’t be the same with one you connect your phone to.

Q3: What can I do if I forget the password?

A3: Please reset the camera. (See VI)

Q4: Why live video screen shows up black and a searching circle spins in center but 
nothing ever displays?

A4: If your camera is connected to a slow WIFI network, wait 10-30 seconds for live video 
to re-appear.

Summary of Contents for WIFI33

Page 1: ...WIFI33 User Guide I Product Overview 1 Antenna 2 Electrode 3 Battery Life LEDs 4 Power Switch 5 Reset Button 6 Power Input 7 Indicator Light 8 Camera Lens 9 IR LEDs...

Page 2: ...ver4 application on your Android or IOS device 3 3 Slide the Power Switch to the ON position to turn on the camera The indicator light will keep flashing green IV Network Setup 4 1 P2P Connection Setu...

Page 3: ...put default password admin and tap Connect to connect to the camera 4 1 3 It will take a moment to enter into the live video page Now P2P LAN mode is complete and you can view video locally within 15...

Page 4: ...oud Companion On the next page select a desirable WIFI hotspot to enroll the camera in and then tap Next 4 2 3 When the configuration is completed the camera will say Configure Completed 4 2 4 You wil...

Page 5: ...ccessfully added to the APP and it s online in the P2P LAN mode 5 1 Launch the application and then login your camera 5 2 Go to the live video page then tap the gear icon and choose Motion Detection R...

Page 6: ...ou can follow 5 3 to check out the video clips VI Resetting to Factory Default If the camera fails to login or doesn t work properly a quick reset will restore it back to normal operation Operation Wh...

Page 7: ...Charging 8 1 Slide the Power Switch to the OFF position and connect the camera to an outlet AC power supply through the DC5V power adapter and the charging base or using the DC5V power adapter direct...

Page 8: ...WIFI function for a while then turn it on to search again Q2 Why does the WAN mode setup fail A2 Please make sure your network is in a good condition Plus the WIFI network the camera is configured wit...

Page 9: ...WIFI33 Benutzerhandbuch I Produkt bersicht 1 Antenne 2 Elektrode 3 Batterielebensdauer LEDs 4 Netzschalter 5 Reset Taste 6 Leistungsaufnahme 7 Kontrollleuchte 8 Kameraobjektiv 9 IR LEDs...

Page 10: ...f Ihrem Android oder IOS Ger t zu installieren 3 3 Schieben Sie den Netzschalter auf ON um die Kamera einzuschalten Die Kontrollleuchte blinkt gr n IV Netzwerkeinrichtung 4 1 P2P Verbindungsaufbau LAN...

Page 11: ...n und tippen Sie auf Verbinden um eine Verbindung zur Kamera herzustellen 4 1 3 Es wird einen Moment Zeit nehmen um in die Live Videoseite einzutreten Jetzt ist der P2P LAN Modus komplett und man kann...

Page 12: ...oud Companion W hlen Sie auf der n chsten Seite einen gew nschten WIFI Hotspot aus um die Kamera einzuschreiben und dann auf Weiter zu tippen 4 2 3 Wenn die Konfiguration abgeschlossen ist wird die Ka...

Page 13: ...nzugef gt wurde und im P2P LAN Modus online ist 5 1 Starten Sie die Anwendung und melden Sie sich dann Ihre Kamera an 5 2 Gehen Sie auf die Live Videoseite dann tippen Sie auf das Zahnrad Symbol und w...

Page 14: ...en 5 3 Um die Videoclips auszuprobieren VI R cksetzen auf Werkseinstellung Wenn sich die Kamera nicht anmeldet oder nicht ordnungsgem funktioniert wird ein schneller Reset wieder in den normalen Betri...

Page 15: ...Wenn Sie das n chste Mal die Kamera anmelden geben Sie bitte das neue Passwort ein VIII Aufladen 8 1 Schieben Sie den Netzschalter in die AUS Position und schlie en Sie die Kamera an eine Steckdose an...

Page 16: ...Ihres Telefons oder des Mobilger ts f r eine Weile aus und schalten Sie es dann wieder ein Q2 Warum funktioniert das WAN Modus Setup A2 Bitte stellen Sie sicher dass Ihr Netzwerk in einem guten Zusta...

Page 17: ...oi I Aper u du Produit 1 Antenne 2 Electrode 3 LED Indicateur de la Batterie 4 Interrupteur d Alimentation 5 Bouton de R initialisation 6 Entr e de Puissance 7 Voyant Lumineux 8 Lentille de Cam ra 9 V...

Page 18: ...ppareil Android ou IOS 3 3 Faites glisser l Interrupteur d Alimentation sur la position ON pour allumer l appareil photo Le voyant continuera clignoter en vert IV Configuration du R seau 4 1 Configura...

Page 19: ...admin et appuyez sur Connecter pour vous connecter la cam ra 4 1 3 Il faudra un moment pour entrer dans la page vid o en direct Maintenant le mode P2P LAN est termin et vous pouvez visualiser la vid...

Page 20: ...Cloud Companion Sur la page suivante s lectionnez un point d acc s Wi Fi souhaitable pour inscrire la cam ra puis appuyez sur Suivant 4 2 3 Lorsque la configuration est termin e la cam ra dira Config...

Page 21: ...APP et qu il est en ligne en mode P2P LAN 5 1 Lancez l application puis connectez vous votre appareil photo 5 2 Acc dez la page vid o en direct puis appuyez sur l ic ne de l engrenage et choisissez E...

Page 22: ...s vid o VI R initialisation en Usine par D faut Si l appareil photo ne parvient pas se connecter ou ne fonctionne pas correctement une r initialisation rapide le r tablira son fonctionnement normal Fo...

Page 23: ...s connectez la cam ra entrez le nouveau mot de passe VIII Charger 8 1 Faites glisser l Interrupteur d Alimentation sur la position OFF et connectez l appareil photo une alimentation secteur de sortie...

Page 24: ...4 teignez votre t l phone ou la fonction WIFI de votre appareil mobile pendant un certain temps puis allumez le pour effectuer une nouvelle recherche Q2 Pourquoi l installation du mode WAN choue t ell...

Page 25: ...I Panoramica del Prodotto 1 Antenna 2 Elettrodo 3 LED di vita della batteria 4 Interruttore di alimentazione 5 Pulsante di ripristino 6 Ingresso alimentazione 7 Indicatore luminoso 8 Obiettivo della...

Page 26: ...one CloudRover4 sul tuo dispositivo Android o IOS 3 3 Spostare l interruttore di alimentazione in posizione ON per accendere la fotocamera La spia di segnalazione continua a lampeggiare verde IV Confi...

Page 27: ...ord predefinita admin e toccare Connessione per connettersi alla fotocamera 4 1 3 Ci vorr un momento per entrare nella pagina video dal vivo Ora la modalit P2P LAN completa e possibile visualizzare vi...

Page 28: ...igura il Cloud Companion Nella pagina successiva selezionare un punto desiderato WIFI per accedere alla fotocamera e quindi toccare Avanti 4 2 3 Una volta completata la configurazione la fotocamera di...

Page 29: ...ta aggiunta correttamente all APP ed online in modalit P2P LAN 5 1 Avviare l applicazione e quindi accedere alla fotocamera 5 2 Vai alla pagina video dal vivo quindi tocca l icona a forma di ingranagg...

Page 30: ...5 3 Per controllare i video clip VI Ripristino predefinito di fabbrica Se la fotocamera non riesce a accedere o non funziona correttamente un reset rapido lo ripristiner al normale funzionamento Funzi...

Page 31: ...ostare l interruttore di alimentazione in posizione OFF e collegare la fotocamera ad un alimentazione di rete CA attraverso l adattatore di alimentazione DC5V e la base di ricarica o direttamente util...

Page 32: ...del telefono cellulare o del dispositivo mobile per un po quindi accenderlo per ricercare nuovamente Q2 Perch la configurazione del modo WAN non riuscita A2 Assicurati che la rete sia in buone condizi...

Page 33: ...l Usuario I Descripci n del Producto 1 Antena 2 Electrodo 3 LEDs de Autonom a de Bater a 4 Interruptor de Encendido 5 Bot n de Reseteo 6 Entrada de Alimentaci n 7 Indicadora Luminosa 8 Lente de la C m...

Page 34: ...ci n CloudRover4 en su dispositivo Android o IOS 3 3 Deslice el interruptor de encendido a la posici n ON para encender la c mara La luz indicadora parpadear en verde IV Configuraci n de la red 4 1 Co...

Page 35: ...rminada admin y pulse Conectar para conectarse a la c mara 4 1 3 Tardar un momento en entrar en la p gina de video en vivo Ahora el modo P2P LAN est completo y se puede ver el video localmente dentro...

Page 36: ...nto de la nube En la p gina siguiente seleccione un hotspot WIFI deseable para inscribir la c mara y luego pulse Siguiente 4 2 3 Cuando finalice la configuraci n la c mara indicar Configurar completad...

Page 37: ...tamente a la APP y est en l nea en el modo P2P LAN 5 1 Inicie la aplicaci n y a continuaci n inicie sesi n en su c mara 5 2 Vaya a la p gina de v deo en directo luego toque el cono de rueda dentada y...

Page 38: ...lips VI Restablecimiento a los valores predeterminados de f brica Si la c mara no inicia sesi n o no funciona correctamente un restablecimiento r pido volver a su funcionamiento normal Funcionamiento...

Page 39: ...n en la c mara ingrese la nueva contrase a VIII Cargando 8 1 Deslice el interruptor de encendido a la posici n OFF y conecte la c mara a una toma de corriente alterna a trav s del adaptador de corrien...

Page 40: ...funci n WIFI del tel fono o del dispositivo m vil durante un tiempo y luego enci ndala para buscar de nuevo P2 Por qu falla la configuraci n del modo WAN R2 Aseg rese de que su red est en buenas condi...

Page 41: ...WIFI33 I 1 2 3 LED 4 5 6 7 8 9 LED...

Page 42: ...II 1 WIFI 1 DC5V 1 III 3 1 WIFI 3 2 QR Android IOS CloudRover4 3 3 ON IV 4 1 P2P LAN 4 1 1 WIFI WLAN WIFI CC WIFI WIFI...

Page 43: ...4 1 2 UID admin Connect 4 1 3 P2P LAN 15 49...

Page 44: ...4 2 WAN P2P LAN APP 4 2 1 CloudRover4 APP 4 2 2 WIFI 4 2 3 Con gure Completed 4 2 4 admin...

Page 45: ...1 CC WIFI WIFI 2 VI V APP P2P LAN 5 1 5 2 8GB 5 3...

Page 46: ...5 4 5 3 VI 10...

Page 47: ...VII 7 1 7 2 VIII 8 1 OFF DC5V AC DC5V 8 2 4 5 LED Q1 WIFI A1 4 1 2 VI WIFI SSID...

Page 48: ...3 WIFI WIFI WIFI 2 4 WIFI Q2 WAN A2 WIFI WIFI Q3 A3 VI Q4 A4 WIFI 10 30...

Reviews: