background image

10

 · English

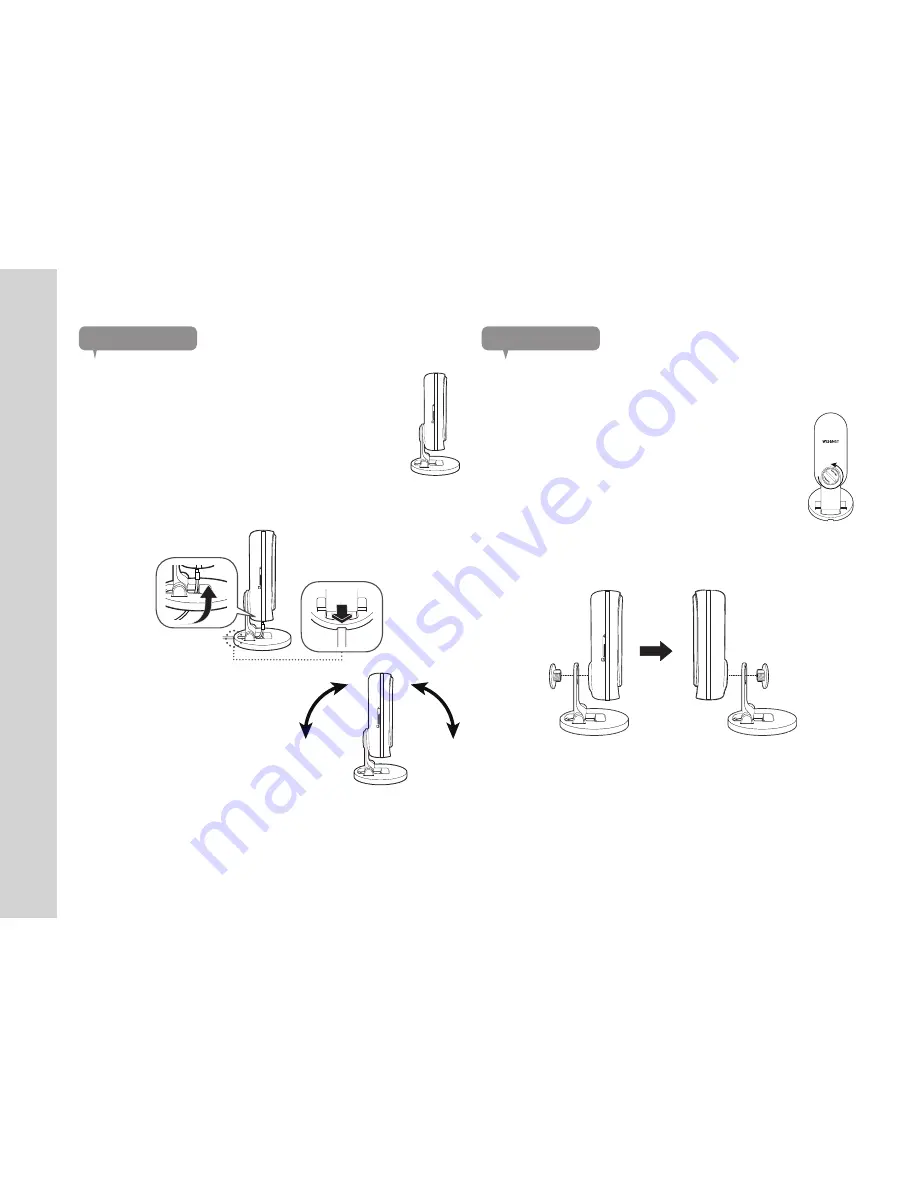
wall installation

Change direction of bracket 

1. 

Turn the bracket knob on the back of the camera 

counterclockwise (left) to loosen and separate the bracket.

2. 

Turn the camera backward as shown in the picture, then insert the bracket 

knob and turn it clockwise (right) to tighten it to the mount. 

on flat surface

1. 

Place the camera stand on a flat horizontal surface.

2. 

Insert the cable into the bracket as shown in the figure to connect the 

camera, then adjust the cable to pass through the cable opening.

3. 

Adjust the camera angle as desired.

SNH-P6415BN

R

ESET

R

ESET

R

ESET

R

ESET

R

ESET

SNH-P6415BN

Summary of Contents for SNH-P6416BN

Page 1: ...SNH P6415BN SNH P6416BN WISENET SMARTCAM User Manual ...

Page 2: ...n Any changes or modifications not expressly approved by the party responsible for compliance could void the user s authority to operate this equipment This transmitter must not be co located or operating in conjunction with any other antenna or transmitter Industry Canada Statement This device complies with RSS 247 of the Industry Canada Rules Operation is subject to the following two conditions ...

Page 3: ...h as heater radiator cooking devices ex electric stove or oven and other warming devices ex audio amplifier TV etc Make sure to keep ventilated while using the product Avoid pillar or furniture that may block ventilation when installing the product Make sure to use the power adaptor provided If used with unidentified adaptor it may damage the product The power adaptor must be used with regular hou...

Page 4: ...tents Getting Started Features 5 What s Included 6 Part Names and Functions 7 Installation Network Connection Installation 9 Network Connection and Settings 14 Appendix Specifications 15 Troubleshooting 18 ...

Page 5: ...d sound are detected your smartphone will generate real time alarms Cloud Storage Anytime anywhere you can enjoy the video and images stored in the cloud storage Saving in SD card When an event occurs the user can save the video in their SD card Two way Audio With the built in speaker and microphone you can make Two way communications Face recognition You can set the person who wants to receive th...

Page 6: ... Check for components when opening the product package Camera Quick Start Guide Option by region Warranty Card GPL Lisence Power Adapter and Cable Security Screws Plastic Anchors n n Adapter may vary based on region or country ...

Page 7: ...NH P6415BN Luminance Sensor Detects light levels where the camera is placed Night vision mode changes according to detection result Microphone LED Status Indicator Speaker Generates audio output from your smart phone Bracket Knob Connect the camera and bracket ...

Page 8: ... product settings to the factory default The system restarts if you press the button for 10 seconds using a pointed object such as a needle J J If you press too strongly the button can break Micro SD Card In Out Power Input It connects with a power adapter ...

Page 9: ...a place where there are a lot of obstacles 5 Do not install the product in places where there are or may be chemicals or traces of oil Cooking oils like soybean oil can cause damage or deformation of the product so please do not install the product near the kitchen or the kitchen counter This may cause damage to the product 6 Please be careful not to get chemical substances on the surface of the p...

Page 10: ...wn in the picture then insert the bracket knob and turn it clockwise right to tighten it to the mount on flat surface 1 Place the camera stand on a flat horizontal surface 2 Insert the cable into the bracket as shown in the figure to connect the camera then adjust the cable to pass through the cable opening 3 Adjust the camera angle as desired SNH P6415BN RESET RESET RESET RESET RESET SNH P6415BN ...

Page 11: ...t mark the wall to which you want to attach the bracket as shown in the figure 5 On the mark drill a hole to a depth of about 3cm in the wall using a drill bit and drill with a 5mm diameter for concrete Remove any debris remaining in the hole after drilling J J Use caution when drilling to avoid injury 6 Insert an anchor in each of the 2 holes for the screws then hit the back of the anchor with a ...

Page 12: ...is turned on the LED blinks red J J Be sure to use the power cable included in the box The camera may not operate normally when using normal cable web Install With the Wisenet SmartCam app users can monitor the SmartCam from a mobile device 1 Go to Google Play App Store and search for Wisenet SmartCam 2 Download the application and install it on your mobile device 3 Run the downloaded application ...

Page 13: ...be within 5 ft 1 5 m LED status LED indicator shows operational status with colors Refer to table below for detailed meaning of the LED indicator Color Status Red Booting up Red Blinking Booting completed Enabling BLE direct Blue Blinking Searching for available Wi Fi network Blue Connected to Wi Fi network Green Connected to Server Setup Completed Purple Download firmware Purple Blinking Updating...

Page 14: ...ts may be lost depending on the network traffic load According to the network policy of the Internet service provider UDP blocking video reception may be limited to 7 minutes In addition to the above situations you may encounter a network delay or interruption due to the network conditions Network Connection and Settings Connection using the BLE function 1 Connect the power adapter to the product ...

Page 15: ...evice 1 2 9 CMOS Min Illumination B W 0 Lux with IR Lens Angular Field of View H V D H 112 V 62 D 130 Lens Distortion Correction Support Camera Level Operational IR LED 850nm Viewable Length 10m Time display Off On Day Night True D N Wide Dynamic Range HDR Digital Noise Reduction Support 2D 3D Noise Filter Specifications Specifications ...

Page 16: ...20 640x360 Max Framerate 1920x1080 30fps Audio Compression Format G 711 u law Audio Communication 2 way Audio with Echo Cancellation Streaming Method Unicast Max User Access 5 users at Unicast Mode Recording Micro SD Cloud Optional Web App viewer Web viewer not supported Supported OS iOS Android Item Description Environmental Operating Temperature Humidity 0 C 40 C 32 F 104 F Less than 90 RH Stora...

Page 17: ...17 03 Appendix Product Appearance unit mm inch ...

Page 18: ...tered again and try to register the product again If this fails to resolve the problem factory reset the product and repeat the procedure from the beginning To factory reset the product press and hold the RESET button on the product for 5 seconds The product will be restarted when the product is factory reset The video from the camera is temporarily lost The video from the camera can be delayed ac...

Page 19: ...e sustainable reuse of material resources Household users should contact either the retailer where they purchased this product or their local government office for details of where and how they can take these items for environmentally safe recycling Business users should contact their supplier and check the terms and conditions of the purchase contract This product and its electronic accessories s...

Page 20: ...47 8753 Fax 82 31 8018 3740 www wisenetlife com Hanwha Techwin America 500 Frank W Burr Blvd Suite 43 Teaneck NJ 07666 Tel 1 877 349 3149 www wisenetlife com Hanwha Techwin Europe Heriot House Heriot Road Chertsey Surrey KT16 9DT United Kingdom Tel 1 00800 801 08022 Tel 2 31 77 326 1580 www wisenetlife com ...

Page 21: ...may cause harmful interference to radio communications However there is no guarantee that interference will not occur in a particular installation If this equipment does cause harmful interference to radio or television reception which can be determined by turning the equipment off and on the user is encouraged to correct the interference by one of the following measures Reorient or relocate the r...

Page 22: ...nly This device meets all other requirements specified in Part 15E Section 15 407 of the FCC Rules Industry Canada Statement This device complies with RSS 247 of the Industry Canada Rules Operation is subject to the following two conditions 1 This device may not cause harmful interference and 2 this device must accept any interference received including interference that may cause undesired operat...

Page 23: ...us les utilisateurs devraient aussi être avisés que les utilisateurs de radars de haute puissance sont désignés utilisateurs principaux c à d qu ils ont la priorité pour les bandes 5 250 5 350 MHz et 5 650 5 850 MHz et que ces radars pourraient causer du brouillage et ou des dommages aux dispositifs LAN EL Industry Canada Radiation Exposure Statement This equipment complies with IC radiation expos...

Reviews: