background image

English _

29


FLUSH MOUNT DOME CAMERA

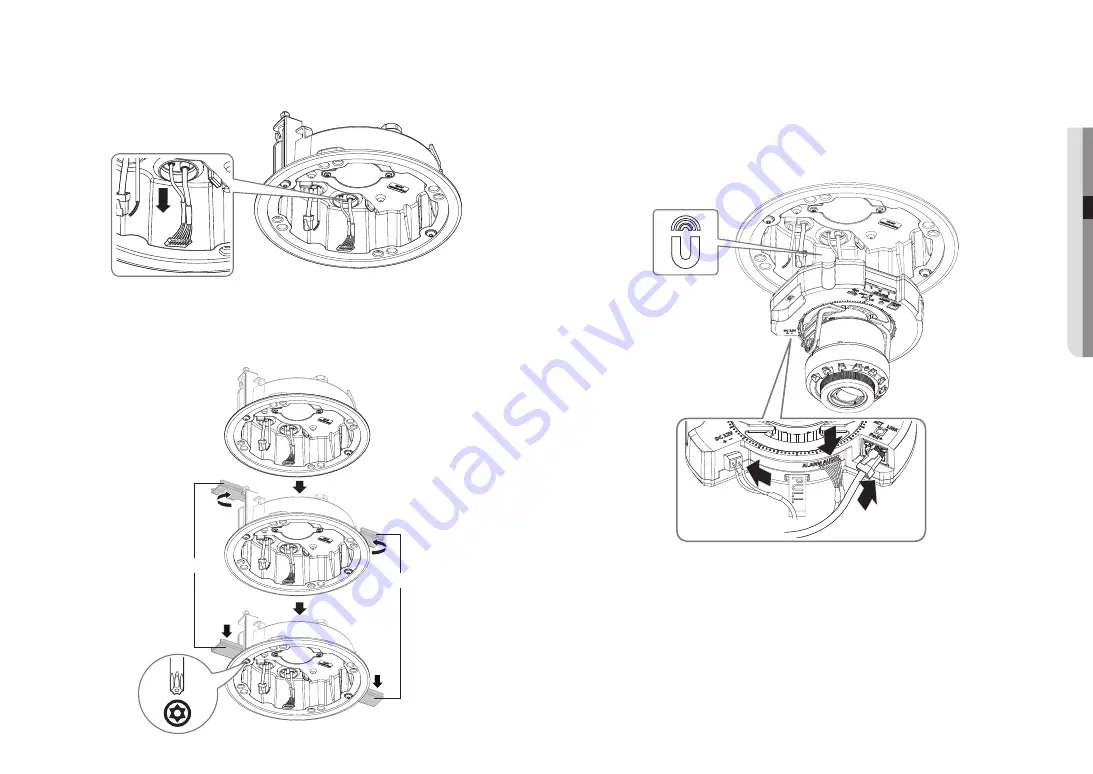
Installing the camera module

1. 

Connect the network/power/audio/alarm cables to the camera module terminal.

2. 

Attach the camera module to the case.


J


`

A magnet is embedded at the bottom of the module


`

Take caution not to allow any foreign objects between the attaching surfaces.

3. 

Adjust the lens to the desired direction with reference to “

Adjusting the monitoring direction for the 

camera

” section. (page 41)

[Installing audio/alarm cables]
3-1. 

Mount the cable bushing of the provided audio/alarm cables to the camera case.

4. 

Turn the screws on the housing to fix the housing to the ceiling.


J


`

The bracket will fix the housing to the ceiling.


`

Ensure that the housing is firmly fixed to the ceiling.

Bracket

Bracket

x4

2x

TR20

Summary of Contents for PNB-A6001

Page 1: ...NETWORK CAMERA User Manual PNV A6081R PND A6081RV PND A6081RF PNO A6081R PNB A6001 ...

Page 2: ... correctness of the contents in this document but no formal guarantee shall be provided Use of this document and the subsequent results shall be entirely on the user s own responsibility Hanwha Techwin reserves the right to change the contents of this document without prior notice Designandspecificationsaresubjecttochangewithoutpriornotice TheinitialadministratorIDis admin andthepasswordshouldbese...

Page 3: ... Class 2 or LPS and rated from 12 Vdc 1 17 A or PoE 0 33 A PNB A6001 19 This product is intended to be supplied by isolation power 20 If you use excessive force when installing the product the camera may be damaged and malfunction If you forcibly install the product using non compliant tools the product may be damaged 21 Do not install the product in a place where chemical substances or oil mist e...

Page 4: ... 1 or PS2 as defined in UL62368 1 Unit is intended for installation in a Network Environment 0 as defined in IEC TR 62102 As such associated Ethernet wiring shall be limited to inside the building Please read the following recommended safety precautions carefully y Do not place this apparatus on an uneven surface y Do not install on a surface where it is exposed to direct sunlight near heating equ...

Page 5: ...ATION CONNECTION 41 41 Adjusting the monitoring direction for the camera 42 Connecting with other Device FLUSH MOUNT DOME CAMERA 24 24 What s Included 24 At a Glance 25 Installation NETWORK CONNECTION AND SETUP 47 47 Connecting the Camera Directly to Local Area Networking 47 Connecting the Camera Directly to a DHCP Based DSL Cable Modem 48 Using Device Manager 48 Automatically searching camera 48 ...

Page 6: ... Safari version 11 0 1 or later The video play performance of the web viewer depends on the performance of the user s CPU and GPU RECOMMENDED MICRO SD SDHC SDXC MEMORY CARD SPECIFICATIONS Recommended capacity 16GB to 256GB MLC type required Recommended Manufacturers SanDisk Transcend Product Type High endurance The compatibility varies depending on the card manufacturers and types NAS RECOMMENDED ...

Page 7: ...English _7 OVERVIEW Outdoor Vandal Dome Camera PNV A6081R Indoor Dome Camera PND A6081RV Flush Mount Dome Camera PND A6081RF 9 17 24 Outdoor Bullet Camera PNO A6081R Box Camera PNB A6001 31 38 ...

Page 8: ...CMW Ceiling Mount SBP 300WMW Wall Mount SBP 300WMW1 Wall Mount SBP 300NBW Installation Box SBP 300NBW Wall Mount Base SBP 300PMW Pole Mount SBP 300PMW1 Pole Mount SBP 300KMW Corner Mount SBP 300KMW1 Corner Mount PND A6081RV SBP 167HMW PNO A6081R SBP 302PM PNB A6001 SHB 4300HP OPTIONAL ACCESSORIES FOR INSTALLATION You can purchase appropriate optional accessories available ...

Page 9: ...y of the power connection CAUTION Be ware of the Rated Voltage and Polarity of the power connection CAUTION Be ware of the Rated Voltage and Polarity of the power connection CAUTION Be ware of the Rated Voltage and Polarity of the power connection AT A GLANCE Pipe cover e Dome cover d Camera module c Camera case b Mount plate a i Reset button j Zoom Focus Control Button p Micro USB port o Micro SD...

Page 10: ...e If the product is installed with excessive force it may cause damage to the camera due to malfunction Forcing assembly using non compliant tools may damage the product Removal 1 Peel off the tape fixing the camera case 2 Take off the lens cover protecting the camera lens Inserting a Micro SD card Slide the Micro SD card into the Micro SD card slot on the camera module in the direction of the arr...

Page 11: ...Apply button and turn the camera off If you turn off the camera or remove the Micro SD card that contains data from the product the data may be lost or damaged Installation mount plate Directly installing on wall ceiling 1 1 Attach the installation template on the desired surface and drill holes for screws and cables 1 2 Fix the mount plate using appropriate screws 1 3 Pull out necessary cables am...

Page 12: ...cables through the pipe Installation camera case J Use a cable bushing compliant with the network cable to be connected Camera main use a cable with the diameter of Ø5 to 6 5 Components use a cable with the diameter of Ø5 to 8 5 Installing network power cables 1 1 Pull off the extruded parts of the cable bushing to be used 1 2 Route the network cable through the big hole of the cable bushing and c...

Page 13: ... cables 3 1 Mount the cable bushing of the provided audio alarm cables to the camera case 1 4 Mount the cable bushing to the camera case Installing the network cable IP66 2 1 Pull off the extruded part of the 1 hole cable bushing provided 2 2 Use the cap installer to pass through the RJ45 cable Cap Installer ...

Page 14: ... network power audio alarm cables to the camera module terminal 2 Attach the camera module to the case J A magnet is embedded at the bottom of the module Take caution not to allow any foreign objects between the attaching surfaces 3 Adjust the lens to the desired direction with reference to Adjusting the monitoring direction for the camera section page 41 ...

Page 15: ...and fasten the screws J Make sure to firmly tighten the fastening screws so that there is no water damage issue 2x TR20 Assembling the dome cover Directly installing on wall ceiling 1 Assemble the dome cover J Make sure to firmly tighten the fastening screws so that there is no water damage issue x4 4x TR20 J Be careful not to alter the monitoring direction of your camera ...

Page 16: ...onnect the power I O and network cables 2 Wrap the black cable jacket Area A and the cable connection area with waterproof butyl rubber tape so that more than half of the butyl rubber tape is overlapped Camera Camera Camera System System System A A J If the cable jacket is not waterproofed properly then it can directly cause leakage Make sure to protect the cable with a dense layer of taping Water...

Page 17: ... of the power connection CAUTION Be ware of the Rated Voltage and Polarity of the power connection CAUTION Be ware of the Rated Voltage and Polarity of the power connection AT A GLANCE Mount plate b Pipe cover a Camera case c Camera module d Dome cover e i Reset button j Zoom Focus Control Button p Micro USB port q Microphone cable port o Micro SD card slot n Test monitor out port f IR LED g Illum...

Page 18: ...oduct is installed with excessive force it may cause damage to the camera due to malfunction Forcing assembly using non compliant tools may damage the product Removal 1 Peel off the tape fixing the camera case 2 Take off the lens cover protecting the camera lens Inserting a Micro SD card Slide the Micro SD card into the Micro SD card slot on the camera module in the direction of the arrow J Before...

Page 19: ...y button and turn the camera off If you turn off the camera or remove the Micro SD card that contains data from the product the data may be lost or damaged Installation mount plate Directly installing on wall ceiling 1 1 Attach the installation template on the desired surface and drill holes for screws and cables 1 2 Fix the mount plate using appropriate screws 1 3 Pull out necessary cables among ...

Page 20: ... Components use a cable with the diameter of Ø5 to 8 5 Installing network power cables 1 1 Pull off the extruded parts of the cable bushing to be used 1 2 Route the network cable through the big hole of the cable bushing and connect to the network cable connector 1 3 When using the power Route the power cable through the small hole of the cable bushing and connect it to the provided terminal block...

Page 21: ...cable bushing to the camera case Installing the network cable 2 1 Pull off the extruded part of the 1 hole cable bushing provided 2 2 Use the cap installer to pass through the RJ45 cable Cap Installer 2 3 Mount the cable bushing to the camera case ...

Page 22: ...e module Take caution not to allow any foreign objects between the attaching surfaces 3 Connect the microphone cable to the camera module 4 Adjust the lens to the desired direction with reference to Adjusting the monitoring direction for the camera section page 41 Installing audio alarm cables 3 1 Mount the cable bushing of the provided audio alarm cables to the camera case 4 Join the mount plate ...

Page 23: ...the dome cover Directly installing on wall ceiling 1 Assemble the dome cover J Make sure to firmly tighten the fastening screws so that there is no water damage issue x4 4x TR20 J Be careful not to alter the monitoring direction of your camera ...

Page 24: ... the Rated Voltage and Polarity of the power connection CAUTION Be ware of the Rated Voltage and Polarity of the power connection CAUTION Be ware of the Rated Voltage and Polarity of the power connection AT A GLANCE Bracket a Housing b Camera module c Dome cover d i Reset button j Zoom Focus Control Button p Micro USB port o Micro SD card slot n Test monitor out port f IR LED g Illumination Sensor...

Page 25: ...ct is installed with excessive force it may cause damage to the camera due to malfunction Forcing assembly using non compliant tools may damage the product Removal 1 Peel off the tape fixing the camera case 2 Take off the lens cover protecting the camera lens Inserting a Micro SD card Slide the Micro SD card into the Micro SD card slot on the camera module in the direction of the arrow J Before in...

Page 26: ... card in Storage set the device to Off and press the Apply button and turn the camera off If you turn off the camera or remove the Micro SD card that contains data from the product the data may be lost or damaged Installation housing 1 Attach the installation template to the ceiling and mark its location with a pencil Maximum 6 5 kg 14 Ib KG More than 5 mm less than 70 mm 95 mm 2 Attach the instal...

Page 27: ...NT DOME CAMERA 4 2 Pull out necessary cables among network power audio alarm cables through the pipe 3 Connect the safety cable J A safety cable is not provided e g Using pipe 4 1 Install the pipe in a fitting hole NUT NUT ...

Page 28: ...ed 1 2 Route the network cable through the big hole of the cable bushing and connect to the network cable connector 1 3 When using the power Route the power cable through the small hole of the cable bushing and connect it to the provided terminal block 1 4 Mount the bush to the housing Installing the network cable 2 1 Pull off the extruded part of the 1 hole cable bushing provided 2 2 Use the cap ...

Page 29: ...jects between the attaching surfaces 3 Adjust the lens to the desired direction with reference to Adjusting the monitoring direction for the camera section page 41 Installing audio alarm cables 3 1 Mount the cable bushing of the provided audio alarm cables to the camera case 4 Turn the screws on the housing to fix the housing to the ceiling J The bracket will fix the housing to the ceiling Ensure ...

Page 30: ...roof the concerned area with waterproof butyl rubber tape can be purchased in stores as below 1 Connect the power I O and network cables 2 Wrap the black cable jacket Area A and the cable connection area with waterproof butyl rubber tape so that more than half of the butyl rubber tape is overlapped Camera Camera Camera System System System A A J If the cable jacket is not waterproofed properly the...

Page 31: ...e power connection CAUTION Be ware of the Rated Voltage and Polarity of the power connection AT A GLANCE Mount plate b Pipe cover a Bottom cover c Camera body f Sunshield e Sunshield fixing screw d k Zoom Focus Control Button m Micro SD card slot l Micro USB port j Test monitor out port i Reset button h Power Port DC12V g Audio Alarm cable port f Network port J Wipe out a dirty surface of the lens...

Page 32: ...hole for any purpose other than for connecting the sunshield Inserting a Micro SD card Slide the Micro SD card into the Micro SD card slot on the camera module in the direction of the arrow J Before installing the camera the Micro SD card should be inserted while the power source and the body are separated Do not forcefully insert it in the reverse direction It might damage your Micro SD card and ...

Page 33: ...and drill holes for screws and cables 1 2 Fix the Mount plate using appropriate screws 1 3 Pull out necessary cables among network power audio alarm cables through the hole in the Mount plate Installing using pipe 2 1 Attach the installation template and drill holes for screws and cables 2 2 Separate the pipe cover of the Mount plate by pressing its sides ...

Page 34: ...le with the diameter of Ø5 to 8 5 Installing network power cables 1 1 Pull off the extruded parts of the cable bushing to be used 1 2 Route the network cable through the big hole of the cable bushing and connect to the network cable connector 1 3 When using the power Route the power cable through the small hole of the cable bushing and connect it to the provided terminal block 1 4 Mount the cable ...

Page 35: ...T CAMERA 2 3 Mount the cable bushing to the Bottom cover Installing audio alarm cables 3 1 Mount the cable bushing of the provided audio alarm cables to the Bottom cover 4 Join the Mount plate with the Bottom cover x4 3x HEX S3 ...

Page 36: ...al 3 Attach the camera body to the Bottom cover J Make sure to firmly tighten the fastening screws so that there is no water damage issue x4 3x HEX S3 4 Adjust the camera direction using the Hex L wrench provided J When you adjust the camera position using a bracket please loosen the bracket screw adjust the camera and tighten it If you attempt to adjust it forcibly while the screw is tight it may...

Page 37: ...ected to the outside 1 Connect the power I O and network cables 2 Wrap the black cable jacket Area A and the cable connection area with waterproof butyl rubber tape so that more than half of the butyl rubber tape is overlapped Camera Camera Camera System System System A A J If the cable jacket is not waterproofed properly then it can directly cause leakage Make sure to protect the cable with a den...

Page 38: ...tage and Polarity of the power connection Option not included CS mount Lens box camera AT A GLANCE Mounting Bracket Screw Hole b CS mount Lens not included a Auto Iris Lens port c Test monitor out port l Audio cable port k Micro SD card Compartment d GND e Alarm I O Port f Network Port g Power port DC 12 V h Focus button i Micro USB port j ...

Page 39: ...s Connecting the Auto Iris Lens connector Plug the iris connector of the lens in the camera connecting groove Focusing Select a target to film turn the zoom lever of the lens to adjust the magnification and then focus the lens so that target is clearly displayed M After focusing with the zoom lever of the lens press the FOCUS button on the rear of the camera to adjust the lens even more clearly Th...

Page 40: ...on or ejection of a Micro SD card is not recommended When installing removing the Micro SD card make sure you put the product body on a flat ground before working on it in order to prevent accidents due to loss or drop of any parts Removing a Micro SD card Gently press down on the exposed end of the Micro SD card as shown in the diagram to eject the Micro SD card from the slot J Before removing th...

Page 41: ...tation angle is 0 355 J In 75 or more tilt angle a blockage of view or burred image may occur in some part of the screen depending on the zoom magnification Do not forcefully rotate or press the focus zoom lens Otherwise the focus might not work properly due to motor failure Methods of adjustment 1 Adjust the pan angle taking account of the direction to monitor 2 Adjust the horizontal angle so tha...

Page 42: ...M 1 2 ALARM 2 3 GND 4 ALARM OUT 12V 50mA 5 GND 6 RS 485 7 RS 485 2 1 3 4 5 6 7 RESET VIDEO USB AUDIO OUT AUDIO IN FOCUS NETWORK PoE DC 12V SOFTAP Monitor for installation Ethernet Grounding cable Power WiFi dongle J The Test Monitor Out port of the product is provided for easier installation and is not recommended for monitoring purposes The Micro USB port of the product is provided for easier ins...

Page 43: ...r to connect each line of the power cable to the corresponding power port of the camera J If the power sources for PoE and DC 12 V are simultaneously turned on the device power will be supplied by both of PoE and DC 12 V You can also use a router featuring PoE to supply power to the camera Use PoE that is compliant with the IEEE 802 3at protocols Be careful not to reverse the polarity when you con...

Page 44: ...e in Built in microphone Supported voltage 2 5VDC 4mA Input impedance 2K Ohm Audio in PNV A6081R PND A6081RF PNO A6081R Selectable microphone Line in Supported voltage 2 5VDC 4mA Input impedance 2K Ohm Audio out Line out 3 5mm mono jack Maximum output 1Vms Line out impedance 600Ω J In the case you access the web viewer and select an external microphone as the audio input sources in Video Audio Aud...

Page 45: ...urrent specifications page 46 To connect the external sensor Connect one strand of each signal line 2 strand of the sensors to the ALARM 1 port and connect the other strand to the GND port Connecting to the I O port box PNB A9001 Connect the Alarm I O cable to the corresponding port of the port box RESET AUDIO OUT AUDIO IN USB VIDEO LINK FOCUS NETWORK PoE DC 12V 1 ALARM 1 2 ALARM 2 3 GND 4 ALARM O...

Page 46: ...Out Wiring Diagram When the warning light siren exceeds DC12V 50mA Warning lamp Siren power Warning lamp Siren ALARM 2 RESISTOR 10K ohm DIODE RELAY DC 5V or 3 3V TRANSISTOR GND GND TRANSISTOR External connection Inside of the camera GND RESISTOR When the warning light siren does not exceed DC12V 50mA Warning lamp Siren power ALARM 2 DC 12 V 50 mA MAX ALARM Out DC 12 V 50 mA MAX TRANSISTOR External...

Page 47: ...ver automatically If there is no DHCP server available the IP address will be set to 192 168 1 100 To change the IP address use the Device Manager For further details on Device Manager use refer to Using Device Manager Page 48 CONNECTING THE CAMERA DIRECTLY TO A DHCP BASED DSL CABLE MODEM 1 Connect the user PC directly with the network camera 2 Run the Device Manager and change the IP address of t...

Page 48: ...administrator HTTP Port Used to access the camera using the Internet browser defaulted to 80 RTSP Port A port that controls real time streaming The initial value is 554 If using a Broadband Router IP Address Enter an address falling in the IP range provided by the Broadband Router ex 192 168 1 2 254 192 168 0 2 254 192 168 XXX 2 254 Subnet Mask The Subnet Mask of the Broadband Router will be the S...

Page 49: ... OK MANUALLY REGISTERING CAMERA If the camera cannot be found using search function the camera can be registered remotely by manually inserting IP information if the camera is connected to external network 1 Click Add Devices Manually Add Device at the main page of device manager 2 Insert the range of IP address that you search 3 Select the Model Name of the camera that you register and insert HTT...

Page 50: ...orwarding setting is an example of setting CISCO IP router The settings may differ depending on the connected Broadband Router model For more information refer to the user manual of the applicable router Setting up Port Range Forward for several network cameras You can set a rule of Port Forwarding on the Broadband Router device through its configuration web page A user can change each port using ...

Page 51: ...a remote computer that is not in the Broadband Router s network cluster is not allowed users can access cameras within a Broadband Router s network by using the camera s DDNS URL 1 Before you can access a camera in the Broadband Router network you should have set the port range forward for the Broadband Router 2 From the remote PC launch the Internet browser and type the DDNS URL address of the ca...

Page 52: ...rating system in support of the UPnP protocol 2 Click the camera name for search In the Windows operating system click the camera name searched from the network menu The login window is displayed Connecting via Bonjour 1 Run the client or operating system in support of the Bonjour protocol 2 Click the camera name for search In the Mac operating system click the camera name searched from the Bonjou...

Page 53: ... LOGIN Whenever you access the camera the login window appears Enter the User ID and password to access the camera 1 Enter admin in the User name input box The administrator ID admin is fixed and can not be changed 2 Enter the password in the Password input field 3 Click Sign in If you have logged in successfully you will the Live Viewer screen J When you access the camera web viewer pay special a...

Page 54: ... cameras are set to a single multicast address instead of different addresses If a single address is used for multiple cameras the images may overlap No image appears y If the transmission method is set to multicast check whether there is a router that supports multicast in the LAN the camera is connected to PROBLEM SOLUTION Voice is not recorded even though audio input settings are configured y Y...

Page 55: ...ury cadmium or lead above the reference levels in EC Directive 2006 66 If batteries are not properly disposed of these substances can cause harm to human health or the environment To protect natural resources and to promote material reuse please separate batteries from other types of waste and recycle them through your local free battery return system Correct Disposal of This Product Waste Electri...

Page 56: ......

Reviews: