background image

36

WPS-100-DVR-4CH Installation and Users Manual
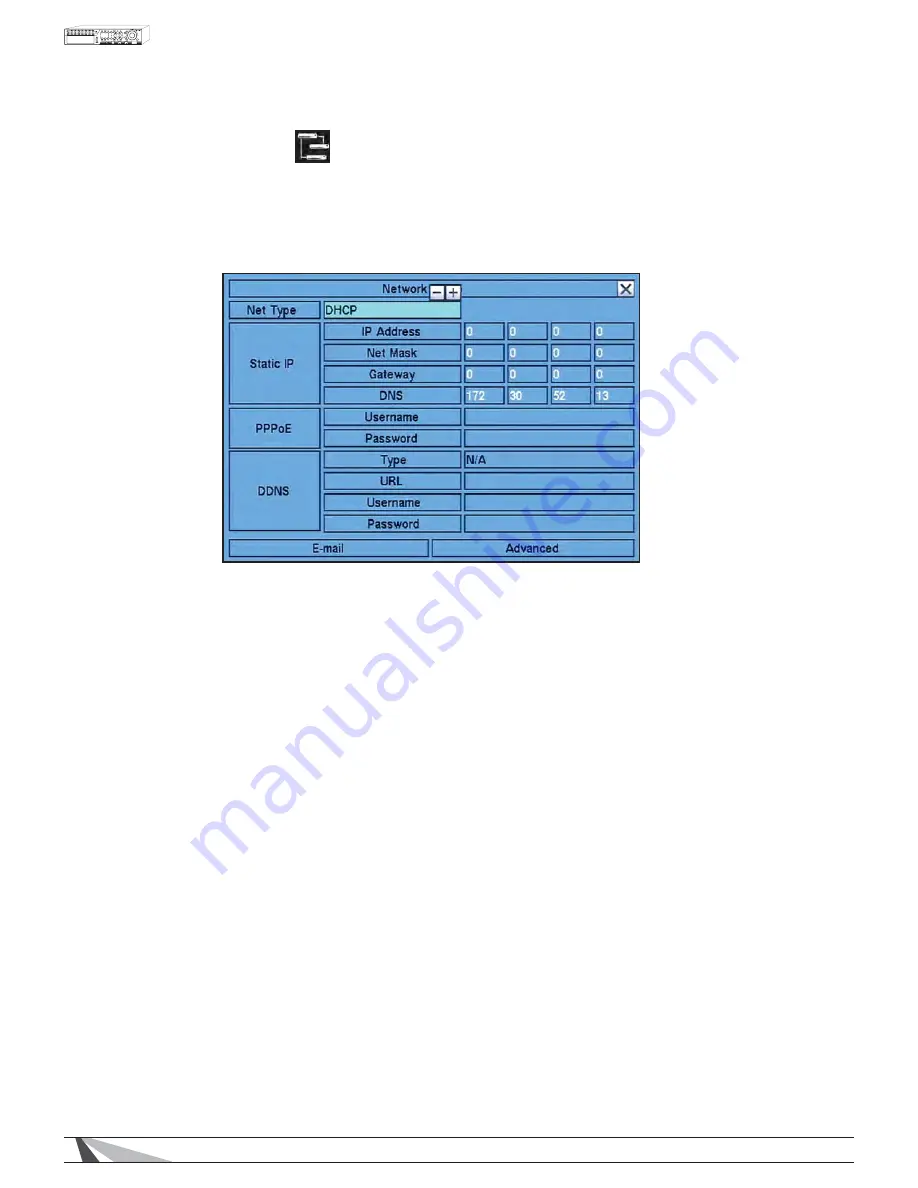
6.4 NETWORK SETUP 

The Network Setup allows the administrator to setup all Ethernet network related parameters.  Consultation  

with the network administrator may be required to set these parameters correctly.

In the Setup Menu 

GLVSOD\SUHVVʆʈʉʇRQWKHUHPRWHWRFKDQJHWKH


highlighted option to Network

DQGWKHQSUHVV

ENTER to display Network Setup as shown.

To navigate and operate this menu:

 ‡ʆʈʉʇ

      Press these buttons on the remote control to select an item.   

  $OWHUQDWLYHO\XVHWKHPRXVHWRVHOHFWDQLWHP

 ‡(6&


 Press 

the 

ESC button on the remote control to escape from this menu and return to the main menu.  Alter 

  QDWLYHO\XVHWKHPRXVHWRH[LWWKHVXEPHQXE\FOLFNLQJRQWKH´;µ,IWKHFRQWHQWVLQWKLVPHQXKDYHEHHQ

  PRGLÀHGD

Save dialog box will be displayed requesting the user to save the changes.  Press ENTER on the  

  UHPRWHFRQWUROWRH[LWDQGVDYH

ESC to exit without saving.  Another method to escape is to use the mouse  

  WR´ULJKWFOLFNµDQGH[LWWKHVXEPHQX

7KHIROORZLQJLVDEULHIGHVFULSWLRQIRUHDFKLWHPLQWKHVXEPHQXDQGLWVVSHFLÀFRSHUDWLRQV

Follow the Text Input method described in Section 4.1 

WRPRGLI\WKHVHLWHPV$OWHUQDWLYHO\XVHWKHPRXVHDQG

the pop-up keyboard to enter these settings.  Consultation with the network administrator may be required for 

these settings.  

 ‡1(77<3(


 Press 

+/- buttons on the remote control to change the Net Type.   

  $OWHUQDWLYHO\XVHWKHPRXVHWRFKDQJHWKLVVHWWLQJ2SWLRQVLQFOXGH

Static IP, PPPoE

RU

DHCP.  DHCP  

  FDQRQO\EHXVHGIRULQWUDQHW/$1DFFHVVZKLOH

Static IP and PPPoE can be used for both internet  

   LQWUDQHWDFFHVV7KHGHIDXOWVHWWLQJLV

DHCP.  

 ‡,3$''5(66


 Enter 

an 

Ethernet IP Address

IRUWKH'957KLVDGGUHVVVKRXOGQRWFRQÁLFWZLWKDQ\RWKHU,3DGGUHVV


      on the LAN.  

 ‡1(70$6.


 Enter 

the 

Net Mask for the IP address.  


Summary of Contents for WPS-100-DVR

Page 1: ...WPS 100 DVR DVR 4 CHANNEL INSTALLATION AND USERS MANUAL Review manual thoroughly before installation Retain for future reference...

Page 2: ...ar 13 4 4 Digital Zoom 15 5 MAIN MENU 16 5 1 Video Adjustment 17 5 2 Display 18 5 3 Backup Device 19 5 4 Software Upgrade 21 5 5 System Shutdown 22 6 SETUP MENU 23 6 1 Camera Setup 24 6 1 1 Motion Set...

Page 3: ...DWLRQ RI HYLFH 3URSHUWLHV 59 8 3 1 System 60 8 3 2 Password 61 8 3 3 Network 63 8 3 4 Pre Camera 65 8 3 5 Camera 65 8 3 6 Motion 66 8 3 7 Video Loss 68 8 3 8 Alarm 69 8 3 9 SEQ Display 69 8 3 10 Sched...

Page 4: ...ing this device even if it is to simply reposition it on a shelf or in a rack I VHUYLFLQJ RU H FKDQJLQJ WKH KDUG GULYH SURWHFW LW IURP VWDWLF HOHFWULFLW 8VH D JURXQGHG VWDWLF ZULVW guard and matt to p...

Page 5: ...RPSUHVVLRQ ZLWK FRQ JXUDEOH TXDOLW 3 0 DXGLR FRPSUHVVLRQ 3HQWDSOH RSHUDWLRQ VLPXOWDQHRXV UHFRUG OLYH SOD EDFN EDFNXS FRQWURO UHPRWH DFFHVV 5HFRUG FDSDELOLWLHV Full D1 up to 60 FPS frames per second Ha...

Page 6: ...DO WR DQ H WHUQDO GHYLFH VXFK DV DQ DPSOL HU FRQQHFWHG WR D VSHDNHU 5HFRUGHG DXGLR ZLOO be supplied from AUDIO OUT during playback 4 Main Monitor Output Connectors BNC VGA Connection to TV monitors vi...

Page 7: ...nd Users Manual WPS 100 DVR 4CH 2 2 FRONT PANEL 1 Remote IR Sensor Use to receive signal from an IR remote controller 2 Power HDD LED Indicates status of Power and HDD RED Power On Flickers to indicat...

Page 8: ...l Volume Zoom Control 6 Buttons by the symbol Split Window Control 7 ENTER Button 8 MENU ESC Button 9 S BS Up BS Button 10 PTZ No Function on 4ch 11 W X Left Right Buttons 13 FWD REV on the jog shuttl...

Page 9: ...installing the DVR 3RVLWLRQ WKH 95 ZLWK DOO IHHW UHVWLQJ RQ D VROLG OHYHO VXUIDFH H VXUH WKDW WKH 95 LV LQ D ZHOO YHQWLODWHG DUHD WKDW SURYLGHV DGHTXDWH FRROLQJ Do not place the DVR on carpeting or an...

Page 10: ...ge protection or wall outlet 3 2 2 OPTIONAL CONNECTIONS 8 2 1387 Connect the audio input connector to the audio line out from line level microphones or other audio sources Please make sure to associat...

Page 11: ...the following information 6 4 GLVSOD 6 4 LFRQ VKRZQ IRU 6 4 GLVSOD 21 DFNXS VWDWH DFNXS LFRQ VKRZQ IRU EDFNXS 0DQXDO UHFRUG 5 LFRQ VKRZQ IRU 21 RRP VWDWHV RU 0XWH VWDWH 6SHDNHU LFRQ YLVLEOH ZKHQ QRW P...

Page 12: ...1 9 0 repeatedly until the character you want appears 1 for 1 RU VSDFH 2 for 2 a A b B or c C HWF 5 Press mark found on the remote control to display a list of punctuation marks and special characters...

Page 13: ...in name and Password 2QFH WKH QDPH DQG SDVVZRUG DUH HQWHUHG SUHVV WR KLJKOLJKW DQG VHOHFW WKH Login option Press ENTER WR ORJLQ WKH V VWHP 7R ORJRXW RI WKH V VWHP UVW GLVSOD WKH Login Logout PHQX DQG...

Page 14: ...tton on the remote control to display the search menu OWHUQDWLYHO XVH the mouse to select this icon SEARCH is only available to an Administrator or Supervisor 5 Press this button on the remote control...

Page 15: ...nch the Instant Playback menu WR SOD EDFN WKH ODVW VHFRQGV RU RU PLQXWHV RI YLGHR OWHUQDWLYHO XVH WKH PRXVH WR FOLFN RQ WKLV LFRQ 4 4 DIGITAL ZOOM 7KH 95 VXSSRUWV DQG LJLWDO RRP 8VH WKLV IXQFWLRQ LQ I...

Page 16: ...ion 4 2 for Login Logout GLVSOD 7KH QDPHV RI WKH LFRQV DUH GLVSOD HG ZKHQ WKH PRXVH KRYHUV RYHU WKH LFRQ To navigate and operate this menu Press these buttons on the remote control to change the highl...

Page 17: ...change the camera OWHUQDWLYHO use the mouse to select the desired camera Press these buttons on the remote control to change the settings OWHUQDWLYHO use the mouse to make these changes SEQ Press thi...

Page 18: ...e sure the connected VGA monitor can accept the desired resolution before selecting it If a resolution is selected that is not supported by the monitor and video is lost at the VGA monitor continue to...

Page 19: ...riety of USB 2 0 storage devices including thumb drives and DVD drives 2QFH LQ WKH PDLQ 0HQX GLVSOD SUHVV RQ WKH UHPRWH FRQWURO WR VHOHFW Backup Device and then press ENTER WR GLVSOD WKH PHQX DV VKRZQ...

Page 20: ...WR UHDG ZULWH I LW IDLOV WR FRQQHFW XQSOXJ WKH GHYLFH DQG WKHQ SOXJ WKH GHYLFH LQWR WKH 86 SRUW DJDLQ 1RWH 6RPH EDFNXS GHYLFHV PD KDYH FRPSDWLELOLW SUREOHPV 6HH WKH OLVW RI WHVWHG GHYLFHV EHORZ BACKU...

Page 21: ...in Menu display OWHUQDWLYHO XVH WKH PRXVH WR H LW WKH VXE PHQX E FOLFNLQJ RQ WKH X I WKH FRQWHQWV LQ WKLV PHQX KDYH EHHQ PRGL HG D Save dialog box will be displayed requesting the user to save the cha...

Page 22: ...g this procedure may cause damage to the Hard Disk Drives 1 Access the menu by pressing the MENU ESC EXWWRQ RQ WKH 5 UHPRWH OWHUQDWLYHO WKH mouse can be used by right clicking to open the menu 2 Login...

Page 23: ...ontrol to change the highlighted item OWHUQDWLYHO XVH WKH PRXVH WR QDYLJDWH 17 5 Press this button on the remote control to enter the detailed display of the highlighted RSWLRQ OWHUQDWLYHO XVH WKH OHI...

Page 24: ...6 Press the ESC button on the remote control to escape from this menu and return to the main menu OWHUQDWLYHO XVH WKH PRXVH WR H LW WKH VXE PHQX E FOLFNLQJ RQ WKH X I WKH FRQWHQWV LQ WKLV PHQX KDYH E...

Page 25: ...6 DW DOI UHVROXWLRQ RU 36 DW XOO UHVROXWLRQ RQ UP WKH V VWHP V WRWDO YHQW Record FPS by totaling the Event Record FPS for each camera connected to the system The DVR will automatically lower the actua...

Page 26: ...se buttons on the remote control to change the camera OWHUQDWLYHO XVH WKH PRXVH WR VHOHFW WKH GHVLUHG FDPHUD COPY Press the COPY button on the remote control to copy the Video Loss settings of the foc...

Page 27: ...3RVW 5HFRUG 36 VHW LQ Section 6 2 GHWHUPLQHV WKH IUDPH UDWH RI WKLV UHFRUGLQJ 3UHVV EXWWRQV RQ WKH UHPRWH FRQWURO WR DGMXVW WKH YDOXH IURP WR PLQXWHV OWHUQDWLYHO XVH WKH PRXVH WR DGMXVW WKLV VHWWLQJ 7...

Page 28: ...Q GHWHFWLRQ LV GLVDEOHG IRU D JLYHQ FDPHUD LW LV UHFRPPHQGHG WR HQDEOH the entire area if the Smart Search feature may be used 7KH IROORZLQJ LV D EULHI GHVFULSWLRQ IRU HDFK LWHP LQ WKH VXE PHQX DQG LW...

Page 29: ...U RI JULGV 6 5 Press this button on the remote control to test the motion detection of this camera Grids in green LQGLFDWH WKDW DUHD WKDW ZLOO GHWHFW PRWLRQ KHQ PRWLRQ LV GHWHFWHG WKHVH JULGV ZLOO FKD...

Page 30: ...pe OWHUQDWLYHO XVH WKH PRXVH WR VHOHFW WKH IRFXV UHFRUGLQJ W SH 1XPHULF Press these buttons on the remote control to select one of the Recording Modes listed above Or press the ENTER button on the rem...

Page 31: ...drive In HDD Setup GLVSOD SUHVV MODE to display HDD Clear screen as shown To navigate and operate this menu 6 4 Press the ENTER button on the remote to Clear GHOHWH DOO OHV WKH KDUG GULYH FRQ UPDWLRQ...

Page 32: ...R LEVEL LOGIN NAME IS user THE PASSWORD IS 1234 To navigate and operate this menu 3UHVV WKHVH EXWWRQV RQ WKH UHPRWH FRQWURO WR VHOHFW DQ LWHP OWHUQDWLYHO XVH the mouse to select an item 02 Press the M...

Page 33: ...YHO OWHUQDWLYHO XVH WKH PRXVH WR VHW WKLV IHDWXUH WARNING This feature could allow unwarranted access to the DVR Caution is strongly advised when enabling this feature 872 2 287 I WKHUH LV QR XVHU RSH...

Page 34: ...HWKRG WR HVFDSH LV WR XVH WKH PRXVH WR ULJKW FOLFN DQG H LW WKH VXE PHQX 7KH IROORZLQJ LV D EULHI GHVFULSWLRQ IRU HDFK LWHP LQ WKLV PHQX DQG LWV VSHFL F RSHUDWLRQV 7 0 21 Press the buttons on the remo...

Page 35: ...ge OWHUQDWLYHO XVH WKH PRXVH WR VHOHFW WKH DSSURSULDWH ODQJXDJH 1RWH I WKH VHOHFWHG ODQJXDJH LV FKDQJHG WKH XVHU ZLOO EH DVNHG WR UHERRW WKH V VWHP IRU WKH QHZO selected language to take effect 3527 7...

Page 36: ...requesting the user to save the changes Press ENTER on the UHPRWH FRQWURO WR H LW DQG VDYH ESC to exit without saving Another method to escape is to use the mouse WR ULJKW FOLFN DQG H LW WKH VXE PHQX...

Page 37: ...from DynDns 85 Enter the DDNS URL if DDNS is used 16 86 51 0 Enter the DDNS Username if DDNS is used 16 3 66 25 Enter the DDNS Password if DDNS is used 0 Press ENTER on the remote to display the E ma...

Page 38: ...t value is 25 87 17 7 21 Press ENTER or on the remote control to enable or disable this item depending on whether the SMTP mail VHUYHU UHTXLUHV DXWKHQWLFDWLRQ OWHUQDWLYHO XVH WKH PRXVH WR HQDEOH RU GL...

Page 39: ...the product page for more information on Router Setup and how it relates to these settings 21752 3257 Enter the Control Port for remote access The default value is 67 7 3257 Enter the Data Port for r...

Page 40: ...OXHV SUHVV RQ WKH remote control to change the high lighted option to Factory Default and then press ENTER OWHUQDWLYHO XVH WKH PRXVH WR VHOHFW Factory Default 2QFH VHOHFWHG D FRQ UPDWLRQ GLDORJ ZLOO E...

Page 41: ...he Search Icon from the Control Bar To navigate and operate this menu Press these buttons on the remote control to select an item OWHUQDWLYHO XVH WKH PRXVH WR VHOHFW DQ LWHP 17 5 Press the ENTER butto...

Page 42: ...button from the remote control to backup copy the selected type of recorded video beginning from the Search Time to the connected backup device The Backup menu described in the Archive portion of Sec...

Page 43: ...XVH WKH PRXVH WR VHOHFW WKH Log option 6 4 Use the SEQ button on the remote control to scroll the Event Log Page Up OWHUQDWLYHO XVH WKH PRXVH WR VHOHFW WKH Page Up option Use the CALL button on the r...

Page 44: ...WV FDQ EH VHOHFWHG LQ WKLV PDQQHU OWHUQDWLYHO XVH WKH PRXVH WR VHOHFW RU GHVHOHFW HYHQWV 2 Press Play button on the remote control to playback all the selected events OWHUQDWLYHO XVH WKH PRXVH WR VHOH...

Page 45: ...EHU ER RS Select the COPY button from the remote control to backup copy the selected type of recorded video beginning from the Search Time to the connected backup device The Backup menu described in t...

Page 46: ...W RI WKH GH QHG DUHD IRU Motion Detection VHH 6HFWLRQ 2QO OHV ZLWK PRWLRQ FRYHULQJ DOO RI WKH GH QHG PRWLRQ DUHD ZLOO EH GLVSOD HG DV PDWFKLQJ UHVXOWV 7KHUHIRUH EDVHG RQ WKH VHDUFK DOJRULWKP WKHUH ZLO...

Page 47: ...HVFULSWLRQ IRU HDFK LWHP LQ WKH VXE PHQX DQG LWV VSHFL F RSHUDWLRQV 83 9 Press ENTER RQ WKH UHPRWH FRQWURO WR FRQQHFW WR WKH EDFNXS GHYLFH DQG GLVSOD WKH OHV RQ WKH GHYLFH OWHUQDWLYHO XVH WKH PRXVH WR...

Page 48: ...WR VHOHFW WKLV LFRQ XGLR FDQ RQO EH SOD HG DW IRUZDUG VSHHG DQG ZKHQ the associated cameras is played back in a full window view 6723 Press this button on the remote control to stop playback of the re...

Page 49: ...will disappear from the Status Bar OWHUQDWLYHO XVH WKH PRXVH WR VHOHFW WKH VWRS IXQFWLRQ 6 Press the ESC button on the remote control to escape from this menu and return to the Smart Search menu OWHU...

Page 50: ...DV ZHOO DV WKH EDFNXS K OHV GLUHFWRU WLWOHG 6HOI3OD HU ZLOO DOVR EH JHQHUDWHG LI LW V QRW DOUHDG H LVWLQJ RQ WKH EDFNXS VWRUDJH GHYLFH WKXPE GULYH ORFDO 3 HWF 7KH XVHU FDQ XVH WKH EDWFK OH WR VHOI SOD...

Page 51: ...WHQVLRQ IRU WKH 95 DQG PXVW EH LQFOXGHG DW WKH HQG RI WKH 95 OWHUQDWLYHO XVH WKH 16 GRPDLQ QDPH DGGUHVV LI WKLV IHDWXUH KDV EHHQ HQDEOHG DQG SURSHUO VHWXS 1RWH 8S WR XVHUV FDQ ORJ LQWR WKLV 95 VLPXOWD...

Page 52: ...5 Freeze the Video 35 17 Print a picture of the current video window 6 4 02 Enable Sequence mode 61 36 27 Take a Snapshot of the video and save it to the local PC 8 9 2 SDQG WKH FXUUHQW VSOLW ZLQGRZ I...

Page 53: ...e DVRs simultaneously to mix and match camera views 8 2 3 SPLIT WINDOW PANEL Use these icons to select the number of cameras viewed on the display 1 63 7 1 2 216 Left click and hold the mouse over the...

Page 54: ...nly be played back if in a single window view of a camera that has an associated audio input Use the Playback Panel LFRQV WR FRQWURO WKH YLGHR 7R H LW SOD EDFN VHOHFW WKH LIVE icon at the bottom of th...

Page 55: ...K 6 VWHP HYHQWV LQFOXGH RJLQ RJRXW H PDLO HUURUV KDUG GULYH IDLOXUHV HWF 6285 Select the camera ID number s to search 35 17 Print the event log to a printer 35 17 72 SRUW WKH HYHQW ORJ WR D W W OH 5 5...

Page 56: ...DSDFLW RI WKH QHWZRUN DQG WKH QXPEHU DQG VL H RI WKH OHV being copied Camera options will populate the Copy menu based on what is being viewed in the split window view If RQO RQH FDPHUD LV EHLQJ YLHZH...

Page 57: ...the panel to the desired location 7R KLGH WKH PHQX FOLFN RQ WKH PTZ Panel icon again 8 2 8 DEVICE CONFIG 7KH QWHUQHW SORUHU XVHU LQWHUIDFH KDV WKH DELOLW WR FRQQHFW WR PXOWLSOH 95V 95V PXVW UVW EH DG...

Page 58: ...in stream Or set the Video Stream to Extra IRU H WUD QHWZRUN VWUHDP IRU XDO 6WUHDPLQJ XDO 6WUHDPLQJ is helpful when viewing a remote DVR over a slow network connection This allows the DVR to continue...

Page 59: ...he upgrade process may take several minutes and will require the DVR to reboot to complete the process Preferably use a hardwire connection on the LAN not over the internet for the XSJUDGH SURFHGXUH D...

Page 60: ...QFKURQL DWLRQ LV HQDEOHG VHOHFW D 7LPH 6 QFKURQL DWLRQ 3URWRFRO 763 VHUYHU 7KH 95 ZLOO V QFKURQL H ZLWK WKH VSHFL HG 763 VHUYHU Date System date Time System time Display Format Select the format used...

Page 61: ...GHIDXOW OHYHOV DQ DGPLQLVWUDWRU FDQ DOVR VHW XVWRPL HG OHYHOV RI DFFHVV DV GHVFULEHG LQ the following ADV section The factory preset administrator level login name is user the password is 1234 7KH IR...

Page 62: ...elect Channels cameras the user can monitor X2 Allow the user to Zoom live and playback video PTZ This feature not available on WPS 100 DVR 4ch Volume Allow the user to change volume Video Adjustment...

Page 63: ...LFW ZLWK DQ RWKHU 3 DGGUHVV RQ the LAN 1 7 0 6 Enter the Net Mask for the IP address 7 Enter the Gateway IP address for the system 16 I XVLQJ 16 HQWHU WKH RPDLQ 1DPH 6HUYHU DGGUHVV IRU WKH V VWHP 86 5...

Page 64: ...ution sent to these devices will speed up the delivery of the video To enable XDO 6WUHDPLQJ VHOHFW RQH RI WKH IRXU OHYHOV RI QCIF Fair is the lowest quality while 6XSHU QH is the highest quality I XDO...

Page 65: ...ng is disabled 9 17 I WKH IROORZLQJ HYHQWV RFFXU IRU WKLV FDPHUD WKH PDLQ GLVSOD 9 RU 1 ZLOO VZLWFK WR WKH YLGHR RI WKLV FDPHUD IRU D VSHFL HG SHULRG RI WLPH GZHOO 2SWLRQV DUH Off Motion Alarm Both 0R...

Page 66: ...XULQJ SOD EDFN V D UHIHUHQFH OLYH YLGHR HTXDOV 36 Q VXUYHLOODQFH 36 LV UHFRJQL HG DV YHU JRRG TXDOLW YLGHR ZKLOH 36 LV W SLFDOO VXI FLHQW for most cases 35 5 25 36 The Frames Per Second Rre Record UDW...

Page 67: ...ording 1RWH FWXDO SUH UHFRUG WLPH PD EH VKRUWHU WKDQ WKH YDOXH VHW LI WKH WRWDO VL H RI WKH SUH UHFRUG YLGHR exceeds the pre record video buffer 3267 5 25 H QH KRZ PXFK WLPH WKH 95 ZLOO UHFRUG DIWHU P...

Page 68: ...rm Out relay will reset immediately once video signal is restored 0 5 72 2 This feature is not available on WPS 100 DVR 4CH 272 35 6 7 This feature is not available on WPS 100 DVR 4CH 35 5 25 H QH KRZ...

Page 69: ...ection 9 3 11 for more information on E mail 73 This feature is not available on WPS 100 DVR 4CH 6 5 1 0 66 GHIDXOW WKH 95 ZLOO GLVSOD D YLGHR ORVV PHVVDJH LQ WKH 6 VWHP 6WDWXV DU YLVLEOH IURP WKH 9 o...

Page 70: ...of the week 7KH IROORZLQJ LV D EULHI GHVFULSWLRQ IRU HDFK LWHP LQ WKLV PHQX DQG LWV VSHFL F RSHUDWLRQV 67 57 Set the start time of this time segment conditional in increments of 30 minutes in militar...

Page 71: ...11 E MAIL KHQ DQ HYHQW RFFXUV DQG PDLO LV HQDEOHG DV D FRUUHVSRQGLQJ DFWLRQ DQ PDLO ZLOO EH VHQW EDVHG RQ the parameters set in this menu Consultation with the E mail service provider may be required...

Page 72: ...al picture sizes for the attachment can be set to Original to match the recorded resolution or set to QCIF Quarter CIF is 176 x 144 pixels to reduce the size of the attachment Select N A to disable at...

Page 73: ...RQ LV WR VHW 9LGHR Stream found in the Network tab to one of the four QCIF levels Recommendation Set Compression to Normal and use the Video Stream in the Network tab to enable Dual Streaming QWHUQHW...

Page 74: ...GZLGWK consumption and speed video delivery to the remote PC In the Network tab select one of the four QCIF options listed in Video Stream See 9 3 3 for more information on the Video Stream setting RE...

Page 75: ...KDW WKH 95 LV FRQQHFWHG WR GHIDXOW these numbers are 67 and 68 respectively 5 Enter the User Name and Password for the 95 GHIDXOW WKHVH VHWWLQJV DUH user and 1234 respectively 6 Select Extra to connec...

Page 76: ...5 7 21 BACK Exits the Main Display and returns to the Device List DVR SELECTION Select and connect to other DVRs in the Device List CH Displays a virtual numeric keypad for 16 cameras Select any camer...

Page 77: ...D and RWD icons to scroll to more pages of this list This search can be further UH QHG E ALARM MOTION VIDEO LOSS and SYSTEM LOG events shown by these four icons Events of these types can be hidden fro...

Page 78: ...wap htm DGGHG WR WKH HQG I WKH 773 KDV EHHQ FKDQJHG IURP WKH GHIDXOW SRUW WKH FRUUHFW SRUW VKRXOG DOVR EH DGGHG WR WKH DGGUHVV KWWS ZDS KWP LI WKH 773 SRUW KDV been changed to 800 2 1 2QFH WKH ORJLQ S...

Page 79: ...defective in material or workmanship under normal conditions of use 7KLV ZDUUDQW VKDOO QRW DSSO WR SURGXFWV ZKLFK KDYH EHHQ DEXVHG PRGL HG GLVDVVHPEOHG RU improperly installed Products to be repaired...

Page 80: ...HV ZLWK FRQ JXUDEOH GHWHFWLRQ DUHD VHQVLWLYLW Audio Input 5 MDFN FRQQHFWRU OLQH LQ OHYHO 100mV 2Vrms Output 5 MDFN FRQQHFWRU OLQH RXW OHYHO up to 2Vrms Record Compression Video H 264 Audio ADPCM UDPH...

Page 81: ...Protocol 7 3 3 773 333R 3 16 73 763 Remote users Up to 6 users simultaneously Bandwidth TCP IP type dynamic sliding window control Remote stations 6WUHDPLQJ YLGHR IRU 3 PRELOH SKRQH 3 HWF QR Apps requ...

Page 82: ...ing Rate FPS 120 60 30 15 720x480 Full D1 9 3 5 7 0 13 9 8 3 9 7 9 15 7 7 4 6 9 2 18 4 6 5 2 10 5 21 0 5 6 9 13 8 28 4 8 5 17 1 34 3 12 5 25 50 2 17 2 34 69 1 27 54 107 720x240 Half D1 9 3 5 6 9 13 9...

Page 83: ...M or DVD ROM drive in the PC and copy the AVI_Converter exe OH WR WKH desktop Double click the AVI Converter icon to open the utility 6HOHFW WKH VRXUFH OHV h264 OHV DUFKLYHG IURP WKH 95 WR EH FRQYHUWH...

Page 84: ...111206 2011 Wirepath Surveillance...

Reviews: