background image

23

WINYCAM  HX200

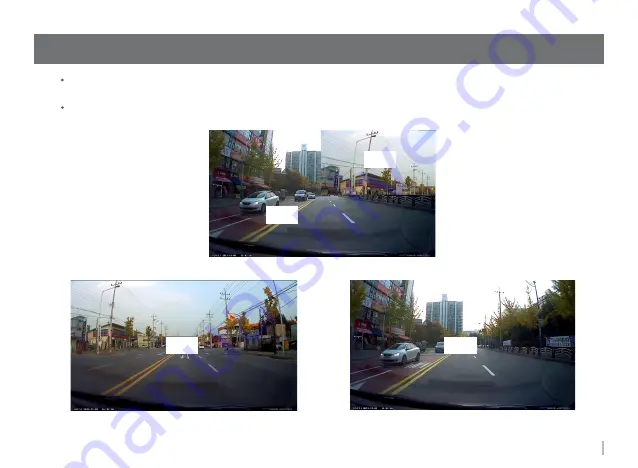
When you touch in the upper-right-hand corner of the screen (1/4 of whole screen), LCD Screen will  

change automatically Front/Rear, only Front, only Rear.
Only LCD Screen looks different, 2CH images will be recorded when rear camera is connected.

Front/Rear LCD Screen

Rear LCD Screen

Front LCD Screen

Rear

Rear

Front

Front

16. How to display Front / Rear screen

Summary of Contents for HX200

Page 1: ...User Guide WINYCAM www winycam com HX200 ...

Page 2: ... Guide 11 Voice Guide 12 LCD Configuration 13 PC Viewer Program Installation 14 How to use PC Viewer 15 Playback 16 How to display Front Rear Screen 17 How to save video file on your PC 18 How to separate video 19 Firmware Upgrade 20 SD card format Set breaking voltage 21 Specifications 22 Certificates 23 A S Guide Warranty 2 4 5 6 7 8 11 12 13 14 15 16 17 18 20 23 24 25 26 27 28 29 30 32 ...

Page 3: ...e product at temperature below 20 or above 70 may cause malfunction or breakdown This caution should be applied when product is unused Do not use the product in places in high temperature humidity Do not exert excessive force to the product as it may cause breakdown Operate the product for 3 5 minutes to check for correct recording before each use Prolonged exposure to sunlight and high temperatur...

Page 4: ...be deleted When turn off the power of the body and remove the SD card before LED is turned off the last recording file may not be saved so please be careful When driving a vehicle do not remove the SD card Make sure to remove it safely when a vehicle is in parking or stop After turning on the power make sure that it is in normal operation Please note that the warranty period of an SD card is six 6...

Page 5: ... Minor shock may not detect sensor to record CONBUZZ shall not be liable for any loss or damage to data or to the product which may be caused by accident or impact All rights vested in the design and software of HX200 are the property of CONBUZZ Co Ltd and protected by the Copyright Law HX200 may change without priority notice for further function improvement This User Manual is published based on...

Page 6: ... without connecting to a PC ㆍEach capacity of a constant normal event motion folder can be set in PC Viewer High Quality Voice Record and Voice Guidance ㆍOperating instructions service by voice guidance ㆍVoice recording On Off function and speaker output On Off function ㆍHigh performance microphone built in Back up battery and vehicle constant power discharge protection function ㆍSaved recorded im...

Page 7: ...onal Item HX200 Hardwire Cable Cigar Lighter Cable GPS Module ㆍThe packaged product picture of the user manual may differ from the actual product ㆍVideo input type is different and check the user manual of monitor Micro SD Card Adaptor Rear Camera 4 Package ...

Page 8: ...7 WINYCAM HX200 5 Structure MIC Speaker Security LED Front Camera Power button SD Card Socket GPS DC IN Rear Camera GPS LED REC LED ...

Page 9: ...e the wire using by the cable clip 2 Remove the protective tape from the bracket 4 Attach the bracket on the windshield of the left of center behind the rearview mirror 3 Connect the Power cable to DC IN of the device 5 Plug the cigar jack cable into car power socket 1 Front Camera Installation 6 Installation ...

Page 10: ...rn the device on and check whether to record properly Please power off a car and Dashcam before installation 1 Shutdown a Car Battery and Power 2 Install a Rear Camera 3 Adjust a Rear Camera Angle 6 Arrange a Front Rear Camera Cable Arrange the wire by using the cable clip Remove the protective tape from the rear camera and attach the camera in the proper place Adjust the camera angle and fix it T...

Page 11: ... 1 How to install a Fuse Cable Fuse cable has 3 lines To use hardwire cable Battery Line Red Connect to Emergency Light ACC Line Yellow Connect to Fuse Power Ground Line Black GND 1 2 3 3 1 2 3 Fuse Cable Installation ...

Page 12: ...be available in some countries ㆍOther electronic devices may interfere with GPS signal if placed too close to the device Keep its distance from them as much as possible ㆍGPS may be affected by weather conditions satellite signal or surrounding geographical features Coated windshields can interfere with GPS signal which may result in poor or blocked GPS reception 7 External GPS Installation ...

Page 13: ...ng For automatic recording and manual recording methods please refer the below table After changed to Parking mode LCD will be on for 30sec nevertheless you set screen saving time as 30sec 60sec always When turned to Parking Mode G sensor sensitivity will be more sensitive than driving mode REC Mode Driving Mode Parking Motion Mode REC Method Normal Memory save Event In G sensor detect shock Motio...

Page 14: ... CH 1CH 2CH Video Quality Camera 16GB 32GB 128GB 64GB Super High Super High Front High High Front Normal Normal Front Front Rear Front Rear Front Rear Normal 50 Normal 50 Normal 50 Normal 50 Motion 20 Motion 20 Motion 20 Motion 20 Event 30 Event 30 Event 30 Event 30 3 5 녹화 시간 Unit Minute 9 REC Time 250 324 460 130 171 250 100 129 184 52 69 100 150 194 276 78 103 150 499 647 920 261 343 499 200 259...

Page 15: ... No GPS Signal Recording LED Red Disconnected GPS System Booting ON Blinks Slowly Blinks Slowly Blinks Slowly Blinks Slowly Blinks Slowly Blinks Slowly Blinks Slowly OFF ON ON Blinks Quickly ON ON ON ON Update Firmware Blinks Quickly Blinks from side to side Blinks Slowly OFF Normal Mode Recording N Impact Detected E Parking Mode P Non SD card ...

Page 16: ...re update is starting Event recording start in booting Event recording will start Parking recording start The recording will start REC end The recording will end when an event shock detection Ding Dong Only when event REC mode is set in the configuration the voice guiding event recording will start will announce 11 Voice Guide ...

Page 17: ...a Set Adjust Brightness Contrast Chroma on Camera Front LED LED On Off REC Set Others ADAS REC CH Touch Calibration Set More Bright under nighttime parking mode Calibrate Touch Screen Set REC Channel Front Video Quality Set Front Video Quality Rear Video Quality REC Mode Set Rear Video Quality Continuous Shock Mic Volume Set REC Volume Shock Level N Set Shock Sensor Level Driving Shock Level P Set...

Page 18: ... Pentium4 2 8GHz RAM 1GB Display monitor resolution 1024 X 768 DirectX support WPF Download the latest Winy BB Viewer from our website http www winycam com If you run setup exe Winy BB Viewer will be installed And then installation will be continued according to the installation sequence of setup dialog box 13 PC Viewer Program Installation ...

Page 19: ...18 WINYCAM HX200 14 How to use PC Viewer 2 3 4 5 6 7 8 9 10 1 28 11 13 14 15 16 17 18 19 20 21 22 23 24 25 26 27 12 ...

Page 20: ... Skip Zoom Control Volume Play List Map Button Total File Time Playback Time File Location Search Brightness Contrast REC File List Map Display GPS Signal Condition Playback Video Image Driving Speed Playback Control Latitude Longitude G sensor Information Flip Horizontal Split Image Flip Vertical File Skip Back 1 16 2 17 3 18 4 19 5 20 6 21 7 22 8 23 9 24 10 25 11 26 12 27 13 28 14 15 ...

Page 21: ...oggle Front Rear video diplay 6 Former File Button Playback Former file 7 Playback Button Playback REC file 8 Next File Button Playback Next file 9 Normal Event Motion Tab Each REC file list display tab 2 Playback Icon Display REC List 1 REC File list List REC File list that is selected tab 3 Playback REC Window REC video playback window 4 5 6 7 8 9 10 4 1 2 3 ...

Page 22: ...r 3 Playback Open a removal disc you can see each folders And click files to playback which is saved in each folders 2 Connect a SD Card to PC Insert a SD card to SD Card Reader or to adapter and connect it to PC inf moe evt GPS Information is displayed in the original viewer Normal REC Motion REC which is detected by motion detection sensor Parking mode Event REC which is detected a shock by shoc...

Page 23: ...m 1 Same with general video player to play 5 Play Click N Normal REC file list E Event REC file list P Parking REC file list 3 Find a REC file location Click FILE LOCATION in the viewer program on upper right Choose the file location video file list will be show 3 PC Viewer Program ...

Page 24: ... whole screen LCD Screen will change automatically Front Rear only Front only Rear Only LCD Screen looks different 2CH images will be recorded when rear camera is connected Front Rear LCD Screen Rear LCD Screen Front LCD Screen Rear Rear Front Front 16 How to display Front Rear screen ...

Page 25: ...t SD card to your PC 2 Go to the folder where recorded video files are saved 3 Create the new folder in same location 4 Drag the particular file to the new file to copy If you drag a folder the whole folder will be copied 17 How to save video file on PC ...

Page 26: ...00 18 How to separate video 1 Press Front Rear Extract button on the original PC viewer program 2 Select a video file to separate and click OK button 3 Saved separated file in ex C Users AppData Roaming WINYCAM Video ...

Page 27: ...ack up data 3 Visit WINYCAM website http winycam com and downlaod the latest firmware on the memory card 4 Insert the Micro SD card onto the device and power on Automatic upgrade will begin 5 While upgrading the firmware a voice guidance announces an upgrade status 6 Once upgrade is complete the device reboots and starts normal recording 19 Firmware Upgrade ...

Page 28: ...charge of the vehicle battery by blocking power to the dash cam if the voltage drops below a configured value With the configuration on LCD screen or PC viewer program set the voltage level to cut off automatically in order to prevent from draining the vehicle battery 2 PC Viewer Program Operating Configuration Breaking Voltage Setting Value Disable 11 4 23 1 11 6 23 4 11 8 23 7 12 0 24 0 12 2 24 ...

Page 29: ...pecification Specification ARM Cortex A7 core 128MByte Serial NAND 256 MB DDR 2CH Front OV9732 Rear HDX10 Front HD 1280 x 720 Rear HD 1280 x 720 30 FPS 30 FPS External GPS option Front 102 4 H X 57 6 V X 117 5 D Rear 92 H x 48 V x 110 D DC 12V 24V 3 5 TFT LCD with TSP 480 x 320 Super Capacitor 3D Shock Sensor AVI No Built in high sensitive MIC Built in speaker H 264 AVC MicroSD Card up to 128GB op...

Page 30: ...d due to the times away the Company shall not take responsible 1 Power is not turned on Check once again if the power cable is properly connected If the problem is not solved please contact manufacture 2 The map is not shown when a video is played on a PC original viewer program Check your Internet connection Check if your Internet Explorer is v7 0 or higher 3 Power is connected but LED is not lig...

Page 31: ...ice Product 1 Year from purchase date Micro SD Card 6 months from purchase date if purchase date is not confirmed it should be counted from manufacture date of SD card 2 Paid Service 1 If the warranty period has passed 2 If a failures caused by carelessness using drop flooding shock breakage excessive operation 3 If failures caused by natural disasters fire lightning flood damage etc 4 Failures ca...

Page 32: ...CONBUZZ CO Ltd www winycam com HX200 ...

Reviews: