Maintenance
2728
−
1/A1
Winterthur Gas & Diesel Ltd.
7.
Installation
1) Remove the protection from the cylinder cover.
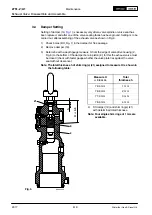
2) Put a new gasket (11,
) in the bore of the cylinder cover (1).
3) Apply a thin layer of oil to the bore of the cylinder cover (1).
4) Attach the control air pipe (14) to the bore in the cylinder cover (1).
5) Carefully put the starting air valve in the cylinder cover (1). Make sure that the
control air pipe (14) goes into the bore of the cylinder cover correctly.
6) Apply Never
−
Seez NSBT
−
8 to the threads of the two M16 bolts(8).
7) Put the two M16 bolts(8) in position in the cover (3).
8) Torque symmetrically the two bolts(8) to the value given in
.
9) Tighten the connections of the control air pipe (14).
10) Connect the electrical connection to the 3/2
−
way solenoid valve (13).
2017
Starting Air Valve: Removal, Disassemble, Grinding, Assemble, Installation
Summary of Contents for X35-B
Page 12: ...Intentionally blank ...
Page 14: ...Intentionally blank ...
Page 16: ...Intentionally blank ...
Page 34: ...Intentionally blank ...
Page 58: ...Intentionally blank ...
Page 60: ...Maintenance 0352 1 A1 Winterthur Gas Diesel Ltd 2 6 WCH03791 2017 ...
Page 61: ...Maintenance 0352 1 A1 Winterthur Gas Diesel Ltd 3 6 WCH03791 2017 ...
Page 62: ...Maintenance 0352 1 A1 Winterthur Gas Diesel Ltd 4 6 WCH03791 2017 ...
Page 63: ...Maintenance 0352 1 A1 Winterthur Gas Diesel Ltd 5 6 WCH03791 2017 ...
Page 64: ...Maintenance 0352 1 A1 Winterthur Gas Diesel Ltd 6 6 WCH03791 2017 ...
Page 68: ...Intentionally blank ...
Page 72: ...Intentionally blank ...
Page 82: ...Intentionally blank ...
Page 85: ...Intentionally blank ...
Page 92: ...Intentionally blank ...
Page 96: ...Intentionally blank ...
Page 112: ...Intentionally blank ...
Page 120: ...Intentionally blank ...
Page 124: ...Intentionally blank ...
Page 138: ...Intentionally blank ...
Page 154: ...Intentionally blank ...
Page 168: ...Intentionally blank ...
Page 180: ...Intentionally blank ...
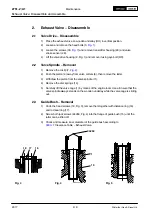
Page 182: ...Maintenance 2728 1 A1 Winterthur Gas Diesel Ltd 2 5 6 Lift housing from the valve spindle 4 ...
Page 186: ...Intentionally blank ...
Page 190: ......
Page 204: ...Intentionally blank ...
Page 211: ...Intentionally blank ...
Page 216: ...Intentionally blank ...
Page 224: ...Intentionally blank ...
Page 228: ......
Page 229: ...Intentionally blank ...
Page 264: ...Intentionally blank ...
Page 270: ...Intentionally blank ...
Page 280: ...Intentionally blank ...
Page 294: ...Intentionally blank ...
Page 298: ...Intentionally blank ...
Page 302: ...Intentionally blank ...
Page 318: ...Intentionally blank ...
Page 328: ...Intentionally blank ...
Page 344: ...Intentionally blank ...
Page 368: ...Intentionally blank ...
Page 374: ...Intentionally blank ...
Page 380: ...Intentionally blank ...
Page 396: ...Intentionally blank ...
Page 407: ...Intentionally blank ...
Page 426: ...Intentionally blank ...
Page 442: ...Intentionally blank ...
Page 444: ...Intentionally blank ...


