background image

Wintal LCD

 | 6

5. 

SETTING UP YOUR LCD

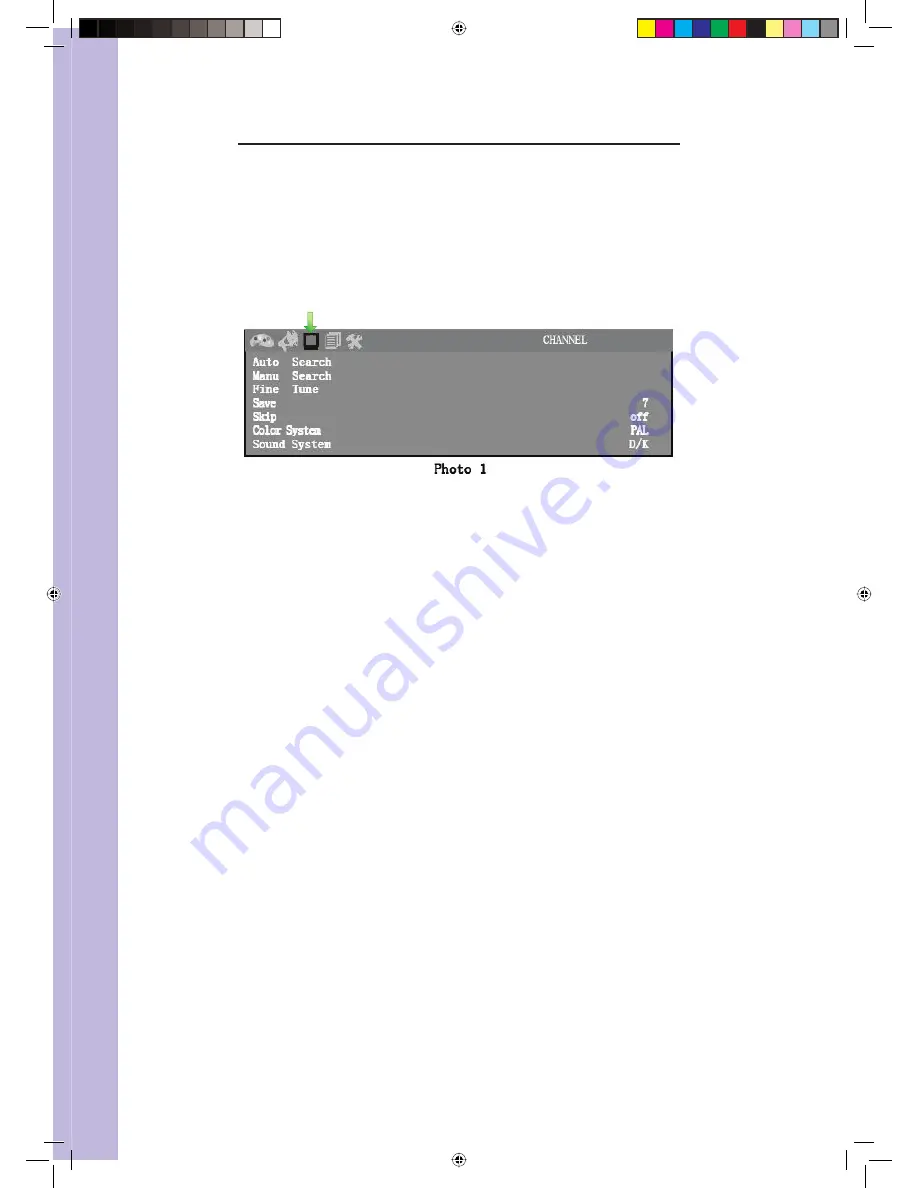
5.1 Auto Search

Press «

MENU

» key on the front control panel or «

SYS MENU

» key on the 

remote control to go into the menu
Th

 en press 

 or 

 to access the menu below

Before selecting «

Auto search

», choose the «

Colour system

» and the «

Sound 

system

» with 

 or 

Select « 

Auto search

 » with 

 or 

Press 

 or 

 to confi rm

5.2 Manual Search

Press «

MENU

» key on the front control panel or «

SYS  MENU

» key on the 

remote control to go into the menu
Th

 en press 

 or 

 to access the menu above

Press 

 or 

 to select «

Manual search

»

Confi rm with 

 or 

5.3 Fine Tune

If the reception signal is poor : 

Press «

MENU

» key on the front control panel or «

SYS MENU

» key on the 

remote control to go into the menu
Th

 en press 

 or 

 to access the menu above

Press 

 or 

 to select «

Fine tune

»

Press 

 or 

 to adjust

5.4 Save Settings

Press «

MENU

» key on the front control panel or «

SYS MENU

» key on the 

remote control to go into the menu
Th

 en press 

 or 

 to access the menu above

Press 

 or 

 to select «

Save

»

Press 

 or 

 to save the channel you want when you use for example manual 

search or sort channel option.

5.5 Skip

Skip function can jump the TV program you dislike. For example, to skip the 
program: 

Change the channel on the LCD to channel 2
Press «

MENU

» key on the front panel or «

SYS MENU

» on the remote control 

to go into the menu
Press 

 or 

 to access the menu above


Manual 20LDVD05.indd   Sec1:6

Manual 20LDVD05.indd   Sec1:6

12/07/2005   11:43:14 AM

12/07/2005   11:43:14 AM

Summary of Contents for 20LDVD05

Page 1: ...Operating Manual Model 20LDVD05 20 4 3 Digital LCD Television with DVD Player http wintal com au Manual 20LDVD05 indd a Manual 20LDVD05 indd a 12 07 2005 11 43 03 AM 12 07 2005 11 43 03 AM...

Page 2: ...Manual 20LDVD05 indd b Manual 20LDVD05 indd b 12 07 2005 11 43 13 AM 12 07 2005 11 43 13 AM...

Page 3: ...8 12 Blue Background 8 13 Channel Swap 8 14 PC Setting 9 15 TV DVD Combo Remote Control 10 15 1 Remote control instructions in TV mode 10 15 2 Remote Control Instructions in DVD Mode 11 16 Remote Con...

Page 4: ...with a voltage source of 220 240 volts and 50 Hz Connection cable Power cord and cables must be properly routed and protected to prevent people from stepping on them and causing the monitor to fall He...

Page 5: ...Wintal LCD 2 3 FRONT BACK CONNECTIONS Front View and Controls Back View Back Connections Manual 20LDVD05 indd Sec1 2 Manual 20LDVD05 indd Sec1 2 12 07 2005 11 43 14 AM 12 07 2005 11 43 14 AM...

Page 6: ...Wintal LCD Side View DVD Player Controls 1 PLAY 2 PAUSE 3 STOP 4 NEXT TRACK 5 PREVIOUS TRACK 6 EJECT Manual 20LDVD05 indd Sec1 3 Manual 20LDVD05 indd Sec1 3 12 07 2005 11 43 14 AM 12 07 2005 11 43 14...

Page 7: ...system as shown can be sourced from TV equipment shops which will provide service for correct installation and connection After installation insertv the 75 antenna plug into the antenna jack as shown...

Page 8: ...Cr Input To connect to your source component terminal use the supplied S Video to 3x RCA adaptor 4 5 PC VGA Connection Manual 20LDVD05 indd Sec1 5 Manual 20LDVD05 indd Sec1 5 12 07 2005 11 43 14 AM 12...

Page 9: ...control panel or SYS MENU key on the remote control to go into the menu Then press or to access the menu above Press or to select Fine tune Press or to adjust 5 4 Save Settings Press MENU key on the f...

Page 10: ...G Press MENU key on the front panel or SYS MENU on the remote control to go into the menu Press or to access the menu below Press or to select the setting you wish to adjust Press or to adjust the set...

Page 11: ...Con rm with o to reset the LCD to default factory settings 12 BLUE BACKGROUND Press MENU key on the front panel or SYS MENU on the remote control to go into the menu Press or to access the menu above...

Page 12: ...60Hz Connect the LCD to the PC with the VGA cable Press MENU key on the front panel or SYS MENU on the remote control to go into the menu Press or to access the menu above Press or to select the setti...

Page 13: ...f 6 o s n v r d h e l p m j i t q w u 15 1 Remote control instructions in TV mode 1 Power ON OFF 2 TV AV DVD PC mode 3 Sleep timer 30 60 90 120 o 4 Mute 5 Number keys 6 System setting menu key 7 Acces...

Page 14: ...selected u Fast forward key t Fast backward key v Jump to next track w Jump to previous track 16 REMOTE CONTROL SETUP Open the cover Insert the supplied AA size batteries When inserting the batteries...

Page 15: ...Cable 18 DVD OPERATION INSTRUCTIONS 18 1 DVD Console Operation Press DISPLAY to bring up the Console Menu The Console function is only available in DVD DVD Audio DVD VR VCD discs and the display resul...

Page 16: ...selecting Menu Language Disc Audio Disc Subtitle Disc Menu setting Press key to adjust Press Enter to con rm the selection Photo 2 18 4DVD Display Setup Press SETUP key until the screen displays as p...

Page 17: ...movie in the smaller portion of the screen And the movie might appear with black bars at the top and bottom of the screen Panscan This image option refers to pictures where the left and right edges o...

Page 18: ...frequency is selected the unit will automatically convert the 96KHz signal into the 48KHz signal and then your system will be able to execute the decoding on the signals On the other hand if the recei...

Page 19: ...is only valid after the disc eject operation is performed following the parental lock setting Password item is used to set the new password or change the old password Before you enter into the item t...

Page 20: ...he respective descriptions of ON and OFF option of the PBC function Auto Play item provides 2 options ON and OFF When the option is set as ON the auto play function will be activated The DVD player wi...

Page 21: ...of the antenna are not correctly plugged in The remote control does not work Please check the batteries are inserted correctly Check that the IR of the remote control is not hidden by something No so...

Page 22: ...Standard antenna socket 75 Audio Output L R 3W 3W VGA Input 800 x 600 60HZ Input RGB 0 7 VP P 75 VIDEO CVBS 1 0 Vp p 75 RCA AV Video 1 0 VP 75 Audio 20 K RCA Output VIDEO 1 CVBS 1 0 VP P 75 RCA AUDIO...

Page 23: ...Manual 20LDVD05 indd Sec1 20 Manual 20LDVD05 indd Sec1 20 12 07 2005 11 43 17 AM 12 07 2005 11 43 17 AM...

Reviews: