WinFast CarePhone Quick Installation Manual Download Page 16

The SoftPhone allows you make calls by using different 
methods to enter a number.

Leadtek SoftPhone can dial to a phone number or an IP address.

Dialing to a phone number


(Proxy Mode)

1. In Proxy Mode, You need to register to the SIP Server with a VOIP 
account. Only after registration can you talk to other VOIP users in the 
SIP Server. The VOIP account can be 
found on the CD sleeve.

2. Before making a call, please make sure 
Leadtek SoftPhone registration indicator is 
green.

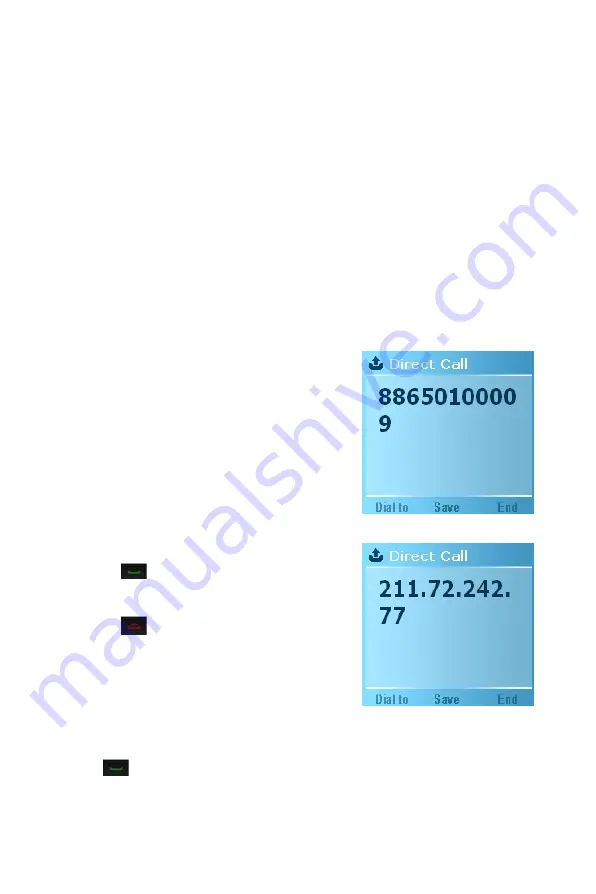
3. Input the phone number of the VoIP 
account with the keyboard or you can use 
mouse to click the number keypad on the 
screen. (Fig. 3)

4. Click          to start dialing, and you will 
hear ring tones.

5. Click          to end the call.

Dialing to an IP address (Peer-to-Peer)

1. When entering an IP address, you have 
to use "." on the keyboard. (Fig. 4)

2. Use keyboard to enter the IP address of the user you want to call. 
Click          to start dialing, and you will hear ring tones.

3 Making a Call

Fig. 3

Fig. 4

Summary of Contents for CarePhone

Page 1: ...nFast CarePhone For other advanced functions or information related to the product please read the complete user manual on the CD Or you can visit our website for the detailed product information Thank you for buying WinFast CarePhone Please read this guide carefully as the following chapters will take you through the installation and network configuration of WinFast CarePhone Please contact our t...

Page 2: ...t CarePhone to the same network device Fig 1 2 Procedure Step 1 Connect the included DC 5V power adapter to the power connector of WinFast CarePhone Plug the other end of the power cord into the wall outlet 110V 240V Fig 1 3 Step 2 When the WinFast CarePhone is connected for power the yellow indicator on the white button will light up 10 20 seconds later a blue indicator on WinFast CarePhone will ...

Page 3: ... 255 255 0 Click OK Fig 1 7 If the DNS server addresses are filled please clear them Return to the previous screen and click OK to complete the TCP IP configuration Step 4 Click Start Run and type cmd Click OK to make sure if the computer has the correct IP address Fig 1 8 In the MS DOS window type ipconfig and press ENTER The command will display the IP address Subnet mask and gateway Choose Use ...

Page 4: ...e Fig 1 9 Step 5 This program can also be used if you install the product in a DHCP environment In the same local area network using the IIAP program can locate the default IP address of WinFast CarePhone which is a fixed IP address http 192 168 0 100 The rest of the network information will be displayed in the IIAP window Note IIAP can only be used to locate WinFast products Follow the steps belo...

Page 5: ...and choose Internet Properties Click the Connection tab and click LAN settings Make sure no items are checked in the LAN settings window Click OK and click OK again Login to WinFast CarePhone configuration screen and start setting up network connection Launch Internet Explorer type http 192 168 0 100 in the address bar and press ENTER Fig 1 11 Input Username and Password as follows Username admin ...

Page 6: ...e below the address bar Click the message below the address bar and choose Install ActiveX Control Fig 1 14 Fig 1 13 Fig 1 14 Note If the firewall in your computer is enabled you will see a security alert Please choose Unblock Fig 1 15 Click Install to begin downloading Fig 1 16 Fig 1 15 Fig 1 16 ...

Page 7: ...d Password after you login for the first time and after you download ActiveX Control Step 8 A Main Menu System Network Camera User Management System Info System Log B Submenu Choose the related functions of the items in the main menu C Settings Modify the configurations of the functions When the installation is completed the image will be displayed in the browser A B C Fig 1 17 ...

Page 8: ...inFast_CarePhone_PC_UserManual_B5 For the detailed descriptions of all the parameters and functions of the product please refer to Leadtek_WinFast_CarePhone_PC_UserManual_B5 For troubleshooting including the problems during installation please refer to Leadtek_WinFast_CarePhone_PC_UserManual_B5 ...

Page 9: ...CarePhone Follow the steps below to directly connect WinFast CarePhone to the computer Network type 1 Direct connection to computer Fig 2 1 WinFast CarePhone can be directly connected to the computer with a Cross Over cable This connection can be used for testing or initializing purposes Procedure 1 Connect the cross over cable to WinFast CarePhone 2 Connect the free end of the cross over cable to...

Page 10: ...lug the power cord into the wall plug 5 If the network is correctly connected the LED will light blue Network type 3 Connecting to the ADSL Cable Modem Fig 2 3 Follow the steps below to connect WinFast CarePhone to the xDSL Modem Procedure 1 Connect the Ethernet cable to WinFast CarePhone 2 Connect the free end of the Ethernet cable to Cable Modem or xDSL ADSL Modem 3 Connect the power cord to Win...

Page 11: ...rePhone and optimizing the proxy server The downloading process is encrypted and is updated through the Internet Enabling APS will manage the phone number of WinFast CarePhone and the network configuration of the server more effectively Just choose the appropriate IP address type in the built in web page of WinFast CarePhone and APS will save you a lot of troubles for setting up the system informa...

Page 12: ...the power to avoid download failures Downloading APS will take 20 30 seconds depending on the network speed After APS is successfully downloaded the system indicator yellow will stop blinking Go to the WinFast CarePhone homepage to reboot the unit or use the RESET button on the back to manually restart the unit After reboot APS will start working You can choose System Info in the main menu of the ...

Page 13: ...ed calls Show Detail calls Call Display Minimize and Close Keys Phonebook Setting Button Hang up Button My Account Dial Button Answer Button Registration status Numeric Keypad Webcam Button Mute Button Volume Button REC Button Snapshot Button Viewer Button Adjust View Button Details Button Add contact menu Minimize screen Maximize screen Close screen ...

Page 14: ...hone as shown in Fig 1 1 Input the Username Password as printed on the label 2 You can find 2 free accounts on the CD sleeve For example 88650100000 is the password The Password is printed after P W as shown in Fig 2 Login Errors You may encounter some common errors 1 Unable to start SoftPhone Please check the network connection of the computer 2 SoftPhone registration failed Make sure you input t...

Page 15: ...e the network connection is working before you can make a call 4 The login procedure will be authenticated by the Username Password you entered After registration you will be able to make calls 5 You have to enter all the required information and the SoftPhone will attempt to login to the server After authentication succeeds SoftPhone registration status will be indicated by a green circle which m...

Page 16: ...he CD sleeve 2 Before making a call please make sure Leadtek SoftPhone registration indicator is green 3 Input the phone number of the VoIP account with the keyboard or you can use mouse to click the number keypad on the screen Fig 3 4 Click to start dialing and you will hear ring tones 5 Click to end the call Dialing to an IP address Peer to Peer 1 When entering an IP address you have to use on t...

Page 17: ... calls Select a number from the phonebook Fig 5 Select a number from the calls log Fig 6 Modifying the number When you enter the wrong number you can use the Backspace key on the keyboard to erase a number or you can click to clear the entire number Fig 5 Fig 6 ...

Page 18: ...l the screen will look like Fig 7 2 When there is an outgoing call the screen will look like Fig 8 3 During a call the screen will look like Fig 9 4 Click to answer the call 5 Click to end the call When SoftPhone stays resident in the system tray and there is an incoming call SoftPhone will pop up and displays the call Fig 7 Fig 8 Fig 9 ...

Page 19: ...w Inbox option to view all calls that have been received Show Outgoing Calls To view all outgoing calls select the tab and select the Show Outbox option to view all calls that have been received Show Missed Calls To view all missed calls select the tab and select the Show MissCalls option to view all calls that have been missed Delete All To delete all call logs select the tab and select the Delet...

Page 20: ...group click the tab select the Display by Group option to sort the information New Contact To add new contact click the tab select the New Contact option to create a new entry item and enter the following information for the contact Name Phone Number Group Icon New Group To add new Group for each contact click the tab select the New Group option to create a new group Delete Item To delete a contac...

Page 21: ...wing items IP Input the IP address of the contact Password If the contact uses SoftPhone you don t have to input password If the contact uses Port Input port number by contact opened range Connect Mode Choose different connection method with your contact network service provider STUN Enable or disable the option while your network environment is behind NAT router ...

Page 22: ...der Fixed IPAddress 59 120 139 66 Internet Service Provider Fixed IPAddress 61 64 12 138 Service Provider ADSL Cable Modem Router NAT PPPoE Internet Service Provider ADSL Cable Modem Router NAT PPPoE Examples For Advanced Settings The following examples show how Leadtek SoftPhone users call WinFast CarePhone users Tunneling Peer to Peer SIP Server ...

Page 23: ... or the handset during your call During call press to increase volume to decrease volume Monitor Switching Button Click to cycle through local remote both images Recording Button Simply press the button and your call video and audio will be recorded as an AVI file in the folder The screen would be printed in REC characters Snapshot Button Simply press the button to capture both of local and remote...

Page 24: ...nfigure A routine was added to the software initialization for auto configuration We recommend you not to modify SIP proxy setting to prevent personal customization being lost Language English Traditional Chinese Simplified Chinese Japanese Network Card Configuration of real or virtual network interfaces Phone Setting Auto Answer Enable to set your SoftPhone to Auto answer mode Sound Effect Enable...

Reviews: