

Wine Storage Cubes
Assembly GUIDE
Page 2
or visit
wineracksamerica.com
Questions?
888.373.6057
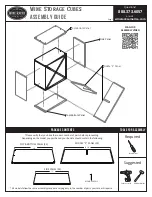
1. Find an open, flat area in which to work. Carefully remove all components from the box and remove banding or
protective wrapping. Check the parts list to verify package contents.
2. Using the included hardware, screw both side frame panels into the notch on the bottom frame panel. Once
attached repeat the process for the top frame panel. (figure 1)
1
BUILD BOX
FRAME
Assembled Box Frame
* Minimize the risk of splitting the wood by drilling a 1/16" pilot hole before driving the wood screws.
For best results, drive the screw most of the way in with your drill, then finish tightening by hand.
3. Lay the assembled frame flat on the ground. Insert the first Middle "X" panel into the assembled frame with the
notch facing upward. (figure 2)
4. Insert the remaining "X" panel into the frame by matching up the notches and sliding down into place. (figure 3)
* DO NOT FORCE! Carefully work the "X" panels into place until they settle flush with the frame. If necessary,
use a rubber mallet to lightly tap it into place.
2
INSERT FIRST
"X" PIECE
3
INSERT SECOND
"X" PIECE
Fully Assembled Wine Cube
5. Stand your rack upright and that’s it! Repeat this assembly process for any remaining cubes. Stack cubes in any
configuration you like once they are assembled.


