


Assembly GUIDE
or visit
wineracksamerica.com
Questions?
888.373.6057
Table Top Racks
Page 2
1. Find an open, flat area in which to work. Carefully remove all components from the box and remove banding
with a utility knife. Check the parts list to verify package contents.
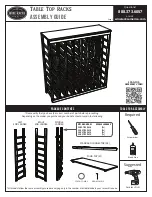
2.
Arrange the end ladders on the floor so that the angled bottle supports face the ground. Align the large gaps on each
end ladder. The end with the larger gap is the top of your rack. Attach a standard column connector to the top and
bottom of your rack using the screws provided. Make sure the connectors are flush with the top and bottom of your
rack. (figure 1)
Top of rack
1
BEGIN WITH BACK
OF RACK
3. Insert the middle ladders and finish securing the top & bottom connectors using the screws provided. Make sure
that the angled bottle supports are facing the ground. (figure 2)
2
FINISH SECURING BACK
CONNECTORS


