background image

22

Maintenance

Batteries

The batteries provide the power to operate the 
machine. The batteries require regular maintenance to 
keep them operating at peak efficiency. 

The machine batteries will hold their charge for long 
periods of time, but they can only be charged a certain 
number of times. To get the greatest life from the 
batteries, charge them when their charge level reaches 
25% of a full charge. Use a hydrometer to check the 
charge level.

Do not allow the batteries to remain in a discharged 
condition for any length of time. Never expose a 
discharged battery to temperatures below freezing. 
Discharged batteries will freeze causing cracked 
cases. Do not operate the machine if the batteries are 
in poor condition or if they have a charge level below 
25% (specific gravity below 1.155).

Keep all metallic objects off the top of the batteries, as 
they may cause a short circuit. Replace worn or 
damaged cables and terminals.

Check the electrolyte level in each battery cell before 
and after charging the batteries. Never add acid to the 
batteries, use distilled water. Do not allow water level to 
fall below the battery plates. Portions of plates exposed 
to air will be destroyed. Do not overfill. Keep plugs 
firmly in place at all times.

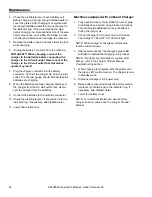
When servicing machine, avoid contact with 
battery acid.

Lors de l'entretien de la machine, évitez tout 
contact avec l'acide de batterie.

Batteries emit hydrogen gas. Explosion or fire can 
result. Keep sparks and open flame away. Keep 
covers open when charging.

Les batteries émettent du gaz hydrogène. Une 
explosion ou un incendie peut en résulter. 
Maintenez les étincelles et les flammes nues à 
l’écart. Gardez les carters ouverts lors du charge-
ment.

Wear eye protection and protective clothing when 
working with batteries.

Portez des lunettes de protection et des vêtements 
de protection lorsque vous travaillez avec des 
batteries.

Charge batteries in a well ventilated area.

Chargez les batteries dans un endroit bien ventilé

Battery Maintenance

1.

When cleaning the batteries, use a solution of 
baking soda and water. Do not allow the cleaning 
fluid to enter the battery cells, electrolyte will be 
neutralized.

2.

Maintain the proper electrolyte level in each battery 
cell. If a cell should accidentally overflow, clean 
immediately.

3.

Wipe off the top of the batteries at least once a 
week.

4.

Test battery condition with a hydrometer at least 
once a week.

5.

Ensure that all connections are tight and all 
corrosion removed.

6.

Every 4 to 6 months, remove that batteries from 
the machine and clean the battery cases and 
battery compartment.

86400640 Operator’s Manual - Saber Compact 20

Summary of Contents for SC20 10052190

Page 1: ...k Behind Scrubber Operating Instructions ENG MODELS SC20 10052190 SC20T 10052200 SCX20T 10052370 SCC20 10052230 SCC20T 10052240 SCXC20T 10052420 From Serial Number Ref No1 See Serial Number Page in Sp...

Page 2: ...ster your product go to http warranty karcherna com For customer assistance 1 800 444 7654 2 86400640 Operator s Manual Saber Compact 20 Machine Data Label Overview The Saber Compact is a battery powe...

Page 3: ...y Stop Procedures 19 Filling Solution Tank 19 Normal Scrubbing 19 Emptying And Cleaning Tanks 21 Solution Tank 21 Maintenance Batteries 22 To Charge The Batteries 23 Changing Batteries 26 Scrub Brushe...

Page 4: ...hazardous or unsafe practices of the machine Levels of hazards are identified that could result in product damage personal injury or severe injury resulting in death The OPERATIONS section is to famil...

Page 5: ...hops and offices for more than normal housekeeping purposes Maintenance and repairs must be done by qualified personnel If foam or liquid comes out of machine switch off immediately Disconnect battery...

Page 6: ...s bureaux les cha nes de magasin que pour un usage domestique normal L entretien et les r parations de la machine doivent tre effectu es par un personnel qualifi Si de la mousse ou du liquide sort de...

Page 7: ...ow when these conditions can exist Locate all safety devices on the machine Please take the necessary steps to train the machine operating personnel FOR SAFETY DO NOT OPERATE MACHINE Unless Trained an...

Page 8: ...enir Rep rer tous les dispositifs de s curit sur la machine Suivre les tapes n cessaires de formation du personnel qui utilise la machine POUR DES RAISONS DE S CURIT NE PAS FAIRE FONCTIONNER LA MACHIN...

Page 9: ...sch mas ci dessous indiquent l emplacement des plaques de s curit Si les plaques deviennent illisibles les remplacer imm diatement REMARQUE Les sch mas ci dessous indiquent l emplacement des plaques d...

Page 10: ...pty without batteries non traction model 213 lbs 96 1 kg Weight empty without batteries traction model 232 lbs 105 3 kg Solution Control non traction model Gravity feed fully variable Solution Control...

Page 11: ...r vu l usage des personnes enfants y compris avec des possibilit s physiques sensori elles ou mentales r duites ou le manque d exp rience et de connaissance moins qu ils aient t donn s la surveillance...

Page 12: ...drive hub allows the scrub brush to follow irregularities and changes in the floor without loosing contact with floor The self adjusting scrub deck skirt controls the cleaning solution on the floor so...

Page 13: ...overy Tank Drain Hose 5 Scrub Head 6 Scrub Brush Access Cover 7 Solution Tank 8 Solution Tank Cover 9 Solution Tank Drain Hose 10 Solution Strainer 11 Solution Tank Support Arm 12 Squeegee 13 Vacuum M...

Page 14: ...on 1 Brush Switch 2 Brush Lift Lever 3 Vacuum Switch 4 Squeegee Lift Lever 5 Solution Control Lever 6 Battery Charge Level Indicator 7 Hour Meter Optional 8 Circuit Breakers 3 1 6 8 7 5 2 4 86400640 O...

Page 15: ...batteries The meter display is divided into 10 vertical bars Bars illuminated on the far right indicate full charge Bars flashing near the left side indicate the batteries should be recharged Further...

Page 16: ...h 5 Squeegee Lift Lever 6 Key Switch 7 Propel Buttons Normally Forward 8 Reverse Propel Button 9 Speed Control Knob 10 Battery Charge Level Indicator 11 Emergency Shut Off Switch Optional 12 Hour Mete...

Page 17: ...lever from its lowered position and lock into highest notch 4 Vacuum Switch Controls the vacuum motor To start vacuum motor press the top of the switch To stop vacuum motor press the bottom of the sw...

Page 18: ...d then reconnected After a few minutes of operation the meter will give the correct charge level 11 Emergency Shut off Switch Optional Shuts off machine To shut off machine push the switch To restart...

Page 19: ...ing solution The solution tank capacity is 13 gallons 50 liters The water must not be hotter than 140 F 60 C to prevent damage to the tank 4 Measure the chemical into the solution tank Liquid chemical...

Page 20: ...topping scrubbing Solution flow is automatically shut off when the brush motor stops When the brush motor is activated flow will automatically resume To Stop Scrubbing 1 Release the directional contro...

Page 21: ...in hose in the bracket Recovery Tank 1 Unhook the large drain hose from the retainer Unscrew the T handle on the plug enough to loosen it then lower the hose in the direction of the drain Do not stand...

Page 22: ...plugs firmly in place at all times When servicing machine avoid contact with battery acid Lors de l entretien de la machine vitez tout contact avec l acide de batterie Batteries emit hydrogen gas Expl...

Page 23: ...les tincelles et les flammes nues l cart Gardez les carters ouverts lors du charge ment Wear eye protection and protective clothing when working with batteries Portez des lunettes de protection et de...

Page 24: ...tteries 9 Connect the batteries to the machine connector 10 Check the electrolyte level It should be up to the indicator ring If necessary add distilled water 11 Lower the solution tank Machines equip...

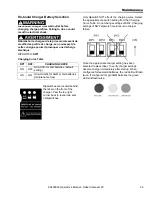
Page 25: ...of dipswitches Only dipswitch SW1 effects the charging curve Select the appropriate dip switch setting from the Charging Curve Table Do not change settings of SW2 Changing settings of SW2 dipswitch co...

Page 26: ...erminal away from batteries 5 Disconnect main positive lead and secure cable terminals away from batteries 6 Loosen both terminals on jumper cable and remove 7 Prepare a suitable site to place the bat...

Page 27: ...ty of applications on coated or uncoated surfaces White Pads Polishing are used for dry polishing to achieve a high gloss appearance or surface washing on highly polished or burnished floors Red Pads...

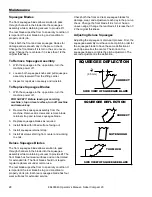
Page 28: ...g out 5 Install squeegee retainer strap 6 Install all screws starting from center and working to ends Deluxe Squeegee Blades The front squeegee blade allows solution to pass through channels in the bl...

Page 29: ...deflection turn the knob counter clockwise NOTE The deflection should be consistent along the length of the squeegee If the deflection varies from end to end the knobs can be adjusted independently t...

Page 30: ...to allow the tank to dry Check scrub deck splash skirt Check batteries for corrosion cracks and evidence of overheating Check all bearings for noise Check all gaskets for wear and leakage Check vac mo...

Page 31: ...covery tank Circuit breaker tripped Reset circuit breaker Loose connection Check motor wires and connec tions Faulty vacuum contractor Replace contactor Worn vacuum motor brushes Replace brushes check...

Page 32: ...er to machine Battery disconnected Check all battery cable connec tions Emergency shut off activated traction model only Reset Battery connections corroded Clean connections Faulty main contactor Repl...

Page 33: ...33 Notes 86400640 Operator s Manual Saber Compact 20...

Page 34: ...34 Suggested Spare Parts Standard 86400640 Operator s Manual Saber Compact 20...

Page 35: ...35 Suggested Spare Parts Deluxe 86400640 Operator s Manual Saber Compact 20...

Reviews: