Windsor Recover 7 Service Manual Download Page 15

Español

 15

„

Si al desembalar el aparato comproba-
ra Vd. algún daño o desperfecto en el 
mismo atribuible al transporte, rogamos 
se dirija inmediatamente al distribuidor 
en donde adquirió el aparato.

„

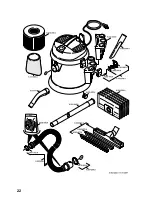
Extraiga la totalidad de las piezas y ac-
cessorios del aparato que se encuen-
tran en el recipiente del mismo o en la 
caja de cartón del embalaje.

„

El aparato no es aspropiado para la as-
piración de polvos nocivos para la sa-
lud, como por ejemplo amianto. Para 
este tipo de aplicaciones deberá poner-
se en contacto con su Distribuidor o la 
Delegación Nacional de Windsor.

„

El aspirador sólo se deberá conectar a 
tomas de corriente instaladas correcta-
mente y provistas de una puesta a tie-
rra reglamentaria. Los datos necesarios 
para el fusible de la red figuran en el 
apartado <<Características Técni-
cas>>.

En caso de utilizar herramientas eléctricas 
acopladas al aparato, deberán observarse 
estrictamente todas las normas de seguri-
dad básicas, a fin de prevenir cualquier 
riesgo de incendio, descargas eléctricas o 
daños o lesiones del personal encargado 
de manipular los mismos: Esta aspiradora 
está diseñada para uso comercial.
1 DESCONECTE LA ASPIRADORA DEL 

CIRCUITO DE ALIMENTACIÓN antes 
de quitar la tapa, antes de realizar tra-
bajo de mantenimiento y cuando no la 
esté utilizando.

2 NO DEJAR EL APARATO sin vigilan-

cia, mientras esté enchufado.

3 SIEMPRE VERIFIQUE QUE EL CA-

BLE ELECTRICO no esté dañado o 
desperfecto antes de usar la Aspirado-
ra.

4 NO TIRE (Jale) O LLEVE LA ASPIRA-

DORA POR EL CABLE ELECTRICO. 
Tampoco debe pellizcarlo con una 
puerta o estirarlo por ningún canto (bor-
de) agudo.

5 NO EXPONGA EL CABLE A LO CA-

LIENTE NI A ACEITES. Para prevenir 
un tropiezo, no deje el cable suelto des-
pués de usarlo.

6 NO PASE LA ASPIRADORA POR EN-

CIMA DEL CABLE DE ALIMENTA-
CIÓN.

7 PONGA EL SELECTOR EN LA POSI-

CION DE <<OFF>> antes de desen-
chufar la Aspiradora.

8 NO DESENCHUFE EL CABLE DE UN 

TIRON (Jalón). Para desenchufarle 
agarre la clavija (enchufe) no el cable.

9 NO AGARRE LA CLAVIJA (ENCHUFE) 

CON LAS MANOS MOJADAS.

10 EL CABLE ELECTRICO (O LA CLAVI-

JA) sólo debe ser reemplazado por un 
representante de un Centro de Servicio 
Autorizado. SE NINGUNA MANERA 
DEBE INTENTAR LA REPARACION 
DEL CABLE ELECTRICO.

11 PARA PREVENIR CHOQUES ELEC-

TRICOS, no exponga la herramienta a 
la lluvia. Guárdela en un luger seco.

12 SOLO USE LA ASPIRADORA COMO 

ESTA RECOMENDADO EN ESTE MA-
NUAL. También use únicamente los ac-
cesorios recomendados.

13 MANTENGA ALEJADOS EL CABE-

LLO (PELO), ROPA, ALHAJAS SUEL-
TAS, DEDOS o cualquier otra parte del 
cuerpo, de las aberturas y partes móvi-
les de la máquina.

14 NO CUBRA NI OBSTRUYA LAS 

ABERTURAS. Mantenga las aberturas 
libres de pelusa, pelo, polvo y cualquier 
cosa que limite la circulación del aire.

ADVERTENCIAS IMPORTAN-

TES

ANTES DE LA PRIMERA 
PUESTA EN MARCHA DEL APARATO 
DEBERÁN OBSERVARSE LOS SIGUIEN-
TES PUNTOS.

Summary of Contents for Recover 7

Page 1: ...English 3 Fran ais 9 Espa ol 15 Recover 7 5 962 243 0 2015954 01 07...

Page 2: ...2 1 2 1 1 2 3 4 1 2 1 5 6 7 8 9...

Page 3: ...hould only be replaced by an authorized serv ice center representative DO NOT AT TEMPT TO REPAIR POWER CORD 11 TO AVOID SHOCK do not expose to rain Store indoors 12 USE ONLY AS RECOMMENDED BY THIS MAN...

Page 4: ...rovided instead of grounding No grounding means is provid ed on a double insulated machine nor should a means for grounding be added to the machine Servicing a double insulated machine requires extrem...

Page 5: ...Accessories and Spare Parts 8 The machine is meant for dry and wet cleaning of floors and walls This machine is suited for the commer cial use e g in hotels schools hospi tals factories shops offices...

Page 6: ...the pa per filter bag 2 Release and remove the vacuum head Turn the vacuum basket by 180 and keep it aside Loosen nut 3 Remove the cartridge filter 1 Insert the nut 3 and tighten it Install the additi...

Page 7: ...ing First remove the main plug before doing any job on the vacuum cleaner Release and remove the vacuum head Turn the vacuum basket by 180 and keep it aside Loosen nut 3 Remove the cartridge filter 1...

Page 8: ...cartridge filter Only use accessories and spare parts which have been approved by the man ufacturer The exclusive use of original accessories and original spare parts ensures that the machine can be...

Page 9: ...eil 8 NE PASTIRER SUR LE CORDON POUR D BRANCHER l appareil Tirer sur la prise 9 NE PAS SAISIR LA PRISE AVEC DES MAINS MOUILL ES 10 SI LE CORDON OU LA PRISE EST AB M le faire remplacer par un agent d u...

Page 10: ...LANT Ne pas utiliser l aspirateur quand on est fatigu ou apr s avoir pris de la drogue de l alcool ou des m dicaments Dans un appareil double isolation deux isolations distinctes remplacement la mise...

Page 11: ...reil est destin au nettoyage sec et au nettoyage par voie humide des sols et des murs Cet appareil convient un usage indus triel par exemple dans le cadre d h tels d coles d h pitaux d usines de magas...

Page 12: ...on de salet s humides il convient de toujours d monter le sa chet filtre en papier 2 D verrouiller et retirer la t te d aspira tion Faire tourner la t te d aspiration de 180 et la d poser D visser l c...

Page 13: ...rvoir collecteur Nettoyer l appareil en l aspirant et en l essuyant l int rieur et l ext rieur Entreposer l appareil dans un endroit sec et le s curiser contre toute utilisa tion non autoris e Avertis...

Page 14: ...uche filtrante V rifier le positionnement de la cartou che filtrante Remplacer la cartouche filtrante Utiliser uniquement des accessoires et des pi ces de rechange autoris s par le fabricant Des acces...

Page 15: ...cia mientras est enchufado 3 SIEMPRE VERIFIQUE QUE EL CA BLE ELECTRICO no est da ado o desperfecto antes de usar la Aspirado ra 4 NO TIRE Jale O LLEVE LA ASPIRA DORA POR EL CABLE ELECTRICO Tampoco de...

Page 16: ...ha ca do en el agua m ndela o ll vela a un representante de servicio autorizado para que el mismo verifique su funcio namiento 23 SIEMPRE USE PROTECCION PARA LOS OJOS cuando opere la Aspirado ra 24 U...

Page 17: ...aparato est dise ado para la limpie za de pisos y superficies murales Este aparato es apto para el uso en aplicaciones industriales como en ho teles escuelas hospitales f bricas tiendas oficinas y neg...

Page 18: ...a aspirar suciedad l quida se debe retirar la bolsa filtrante de papel 2 Desbloquear y extraer el cabezal de as piraci n Girar el cabezal de aspiraci n 180 y depositar Desatornillar la tuerca 3 Retira...

Page 19: ...ador de sucie dad Vac e el dep sito acumulador de sucie dad Limpie el aparato por dentro y por fuera aspir ndolo y enjuag ndolo Coloque el aparato en un cuarto seco y prot jalo frente a un uso no auto...

Page 20: ...artucho Comprobar si el cartucho de filtro est montado correctamente Cambiar el filtro de cartucho S lo deben emplearse accesorios y piezas de repuesto originales o autori zados por el fabricante Los...

Page 21: ...A I nom 10 A 7 0 gal 27 l 3 7 gal 14 l max 142 CFM 67 l s max 2000 mm 19 6 kPa 16 5 in x 16 5 in x 20 5 in 420 mm x 420 mm x 525 mm V EN 60704 2 1 16 5 lbs 7 5 kg C DN C ID 1 38 in 35 mm II max 104 F...

Page 22: ...22...

Page 23: ...of operation whichever comes first to the ori ginal end user Parts replaced or repaired under this warranty are guaranteed for the remainder of the original warranty period See table below Service lab...

Page 24: ...purchase date The warranty com mences on the purchase date by the origi nal end user from an authorized Windsor agent subject to proof of purchase The Machine Registration Card must be com pleted and...

Page 25: ...nties are handled directly with the manufacturer Trojan batteries and Lester char gers 9 High pressure washing 10 Electrical components exposed to moisture If difficulty develops during the warranty p...

Reviews: