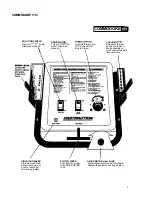
COMMODORE
THE
COMMODORE
FILL SOLUTION TANK
to
the desired
according
to
the marked gauge
inside the tank.
CAUTION:
If a bucket
used
to
fill the tank, be sure that it
Is clean.
CAUTION:
To avoid oossible distortion
of polyethylene
tanks,
DO NOT USE WATER TEMPERATURE
THAT EXCEEDS
150°F
(65°C).
ARE
PREFERRED,
however if a powdered detergent is
used, be sure
it
is fully dissolved
BEFORE
putting
it
in the solution tank.
Do
this by dissolving it in a bucket
containing about
1
gallon of hot water
before emptying it into the solution tank.
You will find a
1
cup (8
measure
on the bottom of the solution tank lid
to
assist you in making the proper
dilution of cleaning chemical and water.
WARNING:
Do not put defoamer.
solvents, spotter or prespray chemicals
in the solution tank.
CHEMICALS
The internal parts of the pump used in
the extractor is suitable for use with
most carpet cleaning chemicals. But it
is susceptible
to
chemical attack from
some cleaning substances, such as
hydrocarbon solvents and chlorinated
These noncompatible materials
are not of the type normally used for
carpet cleaning,
SUITABLE
CHEMICALS
CHEMICALS
Aldehydes
Clomx
Bleach’
Hydrocarbons
Agents
But
Detergents
Tetrachloride
Hydroxides
Oxygen
Bleaches
Chlorinated
Bleaches
soaps
Chlorinated
Hydrocarbons
Softener’
1
Vinegar
(MEK)
White Monday Bleach’
Phenols
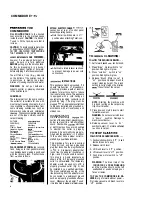
PLACE RECOVERY DOME
atop recovery
tank, being sure that gasket material
is undamaged and making a good seal
with the recovery tank. Connect hose
from
shoe
to
dome.
1.
4
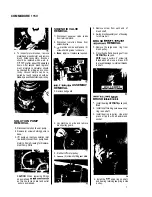
ATTACH ELECTRIC CABLE
connection at rear of control panel
beneath operating handle.
.
Note that all switches are in
“off”
position when attaching Twist-Lok.
.
Attach cable strain reliever as shown
to
prevent damage
to
power cord
connections.
INSTRUCTIONS
This appliance must be grounded. If
it
should malfunction or breakdown,
grounding provides a path of least re-
sistance for electric current
to
reduce
the risk of electric shock. This appliance
is equipped with a cord having an
equipment-grounding conductor and
grounding plug. The plug must be
plugged
an appropriate outlet that
is properly Installed and grounded
accordance with all local codes and
ordinances.
WARNING;
con-
nection of the equipment-grounding con-
ductor can result in a risk
of
electrical
shock. Check with a
electrician
or
person if you are in doubt
as
to
whether the outlet is properly
grounded. Do not modify the plug pro-
vided with the appliance
-
it
will not
fit the outlet, have a proper outlet in-
stalled by a qualified electrician.
This machine is for use on a nominal
120-volt circuit, and has a grounded
plug that looks llke the plug illustrated
In
A.
A
temporary adapter that
looks like the adapter illustrated in
Figs. and C may be used to connect
this plug to a 2-pole receptacle as
shown in Fig. B if a properly grounded
outlet is not available. The temporary
adapter would be used only
a
properly grounded outlet (Fig.
A)
can
be installed by a qualified electrician.
The green colored
ear, lug, or the
llke extending from the adapter must
be connected to a permanent ground
such as a properly grounded outlet
cover. Whenever the adapter
used,
it
must be
in
TO
CLEAWINQ:
FOLLOW THE SEQUENCE BELOW.
.
.
1. Set
forward speed
control knob.
2.
Press
“drive” motor switch
to “on”
position. Red light will glow.
3.
Press “solution” switch
to
“on”
position. Red light will glow.
4.
Release “Brush Motor Lever”
to
“on” position and adjust brush to
correct cleaning height. The brush
setting Is correct when the bristles
the surface of the carpet.
NOTE:
Starting the machine with
dry bush resting on the carpet may
trip circuit breaker.
5.
Press down on clutch lever to start
forward movement.
WARNING:
Do not secure clutch lever
in “down” position. Damage
to
machine could occur.
6. Release vacuum lever to “on”
position
to
start
motor
and
lower
shoe
to
carpet.
TO
STOP
FOLLOW THE SEQUENCE BELOW
.
. .
1.
Push solution switch
to
“off”
(2
or
3
2.
Release clutch lever.
3.
Lift brush lever
to
“off” position.
Lift vacuum lever to “off” position.
5.
Push drive motor switch
to
”off”
position.
WARNING:
The drive train of the
COMMODORE is
FREE WHEELING
and the machine should not
be
left
unattended or used on sloping sur-
faces or ramps.
feet before end
of pass.)
TO PULL THE COMMOOORE IN RE-
VERSE,
or go forward without power
...
first raise vacuum and brush levers
to
“off” position.
’
Summary of Contents for COMMODORE CMD
Page 11: ...COMMODORE 115V CONTROL PANEL ASSEMBLY I COMMOOOAE CONTROL PANEL ...
Page 12: ...2 CHASSISWIDRIVE ASSEMBLY ...
Page 14: ...COMMODORE 1 15V 14 ...
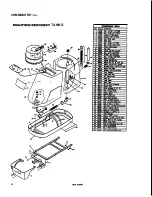
Page 16: ...COMMODORE 115V SQtUTION RECOVERY TANKS 16 ...
Page 18: ...COMMODORE 115V CONTROL PANE1 WIRING DIAGRAM 230VOLT CHASSIS WIRING DIAORAM 230 VOLT A I8 i 18 ...


