WimTec SanTec FLUSH SLK Installation & Operating Instructions Manual Download Page 2

2

GB

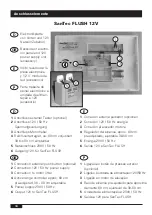
Berührungslose Infrarot 

WC-Steuerung zur vollauto-

matischen sowie manuellen 

Steuerung von SanTec SLK 

UP-Spülkästen. Sowohl zur 

Neumontage auf SanTec 

FIX WC Montageelementen 

(Art.Nr. 102 918 bzw. 103 

076) als auch für Nachrüstung 

durch Batterievariante geeigt-

net. Vollautomatische Spülung 

beim Verlassen des WC’s 

bzw. durch Annäherung der 

Hand, (berührungslos) wahl-

weise mit Zwischenspülung 

alle 10 min. (abschaltbar) für 

Behindertenbereiche, sowie 

manuelle Spülung durch 

Drückertaste möglich.

Bestehend aus:

Elektronikplatte mit inte-

griertem Infrarotsensor, 

manueller Betätigungstaste, 

Lagerbock mit integriertem 

Motorheber, Montagerahmen 

und Befestigungsmaterial.

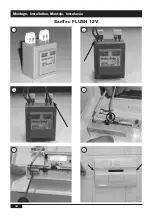
Die Montage und Installation 

darf nur durch einen konzessi-

onierten Fachbetrieb, gemäß 

DIN 1988, ÖVE/ÖNORM 

E8000-1 sowie VDE 0100 Teil 

701 erfolgen. 

Batterien müssen fachge-

recht entsorgt werden. Mit 

ausgelaufenen Batterien 

nicht in Kontakt kommen 

und fachgerecht entsorgen. 

Batteriekontakte unbedingt 

reinigen.

Bei der Planung und Errichtung 

von Sanitäranlagen sind die 

entsprechenden örtlichen, 

nationalen und internationalen 

Normen und Vorschriften zu 

beachten!

Es gelten die „Allgemeinen 

Installationsbedingungen“ 

unter www.wimtec.com.

D

Installationshinweise

Notes on Installation

Non-contact infrared 

WC-control for automatical 

as well as for manual control 

of all SanTec SLK flushing 

cisterns. Suitable for mounting 

on SanTec FIX WC assembly 

elements (art.no. 102 918 or 

103 076) as well as for upgra-

ding with battery variant.

Fully automatical flushing after 

leaving the WC or by approa-

ching the hand to the infrared 

sensor (non-contact), optional 

intermediate flush every 10 

min. (can be deactivated) for 

handicapped areas. Also manu-

al flushing by integrated push 

button possible.

Consisting of:

Electronic plate with integrated 

infrared sensor, manual push 

button, clevis mounting with 

integrated motor lifter, moun-

ting frame and fixing material.

Mounting and installation must 

be performed by licensed 

craftsmen according to DIN 

1988, ÖVE/ÖNORM E8000-1 

as well as VDE 0100 part 701 

standards only.

Batteries have to be desposed 

professionally. Do not get in 

contact with leaked batteries. 

Battery contacts must be 

cleaned.

When planning and installing 

sanitary systems, the relevant 

local, national, and internatio-

nal standards and regulations 

must be complied with!

The „general installation con-

ditions“ at www.wimtec.com 

are valid.

Summary of Contents for SanTec FLUSH SLK

Page 1: ...Montage und Bedienungsanleitung DE Installation and operating instructions GB E Instrucciones para el montaje y el funcionamiento Guia de Instalação e instruções operação P FLUSH Spülkasten SLK ...

Page 2: ... und Vorschriften zu beachten Es gelten die Allgemeinen Installationsbedingungen unter www wimtec com D Installationshinweise Notes on Installation Non contact infrared WC control for automatical as well as for manual control of all SanTec SLK flushing cisterns Suitable for mounting on SanTec FIX WC assembly elements art no 102 918 or 103 076 as well as for upgra ding with battery variant Fully au...

Page 3: ...ões para a Instalação P Control retréte infrarrojo sin contacto para control automati co y control a mano para todos las cisternas de SanTec SLK Conveniente para montar en SanTec FIX WC elementos de montaje art nr 102 918 o 103 076 y tambien para revalorizar los mandos que funcionan a pila Descarga automatica completa despues de retirarse del retréte o por medio de acercar la mano al sensor infrar...

Page 4: ...ca 60 cm voreingestellt 30 70 cm einstellbar Nah Ansprechbereich ca 3 cm Spülmenge Automatik große Spülmenge Manuell kleine Spülmenge Zwischenspülung bei Dauerbenutzung erfolgt alle 10 min eine Spülung schaltbar Frontplatte B H T 245 x 165 x 25 mm Werkstoff Frontplatte ABS Kunststoff Oberflächen glanzchrom mattchrom weiß steel Zubehör Montageelement SanTec FIX WC mit Spülkasten SanTec SLK Art Nr 1...

Page 5: ... 250 x 165 mm Material de la placa ABS plastico Versiónes disponibles cromo mate cromo brillante blanco acero Accessorios Elemento de montaje SanTec FIX WC con zisterna SanTec SLK art nr 102 918 standard art nr 103 076 con absorbción de olor Operating voltage via transformer 230 V 50 Hz 12 V 50 Hz Art No 112 672 Power consumption approx 1 VA peak approx 15 VA Supply line 2 x 1 mm Length of connect...

Page 6: ...justado Ajustável de 30 70 cms Descarga manual Descarga sem contacto por aproximação da mão via reflexo do sensor de IV ou através de pressão do botão de descarga Descarga automática Após utilização tempo minímo de permanência de 15 segs apenas nos programas 2 e 3 Descarga intermédia Cada 10 min apenas no programa 3 Painel frontal 250 x 165 mm Material do painel frontal ABS plastic Acabamentos dis...

Page 7: ...Art Nr 232 158 Zubehör Accessorie Netzteil 230V 12V 50 Hz Power supply 230V 12V 50 Hz Art Nr 231 120 WimTec GmbH Netzteil BV02071 L N 1 2 230V 20mA 12V 2VA Lagerbock mit integriertem Motorheber Bearing block with integrated motor lifter Art Nr 232 042 SanTec FIX WC Montage element mit SanTec SLK Spülkasten SanTec FIX WC assembly element with SanTec SLK flushing cistern Art Nr 102 918 Art Nr 103 07...

Page 8: ...8 Montagebeispiel Example of installation Ejemplo de montaje Exemplo de montagem 230V 50Hz WimTec GmbH Netzteil BV02071 L N 1 2 230V 20mA 12V 2VA 4 5 6 7 1 2 3 ...

Page 9: ...Power supply 12V accessory 6 Wiring for push button min 2 x 0 5 mm2 7 Push button optional 1 12V línea de abastecimiento 2x1 5mm2 largo maximo del cable 100m 2 Entrada de agua 3 Cables para el asidero con pulsador opcional solo en 12 V versión externa 4 caja empotratda para modulo de red 5 Transformador 12 V accessorio 6 Cables para el pulsador min 2 x 0 5mm2 7 Pulsador opcional 1 Cabo de alimenta...

Page 10: ...sory Elektronikplatte von hinten und 12V Netzeil Zubehör Visto reverso de la placa electronica y 12 V modulo de red accessorio Parte traseira do painel electrónico e unidade de alimen tação a 12V acessório 1 Connection external push button optional 2 Connection 12V 50 Hz power supply 3 Connection to motor lifter 4 Active range controller appox 60 cm pre adjusted 30 80 cm adjustable 5 Power supply ...

Page 11: ... always both batteries Pay attention to polarity 2 connection to motor lifter 3 Active range controller at approx 60 cm pre adjusted 30 80 cm adjustable 1 Caja de la pila Pila 2 piezas CRP2P Lithium 6V reem plazar siempre las doz pilas Tener en cuenta los polares 2 Conexión al elevador motora 3 Regulador del alcance aprox 60cm preajustado ajustable 30 80 cm 1 Caixa da pilha Compartimento para pilh...

Page 12: ...Montage Installation Montaje Instalação 12 SanTec FLUSH 12V 6V 4 b 5 6 1 2 3 a ...

Page 13: ...ton bolt Shorten bolt to required length and screw in 6 Mount fixing clamp for push bolt 1 Retirar modulo sifón de la zisterna 2 Reemplace yugo de campana lifter quitar la barra azul a y la correa negro b el uso 3 Insertar sifón con elevador integrado 4 Montar perno de distancia vara del botón y placa de protección 5 Montar marco de montaje y ajuste del perno del botón Cortar el perno a la medida ...

Page 14: ...Montage Installation Montaje Instalação 14 SanTec FLUSH 12V 4 5 6 1 2 3 ...

Page 15: ...l the transformer in the cistern Installation according IP20 e g in a wall mounted box inserted ceiling or junction box Cortar abastecimiento de energia durante la instalación 1 Modulo de red externo 230V 12V50Hz disponible como accessorio art nr 231120 Tenison maxima admisi ble de salida 18V 50Hz marcha en vacio La aplicación de transformadores electronicos es inadmisible 2 Establecer abastecimie...

Page 16: ...Montage Installation Montaje Instalação 16 SanTec FLUSH 6V 4 5 6 1 2 3 ...

Page 17: ...Install front panel and fix it with the safety screws on both sides 7 Device is ready for operation after 60 secs 1 Retirar el caballete de la cisterna 2 Levantar la tapa verticalmente con cuidado 3 Insertar las pilas atención a los polares 4 Conectar el cable del elevador motor 5 Insertar compartimento de la pila y poner la clavija caso que el progra ma debe ser modificado seguir las intrucciones...

Page 18: ... Programm einzustellen Mittels Nahreflex Hand ca 2 cm vor Sensorfenster halten siehe Abbildung kann eines der 3 Programme ausgewählt werden 1x langsam blinken Programm 1 keine automatische Spülung durch Nahreflex nur manuelle Spülung auslösbar 2x langsam blinken Programm 2 Werkseinstellung wie Prog 1 jedoch zusätzlich automatische Spülung beim Verlassen Mindestverweilzeit 15 s 3x langsam blinken P...

Page 19: ...ashes 3 times quick From that time there are 10 s for adjusting the flushing program Via close range reflex hold hand approx 2 cm in front of infrared window see picture it is possible to choose between 3 different programs 1 slow flash program 1 no automatic flushing via close range reflex only manual flushing releasable 2 slow flashes program 2 preset as program 1 but additional automatic flushi...

Page 20: ... medio de un reflejo cercano colocar la mano aprox 2 cm delante de la ventanil la del sensor uno de los tres programas puede ser seleccionado 1 x parpadear lentamente Programa 1 no descarga automatica con reflejo cercano solo descarga manual 2 x parpadear lentamente Programa 2 ajustado en la fabrica igual al programa 1 pero descarga adicional al retiro Tiempo minimo de permanezcar 15 s 3 x parpade...

Page 21: ...ra ajustar o programa de des carga Através do reflexo de activação colocar a mão aprox a 2 cm da janela de IV ver figura é possível escolher entre 3 programas diferentes 1 piscadela lenta programa 1 não há descarga automática apenas há descarga manual através do reflexo de activação 2 piscadelas lentas programa 2 pré ajustado tal como programa 1 mas adicionalmente há uma descarga automática após o...

Page 22: ...15 s Descarga sem contacto aproximando a mão do sensor Optionale Zwischenspülung alle 10 Minuten nur im Programm 3 Optional intermediate flush every 10 min only at program 3 Descarga intermediario opcionalmente a cada 10 min solo con programa 3 Descarga intermédia opcional cada 10 min só disponível no programa 3 Optionale Spülung durch Anschluss Stützgriff mit integriertem Taster oder externem Tas...

Page 23: ...23 Notizen ...

Page 24: ... Elektronische Steuerungs u Meßgeräte GmbH p A 3325 Ferschnitz Freidegg 50 AUSTRIA t 43 0 7473 5000 f 43 0 7473 5000 500 m verkauf wimtec com i www wimtec com Auflage 23 07 2013 Art Nr 903 263 www wimtec com ...

Reviews: