background image

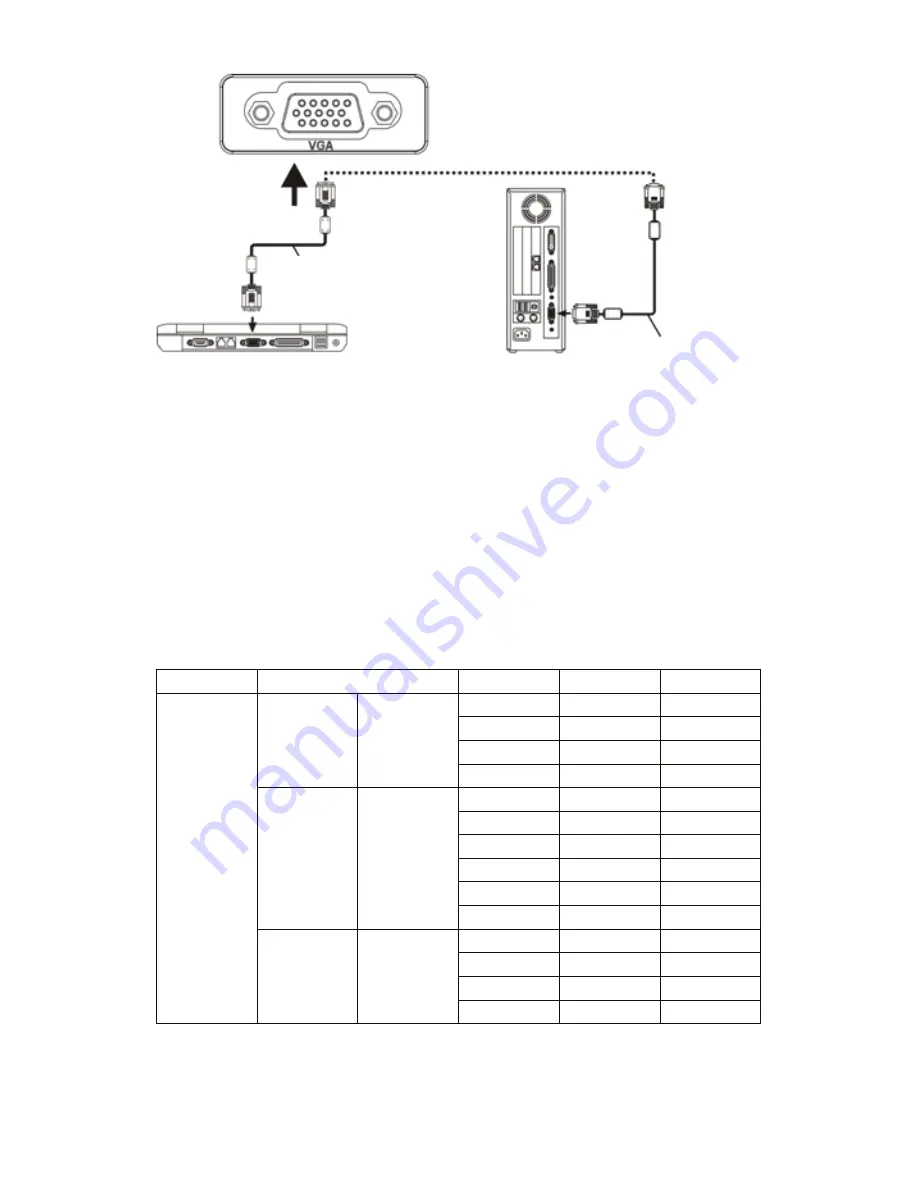
ノートパソコンと接続する場合は、PCでビデオ切り替えることが必要です。
PCの“Fn+Fx”ボタンを押します。つまりFnを押すと同時に、F1からF12ま
でのボタン一つだけ押してください。各ブランドのPCのボタンは以下とな
っています。
Toshiba(Fn+F5)    IBM(Fn+F7)        HP(Fn+F4)     Founder(Fn+F3)
  samsung(Fn+F3)    Panasonic (Fn+F3)    NEC(Fn+F4)     apple(Fn+F8)
  sharp(Fn+F5)    Hitachi(Fn+F7)     Dell(Fn+F8)     Acer(Fn+F5)
  Lenovo(Fn+F3)    BenQ(Fn+F7)      ASUS(Fn+F9)

下記表にあるパラメーターを参考してPC出力信号を調整してください。

タイプ


解像度


KHz


Hz


VESA

標準


PC 


VGA 


640×480 

31.5


60


34.7


70


37.9


72


37.5


75


SVGA 


800×600 

31.4


50


35.1


56


37.9


60


46.6


70


48.1


72


46.9


75


XGA 


1024×768 

40.3


50


48.4


60


56.5


70


60.0 

75 


※:PCとプロジェクターは同時に画面を表示されない場合はPCの表示
特性をCRT出力に設定してください。

7

PC接続ケーブル

デスクトップPC

パソコン

パソコン接続ケーブル

Summary of Contents for T3

Page 1: ...T3 Mini LED Projector User Manual ...

Page 2: ...r presentations or enjoyment it is especially suitable for dance halls karaoke OK home theater and business presentation The projector can use the remote control for full function remote control you can use the buttons on the body to operate The whole machine adopts micro computer intelligent control can automatically control the switch machine self test with anti misoperation shutdown light sourc...

Page 3: ...n ratio 16 9 4 3 Uniformity of light source brightness 90 Focus Manual Projection Color 16770000 Light life 50000 hours TF card U disk Maximum support 64G port USB input 1 TF card input 1 AV 1 HDMI input 1 VGA input 1 Audio output 1 L R Power standard 60 W Built in speaker 2W 8ohm HDMI VGA AV 576i 720P 720i 720P 1080i 1080P Keystone correction 15 power supply 110V 220V 2 dozens of layers of reflec...

Page 4: ...key to call up the main menu or exit the system Select the up and down keys press these two buttons can be moved up and down to select the next menu item of each menu Source selection keys select broadcasttelevision signal or an external video signal Lens Turn this lens you can adjust the focus state of each pixel in the image changing the clarity of the image Inlet and outlet inlet and outlet of ...

Page 5: ...F card can play audio video and picture files 4 HDMI port HD video signal the computer connection HDMI output signal terminal of the DVD 5 USB port insert U disk U disk can play audio video and picture files 6 VGA PC PC signal input port 3 Remote Control Key Names 4 Power Mute Next Last Play Pause Voice Signal Souce Menu Backward Forward Flip Voice Zoom ESC ...

Page 6: ...hind the screen image Installation Note When forward lifting the body can not be higher than the projection on the edge of the screen otherwise it will affect the effect of adjusting the image or trapezoidal Please refer to The distance between the projector and the screen section to determine the size of the distance between the screen and the projector Place the projector screen is on the axis o...

Page 7: ...stone correction slowly slide Keystone Fig 3 until the border of the screen image has become a regular square adjust the keystone of the maximum amplitude of 15 degrees If the adjusted limit Keystone gear position does not eliminate keystone shorten the distance between the projector and screen center in the vertical direction If placed on the table mounted projector the bottom plate can be adjust...

Page 8: ... screwed into enough depth and occurs in the projector falling accident Hanger fixing holes Three Signal linesConnection 1 Power input socket when using please insert the power adapter of the machine accessories into theDC output terminal and the other end of the power adapter is inserted into the mains socket 2 VGA input socket with this port can be connected to a computer or other output socket ...

Page 9: ...n F3 NEC Fn F4 apple Fn F8 sharp Fn F5 Hitachi Fn F7 Dell Fn F8 Acer Fn F5 Lenovo Fn F3 BenQ Fn F7 ASUS Fn F9 Win7 Win8 system Please use the original VGA cable to connect the projector and notebook then the projector is turned on press the machine Source button or Source button on the remote control the projector will switch to VGA mode Back side of the notebook desktop right screen resolution co...

Page 10: ...lay music please connect to an external power amplifier input Audio signal line 5 HDMI signal input This interface can be connected to the output end of a HDMI HD output player When the projector connect to HD player HD set top boxes video games hd HDMI signal connection can be used After connecting projectors and high definition equipment with high definition cable HDMI cable connect the power co...

Page 11: ... mode Press the power button button on the remote controller or panel to turn on the indicator light and enter the normal working condition After a few seconds the system will be fully activated the screen image will appear Press the SOURCE key on the remote control to select the signal channel to be accessed Newly installed projectors first time image may appear blurred or keystone state When the...

Page 12: ...id signal interference affect the playback of the projector 2 Menu operation 1 power off 2 Menu basic operations 11 Turn off the machine Press the power key on the cover or remote control again and the machine will enter the state of dormancy Turn on the machine Press the power key on the cover or remote control the indicator turn color the machine into normal working condition 1 Press the Menu bu...

Page 13: ...enu screen and select a menu language Press the OK button to enterlanguage options screen Press select the language you want and then press the MENU button to accept the settings and exit Setting Setting menu language Restore factory settings Menu transparency low Menu display time close Zoom 0 Image rollovers menu language Restore factory settings Menu transparency low Menu display time close Zoo...

Page 14: ...Balance Time Clock Shutdown time Boot time Sleep timer Auto sleep Menu picture Picture Mode Color Temperature Aspect Ratio Noise Reduction PC Setting standard Picture display mode adjustment Picture display color temperature adjustment Image 4 3 16 9 Zoom adjustments Picture display NoiseReduction adjustment Picture display PC Setting adjustment standard Sound menu Sound mode balance Auto Volume S...

Page 15: ...oes Power cord plug in Does the outlet have a normal mains voltage Does the power on the rear side of the board are open 2 After turning on the projector no image on the screen Does the volume of the projector turn to minimum Is there a stereo audio signal output device Does the volume of the sound equipment turn to minimum Does the Signal path of the projector select correct Does the power source...

Page 16: ...ine automatically cooling otherwise it will affect the life of the projector For safety in addition to professional maintenance staff no person shall own overhaul projector In order to use the projector correctly please read the following tips Please use the power of the projector labeled type it is dangerous to use other types of power supply Please use the supplied adapter to match the power sup...

Page 17: ...anything into the slit of the projector or it may produce a short circuit or an electric shock to your device and cause damage Do not rotate the projector lens too much so as not to fall off When the projector is working do not straight to the projector lens so as not to hurt your eyes When installing the projector you should choose those adequate strength and hanger screws so as to avoid screw qu...

Page 18: ...T3 Mini LED Projector User Manual ...

Page 19: ...e geben Sie das Hauptmenü ein oder das System verlassen Wählen Sie die oben und unten Tasten Drücken Sie diese beiden Tasten bewegt werden kann nach oben und unten den nächsten Menüpunkt jedes Menü auszuwählen Signalquelle tasten Wählen Sie Broadcast TV Signal oder ein externes Videosignal Lens dieses Objektiv drehen können Sie den Fokus Zustand jedes Pixel im Bild anpassen um die Klarheit des Bil...

Page 20: ...n dann kann Audio V ideo und Bilddateien von TF Karte wiedergeben 4 HDMI Anschluss HD Videosignal der Computer Anschluss HDMI Ausgangssignalanschluss der DVD 5 USB Anschluss legen Sie die USB Stick ein dann kann Audio Video und Bilddateien von USB Stick wiedergeben 6 VGA PC PC Signaleingang 2 Power Mute Next Last Play Pause Voice Signal Souce Menu Backward Forward Flip Voice Zoom ESC ...

Page 21: ...n Je nach Bedarf können Sie den Projektor auf einer stabilen Arbeitsplatte nach vorn auf den Bildschirm projiziert platzieren können Sie auch spezielle Aufhänger verwenden können werden auf dem Dach Spiel befestigt werden kann auch hinter einem Bildschirm verwendet werden und gegossen von hinter dem Bildschirmbild Installation Hinweis Wenn nach vorne anheben der Körper nicht höher sein kann als de...

Page 22: ...se die Linse alle wieder in die Maschine und dann langsam drehen Sie das Objektiv gegen den Uhrzeigersinn und sorgfältig die Pixel auf dem Bildschirm die Partikel in der klarste Bild wenn Hou vorbehaltlich der Mitte des Bildbereichs zu beobachten auch ist es die beste Fokuslinsenposition langsam Keystone schieben bis die Grenze des Bildschirmbildes ein reguläres Quadrat stellen Sie die Trapez der ...

Page 23: ...quelle Klimaanlagen und Heizungen da sonst das System überhitzen und schaltet sich automatisch aus Bei der Installation des Projektors bitte diese eine ausreichende Festigkeit und Aufhänger Schrauben wählen um Qualitätszeit zu vermeiden oder Schraube in ausreichende Tiefe eingeschraubt und tritt in den Projektor fallen Unfall 5 Keystone Korrektur Taste ...

Page 24: ...00 480 Auflösung wird diese Funktion verwendet die Dokumentenklasse zu sehen die Schrift nicht sehen aber für ein Computerbilder zu spielen Bilder Klasse betroffen nicht stark Wenn der Laptop an den Projektor angeschlossen benötigt Laptop Video Switch Bitte geben Sie die Original VGA Kabel verwenden das Notebook und den Projektor und der Projektor eingeschaltet ist drücken Sie die VGA Taste auf de...

Page 25: ...meters to adjust the output signal from a computer Type Resolution Horizontal Frequency KHz Field frequency Hz VESA standard PC VGA 640 480 31 5 60 34 7 70 37 9 72 37 5 75 SVGA 800 600 31 4 50 35 1 56 37 9 60 46 6 70 48 1 72 46 9 75 XGA 1024 768 40 3 50 48 4 60 56 5 70 60 0 75 Hinweis wenn es einen Computer an den Projektor und das Bild verbunden ist kann nicht gleichzeitig angezeigt werden bitte ...

Page 26: ...rs oder an der Fernbedienung wählen Sie die Multimedia USB oder TF drücken Sie OK Schlüssel Multimedia Modus zu wechseln eine Video oder Bilddateien in den Video Vorschau Modus drücken Sie auf der Fernbedienung Wiedergabe Pause Taste auf Vollbild auswählen Betrieb und Verwendung des Projektors 1 Power Schalter Nach Größe des projizierten Bildes Abstand feste Projektoren und verbunden Signalleitung...

Page 27: ...n stellen Sie die Bildhelligkeit Kontrast Farbsättigung Lautstärke und Bildklarheit und Schärfe Drücken Sie die Taste Power auf der Frontplatte oder der Fernbedienung erneut die Lichtweg und Anzeigesysteme zu schließen Lüfter automatisch stoppt um den Projektor in den Standby Modus wieder Nach dem Abschalten muss bis der Projektor Fan Verzögerung automatischer Stopp warten kann die Gesamtleistung ...

Page 28: ...uf dem Projektor um das Menü Bildschirm anzuzeigen 2 Drücken Sie die Taste auf der Fernbedienung oder am Projektor Ihren Bedarf zu wählen einzustellen oder einen Menüpunkt gesetzt dann wird das Menü des ausgewählten Symbols wird markiert 3 Drücken Sie die Taste auf der Fernbedienung oder am Projektor im Untermenü den Menüpunkt auszuwählen die Sie anpassen müssen 4 Drücken Sie dann die Fernbedienun...

Page 29: ...uf dem Bildschirm Hat der Signalweg des Projektors richtig auswählen Ist die Stromquelle Gerät einschalten Ist das Signalkabel Stecker in Ist das Signalkabel in der falschen Position einfügen Unter VGA Eingangsmodus wird der Computer Bildwiederholfrequenz zu hoch eingestellt Wenn einen tragbaren Computer verwenden hat der Ausgang des Computers festgelegt externe Anzeige zu signalisieren 3 Drücken ...

Page 30: ...T3 Mini LED Projector User Manual ...

Page 31: ...enu principal ou quitter le système Les touches haut et bas appuyez sur ces deux boutons peuvent être déplacés vers le haut et vers le bas pour sélectionner l élément de menu suivant de chaque menu Touches de sélection de source signal de télévision de sélection de diffusion ou d un signal vidéo externe Objectif Mettre cet objectif vous pouvez régler l état de mise au point de chaque pixel de l im...

Page 32: ...F peut lire des fichiers audio vidéo et image 4 HDMI haute définition port de signal vidéo connecté à l ordinateur HDMI borne de sortie de signal du DVD 5 Port USB insérez le disque U disque U peut lire des fichiers audio vidéo et image 6 VGA PC PC le port d entrée de signal Noms des clésTélécommande 2 Power Mute Next Last Play Pause Voice Signal Souce Menu Backward Forward Flip Voice Zoom ESC ...

Page 33: ...n écran et de fonte de derrière l écran image Installation Note La levée de l avant le corps ne peut pas être supérieure à la projection sur le bord de l écran sinon il aura une incidence sur l effet de réglage de l image ou trapézoïdale S il vous plaît se référer à La distance entre le projecteur et l écran section pour déterminer la taille de la distance entre l écran et le projecteur Placez l é...

Page 34: ...tion de la lentille de mise au point Correction Keystone Glisser lentement Keystone Fig 3 jusqu à la frontière de l image de l écran est devenu un carré régulier régler la clé de voûte de l amplitude maximale de 15 degrés Si la position du train Keystone limite réglée ne supprime pas la distorsion trapézoïdale raccourcir la distance entre le projecteur et le centre de l écran dans la direction ver...

Page 35: ...ils de chauffage sinon la machine peut surchauffer et arrêter automatiquement Lors de l installation du projecteur s il vous plaît choisir les vis adéquates de résistance et de suspension afin d éviter le temps de qualité ou à vis vissée dans une profondeur suffisante et se produit dans le projecteur tombe accident 5 Fig 3 Engrenage keystone Trou à fixation de support ...

Page 36: ...e l ordinateur de la résolution et de la résolution physique du projecteur compatible avec le taux de 60Hz de rafraîchissement Utilisation réelle la plupart des systèmes informatiques actuels ne prennent pas en charge la résolution 800 480 cette fonction est utilisée pour voir la classe de document ne verra pas la police mais pour un ordinateur pour jouer des images des photos de classe n a pas be...

Page 37: ...our connecter le projecteur et l ordinateur le projecteur est allumé appuyez sur la machine bouton Source ou le bouton Source sur la télécommande le projecteur passe en mode VGA Face arrière de l ordinateur portable ordinateur de bureau à droite la résolution de l écran connectez le projecteur pour afficher le copier Reportez vous aux paramètres de tableau ci dessous pour régler le signal de sorti...

Page 38: ...éo HD HDMI connexion de signal peut être utilisé Après le raccordement des projecteurs et des équipements de haute définition avec câble haute définition câble HDMI branchez le cordon d alimentation ou l adaptateur secteur allumer le projecteur appuyez sur le bouton Source sur le panneau du projecteur ou de la télécommande sélectionnez HDMI bouton appuyez sur OK pour entrer dans le mode HDMI Branc...

Page 39: ...u de la télécommande ou menu sur le projecteur pour afficher l écran de menu 2 Appuyez sur la touche de la télécommande ou du projecteur pour sélectionner votre besoin d ajuster ou régler un élément de menu puis le menu de l icône sectionnée sérail mise en surbrillance 3 Appuyez sur la touche sur la télécommande ou le projecteur sur le sous menu pour sélectionner l élément de menu que vous devez r...

Page 40: ...e PC Entrée de signal PC HDMI Entrée de signal HD AV Entrée de signal vidéo USB Multimedia entrée de signal SD Multimedia entrée de signal Voir la section Foncionnement du menu de base pour passer à la droite de l écran de menu puis sélsectionez une langue de menu Appuyez sur le bouton OK écran des options de langue pour entrer Appuyez sur ou sélectionnez la langue que vous voulez puis appuyer sur...

Page 41: ...on de bruit Affichage de l image de réglage de réduction du bruit Réglage PC Affichage de l image de réglage PC de réglage Menu son Menu son Mode sonore standard Réglage du mode de sortie audio équilibre Réglage du niveau de sortie audio Volume auto Réglage du volume de réglage automatique Son surround Surround Sound réglage Réglage Mode Fiber PCM Mode fibre de réglage de réglage du PCM EQ égalise...

Page 42: ...age de la minuterie de mise en veille Auto sommeil Aucun signal automatique COMPENSATION Configuration du menu Langue OSD Réglez l affichage de la langue du menu Restaurer usine par défaut Rétablir les paramètres d usine Mélange Paramètre blending Osd Durée Osd paramètre Durée Image flip Retournement de l image Ajustement du mode zoom Réglage de l image zoom 12 ...

Page 43: ...T3 Mini LED Projector User Manual ...

Page 44: ...ル 投影色彩 1677 万 光源寿命 50000 時間 TF カード U デイスク 最大限 対応 64G 端子 USB 出力 1 TF カード出力 1 AV 1 HDMI 出力 1 VGA 出力 1 オーディオ出力 1 L R パワー標準 60 W 内蔵スピーカー 2W 8ohm HDMI VGA AV 576i 720P 720i 720P 1080i 1080P 台形補正 15 電源 110V 220V 映像対応ファイル MPEG1 MPEG2 MPEG4 RM RMVB MOV MJPEG Divx VOB MKV 音声対応ファイル WMA MP3 M4A AAC APE FLAC WAV 画像対応ファイル JPEG BMP PNG 画像解像度 8544 6656 に対応 テキストファイル Txt 作動温度 0 40 32 104 貯蔵温度 20 45 4 113 作動湿度 10 R...

Page 45: ... 1 オーディオ出力イヤホンジャック 2 AVポート 3 TFカード ポート 4 HDMIポート 5 USBポート 6 VGAポート 2 ...

Page 46: ...3 リモコンについて 3 Power Mute Next Last Play Pause Voice Signal Souce Menu Backward Forward Flip Voice Zoom ESC ...

Page 47: ...二 プロジェクターの組立 一 組立方法 ご注意 天吊の場合はプロジェクター本体をスクリーンの上縁を超えない でください でないと 投影画面や台形調整に影響します 本体をスクリーンの左右対称軸に向いて取り付けください 感電や本体燃や しのため 電源付きで取り付けしないでください 天吊金具をご使用ください投影画面は正方形で取り付け成功 4 正面投影 天吊 リア投影 リア投影天吊 ...

Page 48: ...距離 注意 三 レンズ調整 レンズを右回りして調整してください 四 台形補正 投影画面の縁が正方形になるまで台形補正ダイヤル 図3 をゆっくりと 回します 最大の補正幅度は 15度 制限まで調整しても台形が消え ないなら 本体とスクリーンの距離を縮んでください 台形補正ダイヤル 図3 5 Lens center Screen size 高輝度の光源で光に直視しないでください 特に児童にこの光源にご注意ください ...

Page 49: ...い 天吊金具固定穴 三 信号ケーブルの接続 1 電源 付属の電源アダプターでコンセントに挿入してください 2 VGA VGAケーブルでパソコンと接続します 本体は電源が入った後 本体或 いはリモコンの Source ソース ボタンを押して パソコン VGA を選択し てOKボタンで決定します そしてパソコンモードに入ります パソコンの解 像度をプロジェクターと同じように設定します 頻度を60Hzに設定します 実際に使う時は 殆どのパソコンは800 480の解像度に対応できません この機能はテキストファイルでは字があまり見えなくなりますが 画像では 問題なく使用できます 6 ...

Page 50: ...EC Fn F4 apple Fn F8 sharp Fn F5 Hitachi Fn F7 Dell Fn F8 Acer Fn F5 Lenovo Fn F3 BenQ Fn F7 ASUS Fn F9 下記表にあるパラメーターを参考してPC出力信号を調整してください タイプ 解像度 KHz Hz VESA標準 PC VGA 640 480 31 5 60 34 7 70 37 9 72 37 5 75 SVGA 800 600 31 4 50 35 1 56 37 9 60 46 6 70 48 1 72 46 9 75 XGA 1024 768 40 3 50 48 4 60 56 5 70 60 0 75 PCとプロジェクターは同時に画面を表示されない場合はPCの表示 特性をCRT出力に設定してください 7 PC接続ケーブル デスクトップPC パソコン パソコン接続ケーブル ...

Page 51: ...ルでプロジェクターをHDプレーヤー HDTV セットトップ ボッ クス ゲームなどに接続できます 電源入った後 本体或いはリモコンの Source ボタンを押します HDMI を選択して OK ボタンで決定して HDMIモードに入ります 6 Uデイスク Uデイスクを USB ポートに差し込みます 或いはTFカードをTFカードポー トに挿入します 本体或いはリモコンの Source ボタンを押して マルチメデ ィア USB或いはTF を選択し OK ボタンで決定します ビデオや写真を 選択して再生できます リモコンの再生 一時停止ボタンを押せばフルス クリーンにします 8 ケーブル ...

Page 52: ...完全に止まった後電源 切ることができます 機内に余計な熱を保ってプロジェクターの使用寿命に 影響しますから 投影画面の質に影響しないように適当な投影幕をご使用ください できる だけ暗いところでお使いください 2 メニュー操作について 1 電源オン オフ 2 メニューの基本操作について 9 電源接続したら 本体或いはリモコンの電源 ボタンを押します インジケータランプが変色 mしてから電源オンになります 本体或いはリモコンの電源ボタンをもう一 度押すと 電源オフになります リモコンの或いは本体の MENU メニュー を押します メニュー画面が出ます リモコン或いは本体の ボタンを押 してご希望の項目を選択します リモコン或いは本体の ボタンを 押してご希望の項目を選択します OK ボタンで決定します ボタンで選択します 上記二から五 の手順で繰り返して他のメニューに入りま す 或いは MEN...

Page 53: ...g menu language Restore factory settings Menu transparency low Menu display time close Image rollovers Zoom 0 SOURCE ソース ボタンを押して信号源選択画面に入 ります ボタンを押してPC AV HDMI SD USB中からご 希望の信号を選択します ボタン押して決定します メニュー画面でメニュー言語に入ります OK ボタンを押して言語画面に入ります 或いは ボタンを押してご 希望の言語を決定します MENU ボタン を押して設定して戻ります メニュー画面で右の写真に切り替えます ボタンを押して画像回転を選択し ます OK ボタンを繰り返して押して画像を上下 左右に回転します ...

Page 54: ...い 信号が間違っていないか 信号源デバイスの電源が入ったか 信号ケーブルがちゃんと挿入できたか 信号ケーブル挿入が間違っていないか VGA では PC の頻度が高すぎるか PC 接続する場合は PC の出力を外部表示に設定したか 3 リモコンの電源 ボタンで本体をオ ンにできない 本体の電源スイッチをオンにしたか リモコンが電池切れ リモコンレシーバーの前に障害物がないか 本体から遠く離れたか 4 一時使用した後 自動電源オフにな る 本体のインレットは塞がれたか 過熱保護したか 5 画像は正常だが 音声なし 本体を最低音量に調整したか スピーカーデバイスはオーディオ出力ができるか スピーカーデバイスは最低音量に調整したか ...

Page 55: ......

Reviews: