


Page 7
Rev. 5/2021
www.willoughby-ind.com
Installation & Operation Manual
Aquafount
®
180° Washfountain
WAF-3603-PSL-FT
Willoughby Industries, Inc.
TOLL FREE (800) 428-4065
Ɣ/2&$/
(317) 875-0830
Ɣ)$;
(317) 875-0837
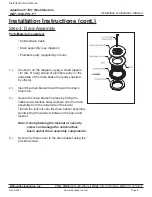
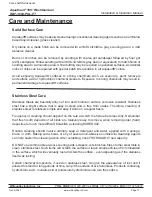
Step 1: Mounting Backplate
3DUWVVXSSOLHG
•
&RPSOHWHSHGHVWDOSUHDVVHPEOHG
Note: Hardware for wall anchoring by others.
Note: Use anchors that are adequate for the type of wall: drywall, concrete, metal studs,
wood studs, etc.
Note: Refer to rough-in drawing for backplate mounting hole locations to achieve
34" rim height.
1.) Remove shroud from pedestal backplate using security screws on sides.
2.) Measure and mark the vertical centerline of the washfountain on the wall. Mark a level line at the
height prescribed by the rough-in drawing for the pedestal backplate center hole. Drill a hole for
a wall anchor (supplied by others) at this height mark.
Make sure that the intended anchor locations will provide adequate backing to support the
installed washfountain. If adequate backing does not exist, install appropriate support backing or
relocate unit before proceeding with installation
(backing provided by others).
3.) Mount the pedestal on the wall using a wall anchor through the backplate center hole and the
¿UVWGULOOHGKROH'21277,*+7(17+,6),567:$//$1&+25$//7+(:$<DV\RXPD\
need to adjust the pedestal to ensure it is level.
4.) Make sure the pedestal is level and plumb against the wall, then mark and drill holes for the rest
RIWKHZDOODQFKRUVDVVSHFL¿HGE\WKHURXJKLQGUDZLQJ
5.) Ensure once more the pedestal is level, then secure it to the wall using the remaining anchors
(supplied by others). Make sure all wall anchors are tight and secure against the pedestal
backplate.
Note: Be sure backplate is level and plumb against the wall so that water in basin will
drain correctly once assembly is completed.
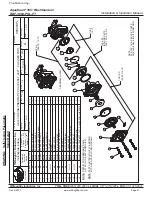
Installation Instructions
Mounting the backplate.
(ONLY PEDESTAL BACKPLATE SHOWN)
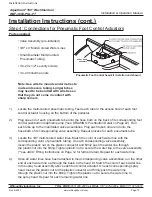
Installation Instructions