3
®
5.
Position the headset microphone
boom as close to the speaker’s mouth
as possible without actually touching.
Lapel clip microphones should be
attached to a collar or lapel, as close
to the speaker’s mouth as possible.
The transmitter can be placed in a
pocket, or clipped onto a belt or
waistband.
6.
When you pause from speaking, mute
the microphone by pressing the
“ON/OFF/MUTE” button once
momentarily. The ON/OFF/MUTE
button will flash RED. To unmute the
mic, press the ON/OFF/MUTE button
once momentarily again.
IMPORTANT:
When the T36 trans-
mitter is not being used, remember to
turn the unit OFF by pressing and hold-
ing the ON/OFF/MUTE button for three
seconds. The Power ON Indicator
should not be lit.
G
AIN
C
ONTROL
The gain control can be used to adjust the
volume level on both the microphone and
auxiliary input.
To adjust the volume level, open the bat-
tery door and locate the Gain Control (FIG.
D). To increase the volume, use a plastic
tuning wand and turn the “Gain” control
clockwise. To decrease the volume, turn
the “Gain” control counterclockwise. Close
the battery door after adjustments have
been made.
A
UXILIARY
I
NPUT
L
EVEL
The auxiliary input level can be used to
adjust the auxiliary input level only.
To adjust, open the battery door and locate
the Auxiliary Input Level (FIG. D). To
increase the input level, use a plastic tuning
wand and turn the “AUX” control clock-
wise. To decrease the auxiliary input level,
turn the AUX control counterclockwise.
Close the battery door after adjustments
have been made.
AA
AA
–
+
+
–
Comp
CH Lock
-
Gain +
-
AUX
+
22:1
1:1
1
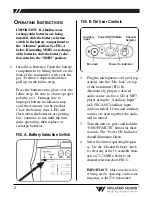
. Gain Control
2
. Auxiliary Input Level
3
. Compression Selector
4
. Channel Lock
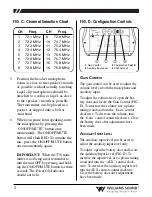
1 2 3 4
CH
1
2
3
4
5
6
7
8
Freq.
72.1 MHz
72.2 MHz
72.3 MHz
72.4 MHz
72.5 MHz
72.6 MHz
72.7 MHz
72.8 MHz
CH
9
10
11
12
13
14
15
16
Freq.
72.9 MHz
74.7 MHz
75.3 MHz
75.4 MHz
75.6 MHz
75.7 MHz
75.8 MHz
75.9 MHz
FIG. C: Channel Selection Chart
FIG. D: Configuration Controls


