


OPERATING INSTRUCTIONS
Preparation
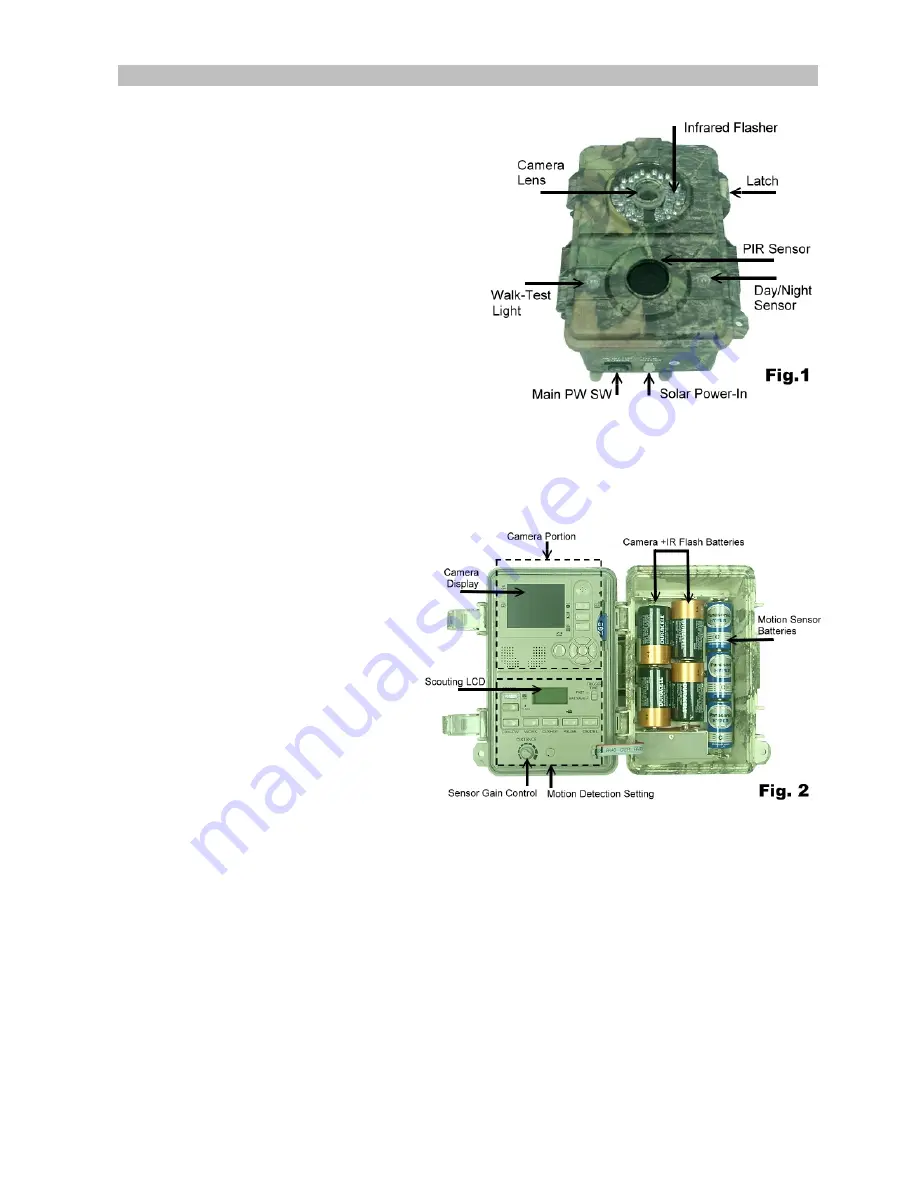
1.
Remove the Steel security bar (Optional parts)
and open the front door by pulling up the two
latches on the side of the cabinet. Push the Main
power switch to OFF (Center).
2.
Install 3 pcs C type Alkaline batteries into the
battery compartment on the right for Motion
sensor working.
3.
Install 4 pcs D type Alkaline batteries to the
compartment to support Digital Camera and IR-
Light operation.
4.
If you connect a solar power pack, all the
installed battries will become a power back up
sourse. You can choose non-battery operation
mode for your application.
5.
Install a SD card into the slot. Be careful to insert the SD card according to direction shown on the SD
card. Before you try to operate with the camera, be sure a SD card must be into the slot.
Caution: Before replacing a SD card, be sure the Main PW switch is already at OFF position in order to
avoid the data in the SD might be flushed. After that, formatting the SD card firstly before operation
will be highly recommended if it is the first time to be used in this device.
Quick Start
An easy way below to tell you step by step
for getting a quick start with the unit, it will
run under the
factory default
if you do not
change any parameter except below:
1.
Push the main power switch
which is allocated in the bottom of
out-side cabinet to ON
2.
After PW is ON, system will be
ready for setup. Press CAM-PW to
switch On the camera section.
3.
Set date and time for the Camera
and choose either at Picture or
Video mode.(See the paragraph
below for
“
Date and time
Setting
”
; Still Picture / Video Mode
)
4.
Set other parameters of scouting and exit the setting mode after finished. (See more paragraphs
about the
Setting for Motion Sensor
below). You can ignore this step if you still are not quite
understand it what they are.
5.
Hang unit on a steady tree around 1 meter height with the attached belt and set the motion PIR
sensor almost point to the area which you wish to monitor.
6.
Slide the main PW switch to TEST and turn the Sensor Gain Control to Max. (Clock-wise). After the
SELF-TEST light goes OFF after 1 minute, try to walk in front of motion sensor in order to verify
how much distance and a zone you will be detected according to the flashing walk-test light .
7.
Push PW back to ON and you can leave. Now the scouting camera will be ready to work stand-by
after 10 seconds since PW is ON. Once an event will be detected, camera will take a shot to save
an image as well as event counter will increase a record automatically.
Factory default settings
For Camera:
Capture = Single Picture /Auto Exposure / 3M pixels resolution / Burst Mode =Off / Shutter
Speed = Auto / Quality =Normal / Stamp =ON / Language = English / TV =NTSC / Download =MSDC / Video
Resolution = VGA 640x480 / Frame rate = 15 F/S
Summary of Contents for AC-833S
Page 11: ......