background image

12

1. Reduce the pressure on the drill bit when it is about to break through. This will prevent the drill from jamming. 

2. When drilling a large hole, first drill a pilot hole using a smaller drill bit.

3. Always apply pressure to your drill bit in a straight line, and if possible at right angles to the workpiece.

4. Never change the operating mode whilst the drill is running.

5. Do not apply excessive pressure to the tool when chiseling. Excessive force does not speed up the work.

Remove the plug from the socket before carrying out any adjustment, servicing or maintenance.

There are no user serviceable parts in your power tool. Never use water or chemical cleaners to clean your power tool. 

Wipe clean with a dry cloth. Always store your power tool in a dry place. Keep the motor ventilation slots clean. Keep all 

working controls free of dust. Occasionally you may see sparks through the ventilation slots. This is normal and will not 

damage your power tool.                                  

If the supply cord is damaged, it must be replaced by the manufacturer, its service agent or similarly qualified persons in 

order to avoid a hazard.   

WORKING HINTS FOR YOUR ROTARY HAMMER DRILL

MAINTENANCE

TROUBLESHOOTING

ENVIRONMENTAL PROTECTION

1. If your power tool does not start, check the plug on the power supply first.

2. If your drill becomes too hot in use, set the hammer switch to the drill mode and allow your drill to operate at maximum 

speed without load for 2 minutes.

3. If your hammer work efficiency is too low, please add sufficient grease in the grease box.

4. If work efficiency is too low please check drill bit or chisel and make sure it is not blunt or worn.

5. If a fault can not be rectified, return the tool to an authorized dealer for repair.

Waste electrical products should not be disposed of with household waste. Please recycle where facilities exist. 

Check with your Local Authority or retailer for recycling advice.

Summary of Contents for 223724

Page 1: ...PDH32DS 2 223724 ROTARY HAMMER 1500W...

Page 2: ...3 14 COMPONENT LIST ACCESSORIES TECHNICAL DATA SYMBOLS NOISE INFORMATION OPERATING INSTRUCTIONS MAINTENANCE WORKING HINTS FOR YOUR ROTARY HAMMER DRILL TROUBLESHOOTING ENVIRONMENTAL PROTECTION PLUG REP...

Page 3: ...tective equipment Always wear eye protection Protective equipment such as dust mask non skid safety shoes hard hat or hearing protection used for appropriate conditions will reduce personal injuries c...

Page 4: ...r its own cord Cutting accessory contacting a live wire may make exposed metal parts of the power tool live and could give the operator an electric shock accordance with these instructions taking into...

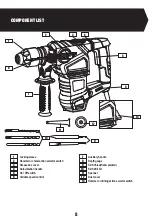
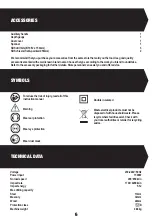
Page 5: ...h Grease box cover Anti vibration handle On Off switch Variable speed control Auxiliary handle Depth gauge SDS Chisel flat pointed SDS Drill bit Spanner Dust cover Hammer or drilling action selector s...

Page 6: ...y Max drilling capacity Steel Masonry Wood Protection class Machine weight 230 240V 50Hz 1500W 200 850 min 1700 4200 min 5 5J 13mm 32mm 40mm II 4 88kg ACCESSORIES Auxiliary handle 1 Depth gauge 1 Dust...

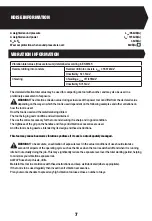
Page 7: ...and well maintained The use the correct accessory for the tool and ensuring it is sharp and in good condition The tightness of the grip on the handles and if any anti vibration accessories are used A...

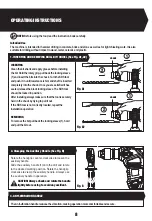
Page 8: ...dle See Fig B Fig A2 Fig B INSERTING Clean the bit shank and apply grease before installing the bit Hold the rotary grip pull back the locking sleeve 1 and insert the bits into the chuck Turn the SDS...

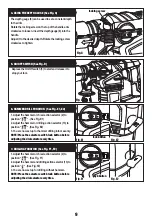
Page 9: ...position See Fig E2 3 You are now set up for hammer drilling into masonry NOTE Press the selector switch lock button before adjusting the dial selector everytime 1 Adjust the hammer or chisel action...

Page 10: ...k piece CAUTION Switching the machine on with the drill bit or chisel jammed in the work piece will generate high reaction torque and can result in injury 11 SAFETY CLUTCH PROTECTION Before drilling f...

Page 11: ...increases as you adjust the thumb wheel 6 towards the higher number and decreases on the lower number Avoid prolonged use at very low speed as this may cause damage 12 VARIABLE SPEED CONTROL See Fig...

Page 12: ...sionally you may see sparks through the ventilation slots This is normal and will not damage your power tool If the supply cord is damaged it must be replaced by the manufacturer its service agent or...

Page 13: ...ollows The wire which is colored blue must be connected to the terminal which is marked with N The wire which is colored brown must be connected to the terminal which is marked with L Warning Never co...

Page 14: ...C Machinery Directive 2014 30 EU Electromagnetic Compatibility Directive 2011 65 EU EU 2015 863 Restriction of Hazardous Substances Directive and conforms to the following standards Standards specific...

Page 15: ......

Page 16: ...Customer Helpline 0345 2005409...

Reviews: