


4
Step-by-Step Installation Instructions for
Sliding Door (217-005)
Customer helpline number: 01604 633607
STEP-BY-STEP INSTRUCTIONS
1.
Using a good quality spirit level, ensure the shower tray (or base of the shower) is level on
all sides.
2.
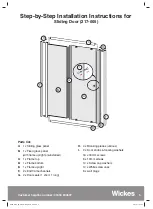
Decide which side you wish the sliding door to be and with the profi le facing outwards, pre-
assemble the frame; which consists of the top, bottom & the frame upright, plus the fi xed
glass panel, with the glass panel on the opposite side to where you wish the door to be,
using 8 x 30mm screws
Fig.1
.
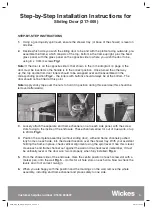
Note:
If the door is on the opposite side to that shown in the in the diagram on page 3, the
door must be inverted so the handle is in the correct position. Once turned the other way
up, the top and bottom door rollers should to be swapped over and reassembled in the
corresponding position
Fig.2
. - the rollers with buttons should always be at the bottom. The
door should not be fi tted at this point.
Note:
Apply sticky tape over the nuts to hold it in position during this exercise (this should be
removed afterwards).
3.
Loosely attach the separate end frame channels, one to each side panel, with the screw
slots facing to the inside of the enclosure. These channels allow for out of true walls, of up
to 20mm
Fig.3
.
4.
Position the complete assembly (without sliding door), with end frame channels pushed
fully home on each side, into the desired location over the shower tray. With your assistant
holding the frame in place, check vertical alignment using the spirit level. Once this is level,
move each end frame channel out against the wall and re-check level (remember, It must
be vertically level or the door won’t work properly when fully installed)
Fig.4
.
5.
From the shower side of the enclosure, mark the centre position of each screw slot with a
marker pen, onto the wall
Fig.5
. – do this for all hole slots on each side. Now re-check the
levels and if not correct, re-align.
6.
When you are happy with the position and the markings on the wall, remove the whole
assembly, including end frame channel and place safely to one side.
1
2
3
8892_Step_By_Step_Sliding Door_V3.indd 4
8892_Step_By_Step_Sliding Door_V3.indd 4
1/9/10 17:54:01
1/9/10 17:54:01


