background image

Operators Manual

Trusted by the best

WIN540D

AMPS

VOLTS

ARC

FORCE

ARC

CONTROL

GASLESS

0.8/0.9/1.2


mm

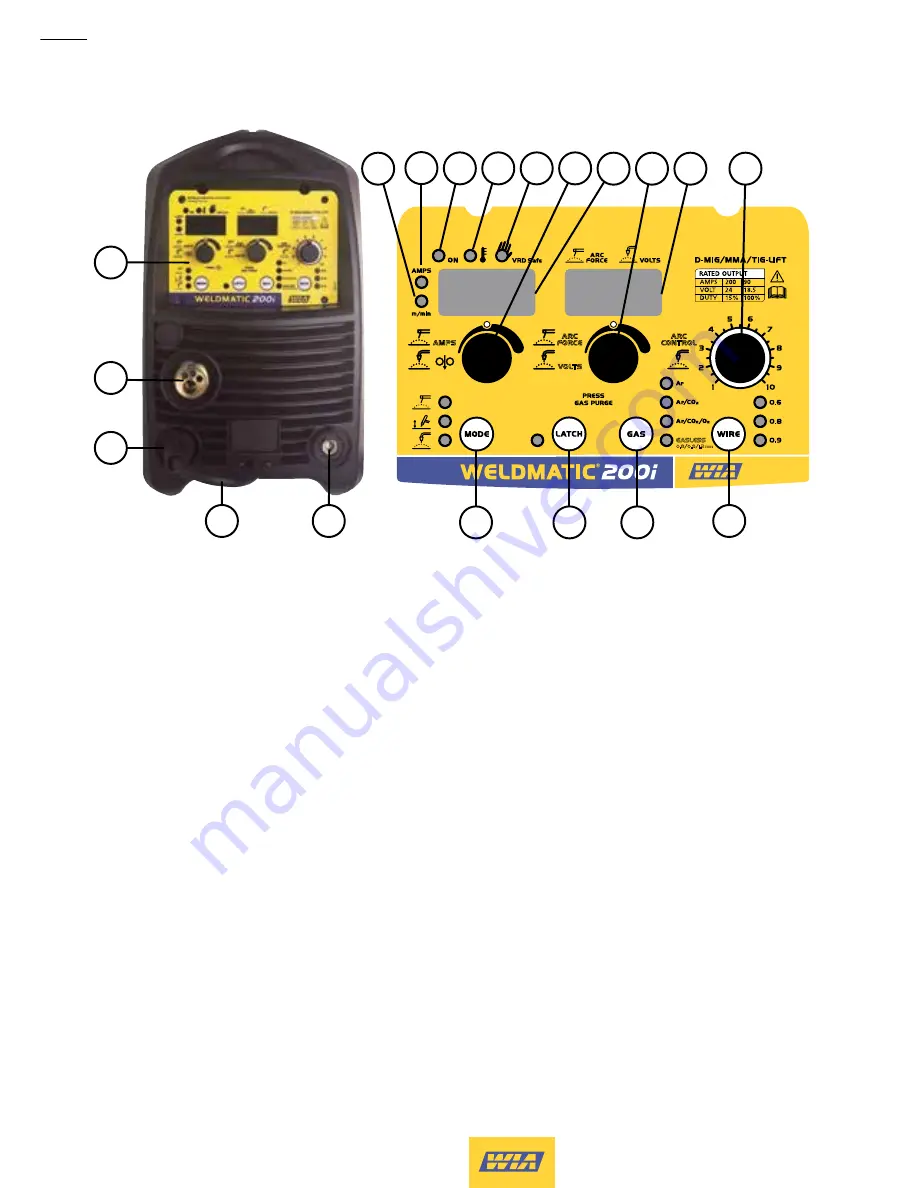
Fig 1

 Weldmatic 200i Controls

2

1  Control Panel

2  Euro Gun/Cable Connector


3  Positive Welding Output Terminal

4  Negative Welding Output Terminal

5  Polarity Selection Cable

6  m/min Indicator 

When this light is on the Digital Display 
(12) is indicating the selected wire speed in 
metres per minute (MIG Mode).

7  Amps Indicator 

When this light is on the Digital Display (12) 
is indicating the selected Amps (Stick or TIG 
Mode).

8  Power On Indicator

9  Over Temperature Indicator 

This light is on if the machine overheats 
or mains voltage os too high or low – the 
machine will prevent weld output until the 
machine has cooled down or mains voltage 
returns to normal. Welding output can then 
recommence.

10 VRD Safe Indicator

This light is on when the machine is in Stick 
Mode (MMAW) and the output voltage is 
reduced to a safe level.

11 Weld Current & Wire Speed 

Adjustment Control/ Inch Button

Stick Mode (MMAW):

 This control sets the 

Weld Current level.  

MIG Mode (GMAW):

 This control sets Wire 

Speed.

4 Controls

10

9

11 12 13 14

8

7

6

15

16

17

18

19

4

5

3

1

Summary of Contents for Weldmatic 200i MIG

Page 1: ...CP137 40 Rev A Weldmatic 200i internal wirefeeder Operators Manual Weldmatic 200i MIG Arc TIG welder Model No CP137 2 Iss A 02 15...

Page 2: ...Welding Industries of Australia A division of ITW Australia Pty Ltd 1300 300 884 Info welding com au welding com au...

Page 3: ...fications 7 4 Controls 8 5 Installation 10 6 Normal Welding Sequence 12 7 Basic Welding Information 12 8 General Maintenance 20 9 External Trouble Shooting 21 10 Service Information 22 10 1 Circuit Di...

Page 4: ...for suspending or mounting the power source in any other manner Safe practices when using welding equipment These notes are provided in the interests of improving operator safety They should be consi...

Page 5: ...unless coating is removed from the work surface the area is well ventilated or the operator wears an air supplied respirator Work in a confined space only while it is being ventilated and if necessary...

Page 6: ...tible s solubility followed by purging and inerting with nitrogen or carbon dioxide and using protective equipment as recommended in AS 1674 2 Water filling just below working level may substitute for...

Page 7: ...ailable in both gas shielded and gasless self shielding types Stainless steel and Aluminium can be welded with GMAW using the correct consumable wire and shielding gas The Weldmatic 200i wirefeeder ha...

Page 8: ...ds the tungsten electrode and directs a flow of inert gas usually Argon over the electrode and the weld zone If filler metal is required it is hand fed into the welding arc The DC current output of th...

Page 9: ...V 15 duty 77 Amp 13 1 V 100 duty Welding Current 30 200 Amps Open Circuit Voltage 71 V VRD 13 5 V Shipping weight 19 kg Includes leads 13 kg Power Source only Mains Circuit Breaker Rating 25 Amps Supp...

Page 10: ...12 is indicating the selected Amps Stick or TIG Mode 8 Power On Indicator 9 Over Temperature Indicator This light is on if the machine overheats or mains voltage os too high or low the machine will pr...

Page 11: ...he amount of Arc Force 0 10 will be displayed MIG Mode Weld Volts will be displayed when adjusted with Voltage Adjustment Control 13 15 Arc Control When in MIG GMAW mode the harshness of the arc can b...

Page 12: ...cable depends on cable size and method of installation Refer to AS NZS 3008 1 Table 9 If it becomes necessary to replace the mains flexible supply cable use only cable with correct current rating The...

Page 13: ...eck the adjustment of the spool adjuster which should be set to prevent over run of the wire spool at the end of a weld without unduly loading the wirefeed motor Feeding the Consumable Wire At the wir...

Page 14: ...so be caused by air entering the gas stream through a damaged hose loose gas connection or from restriction in the nozzle such as from excess build up of spatter When welding aluminium particular care...

Page 15: ...voltage is too low the wire will stub and stutter and there will not be a steady arc If the voltage is too high the arc will be long with metal transfer occurring as a series of large droplets The wel...

Page 16: ...Gasless Wire Wire type Gasless Flux Cored Negative Polarity 4 5kg Spool Knurled Drive Roll Arc Control 1 Material Thickness Wire Size 0 8mm 0 9mm 1 2mm Wirefeed Volts Wirefeed Volts Wirefeed Volts 8mm...

Page 17: ...on Steel ES6 Positive Polarity 5kg Spool Gas Ar 5 CO2 2 O2 Arc Control 5 Material Thickness Wire Size 0 6mm 0 8mm 0 9mm Wirefeed Volts Wirefeed Volts Wirefeed Volts 8mm 10 5 24 5 5mm 11 5 24 0 9 0 22...

Page 18: ...l Solid Wire Wire type Carbon Steel ES6 Positive Polarity 5kg Spool Gas Ar 18 CO2 Arc Control 5 Material Thickness Wire Size 0 6mm 0 8mm 0 9mm Wirefeed Volts Wirefeed Volts Wirefeed Volts 8mm 10 0 24...

Page 19: ...red wires should be operated with approximately 10 15mm of wire stick out from the welding contact tip as shown in Figure 7c 10 Fig 7a Gas Shielded Solid Wires Fig 7b Gasless Flux Cored Wires Fig 7c W...

Page 20: ...he electrode slowly along the weld path aiming to maintain a pool of moulten weld metal behind the arc Decreasing this rate of travel will result in a wider weld deposit and similarly increasing it wi...

Page 21: ...rod A contaminated electrode produces an unstable arc If this occurs regrind the electrode tip To TIG Torch Fig 9 Cable and hose connections for TIG welding Duty Cycle The term duty cycle indicates t...

Page 22: ...ry fit only the correct liner see page 28 The build up of dust can be minimised by regular purging of the liner with dry compressed air This may be conveniently done each time the wire spool is replac...

Page 23: ...in the welding current circuit including weld cable work clamp and gun cable assembly 9 External Trouble Shooting Circuit breaker trips during welding 1 Check the rating of the mains supply circuit br...

Page 24: ...to ensure that no air is being drawn into the shielded area 10 Service Information Before removing the equipment cover ENSURE that the equipment is disconnected from the mains power supply When the e...

Page 25: ...3 4 2 1 3 4 2 1 3 4 2 1 3 4 VCC SGND G C E G C E G C E G C E G1 E1 G2 E2 NTC 1 5K AC 1 AC 2 3 4 2 1 3 4 NTC 2 5K AC 1 AC 2 3 4 1 2 3 FAN FAN1 24V PWA021 G1 E1 G2 E2 QF QF1 DC24V 2 2 1 2 3 4 5 6 7 8 1...

Page 26: ...24 Operators Manual Trusted by the best Fig 12 Weldmatic 200i Power Source Assembly 11 1 Assembly and Parts List Weldmatic 200i Power Source 2 1 3 6 7 8 9 10 13 4 5 11 12 15 14 17 16 18...

Page 27: ...Wirefeeder Control PCB 1 9 M0063 Front Panel 1 10 SA140 0 2 Dinse Socket 2 11 PWA021 Front Panel Control PCB 1 12 WIN540 Front Panel Sticker 1 13 M0058 Knob 3 14 WF055 Wire Drive Assembly 1 15 WF056...

Page 28: ...W26 0 8 0 6 0 8mm Solid Wire 2 W26 8 8 0 8 0 9mm Solid Wire 2 W26 7 8 1 0 1 2mm Flux Cored Wire knurled 2 W26 9 8 0 9 1 2mm Flux Cored Wire knurled 2 W26 3 8 1 0 1 2mm Aluminium Item Part Description...

Page 29: ...see Tips page 28 Contact Tip 3 BE4335 Gas Diffuser Head 4 BE4323 Cap 5 BEQT2 45 BEQT2 30 Body Tube 2 45o supplied Body Tube 2 30o 6 GUN002 Handle Kit includes both halves screws trigger 7 GUN003 Trigg...

Page 30: ...d liner from the wirefeeder end Insert new liner and refit gun cable assembly to the wirefeeder At the gun end compress the liner within the gun cable then cut it 20mm past the end of the body tube 5...

Page 31: ...original purchase package The obligation of Welding Industries of Australia under this warranty is limited to the circumstances set out above and is subject to The customer being able to provide proof...

Page 32: ...shade control Magnifying lens holder WIA Blue Helmet Part No 235620 DESIGNED FOR THE WELDER WHO WANTS PROTECTION PERFORMANCE COMFORT AT AN AFFORDABLE PRICE 1 year warranty Auto Darkening lens only Ba...

Reviews: