


3460AFCAF Stayton Media Console;
3462AFCAF Stayton Media Center
Assembly Instructions
3460AFCAF_3462AFCAF
— Page 4 — 04/13
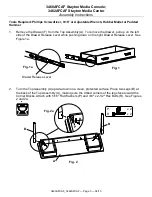
3.
Rotate the Top and Leg assembly so that is sets on the back legs. Turn the Lower Shelf
Assembly (C) and the Upper Shelf Assembly (D) bottom-side-down and place the dowels into
the dowel holes in the Legs. See Figure 3.
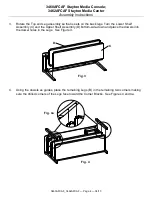
4.
Using the dowels as guides, place the remaining Legs (B) in the remaining two corners making
sure the drilled corners of the Legs face toward the Corner Blocks. See Figures 4 and 4a.
Fig. 4
Fig. 4a
Fig. 3
C
D


