Whittier Wood Pacific 1448AFGSPa Assembly Instructions Manual Download Page 3

1448AFGSPa; 1448AFCAFa Pacific Queen Storage Bed 
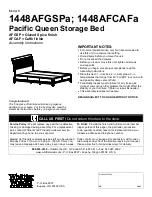
Parts List


1448AFGSPa_1448AFCAFa 

— Page 3 — 04/13 


1449AFGSP; 1449AFCAF Pedestal Kit (x2) 


Part 

Description 

Quantity 

Pedestal Kit 


Drawer Box (inserted) 


Drawer Face (attached) 


Drawer Slides (pre-installed sets) 


T-Nut (inserted) 


#7 x 1-1/2" Black Pan Head Screw (inserted) 


79 

#8 x 1" Lo-Profile Screw (inserted) 


18 

ZA 

#6 x 1-1/4" Black Pan Head Screw (inserted) 


12 

ZB 

#8 x 20mm Pan Head Screw (inserted) 


12 

ZC 

Small Angle Bracket (attached) 


ZD 

#6 x 1/2" Philtruss Screw (inserted) 


42 

ZE 

#6 x 3/4" Philtruss Screw (inserted) 


18 

Summary of Contents for Pacific 1448AFGSPa

Page 1: ...her problem that might affect the stability of your furniture Tighten or repair as needed This assembly requires two people DESIGN SUBJECT TO CHANGE WITHOUT NOTICE CALL US FIRST Do not return this ite...

Page 2: ...rd Kit x1 Part Description Quantity A Headboard Assembly 1 B Footboard Assembly 1 D 5 16 x 2 1 4 Hex Bolt 8 E 5 16 Flat Washer 8 F 1 4 x 80mm Hex Bolt 2 G 1 4 x 1 3 4 Hex Bolt 12 H 1 4 Flat Washer 12...

Page 3: ...wer Box inserted 3 P Drawer Face attached 3 R Drawer Slides pre installed sets 3 T T Nut inserted 9 X 7 x 1 1 2 Black Pan Head Screw inserted 79 Z 8 x 1 Lo Profile Screw inserted 18 ZA 6 x 1 1 4 Black...

Page 4: ...correct re installation Positions are marked on the drawer bottoms 2 To protect your flooring and the surface of the unit place the Pedestal Kits N face down on top of opened and unfolded 1449 carton...

Page 5: ...des with Hex Nut ZF so that the Assembled Feet ZG are 4 1 2 tall as shown in Figure 3a Attach the six Assembled Feet ZG as shown in Figure 3 4 This step requires two people to move the bed to its upri...

Page 6: ...any excess glue See Figures 5 and 5a 6 Position the Footboard B against the end of the pedestal assembly and insert the dowels J into the oval holes in the top cap of the footboard Place four 5 16 Wa...

Page 7: ...ts with a 1 2 wrench See Figure 7 8 Secure the pre attached Angle Brackets K on the Headboard to the Pedestal Assembly with six 6 x 3 4 Flat Head Screws L See Figures 8 and 8a Insert one Barrel Nut I...

Page 8: ...bed into its final position verify that all 6 Assembled Feet ZG are touching the floor and carrying weight if needed use a 7 16 wrench to adjust the Adjustable Glides ZF on the bottoms of the Assemble...

Reviews: