


1236DUETc Addison 50"W Dresser
1237DUETc Addison 60"W Dresser
Parts List
1236DUETc_1237DUETc — Page 3 — 08/19
Part
Description
Quantity
1236DUETc 1237DUETc
S
#8 x 7/8" Black Lo-Profile Screw (inserted)
76
80
T
#8 x 1-3/4" Pan Head Screw (inserted)
16
16
U
#8 x 1-1/4" Black Screw (inserted)
7
8
V
#8 x 2" Black Screw (inserted)
2
2
W
#8 x 1-5/8" Machine Screw Tuscan (installed)
16
16
Y
5/16" x 3/4" Insert Nut (inserted)
1
1
ZA
1/4" x 20mm Insert Nut (inserted)
4
4
ZB
4 x 10mm Insert Nut (inserted)
4
8
ZC
5/32" x 10mm Insert Nut (inserted)
16
16
ZD
Black Walnut Pull (attached)
8
8
ZE
Small Adjustable Glide (installed)
4
4
ZF
Base (attached)
1
1
ZG
Front 4-Hole Bracket (attached)
2
2
ZH
Back 6-Hole Bracket (attached)
2
2
ZI
#6 x 3/4" Brass Flat Head Screw (inserted)
20
20
ZJ
#8 x 1-5/8" Black Screw (inserted)
8
8
ZK
#8 x 1-3/8" Lo-Profile Screw (inserted)
17
21
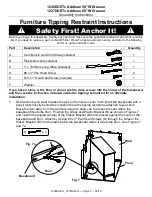
TS
Furniture Tipping Restraint (attached)
1 set
1 set
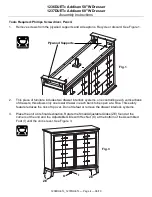
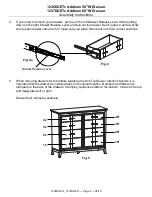
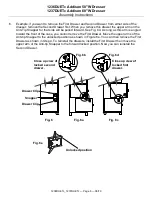
1236 shown in the illustrations.


