


HOJA DE INSTRUCCIONES PARA ARMADO INMEDIATO
SÓLO PARA USO DOMÉSTICO.
NO
SE RECOMIENDA PARA USO COMERCIAL.
8/03
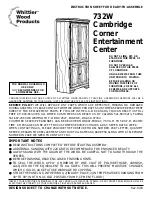
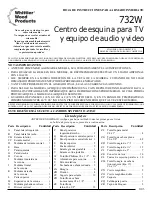
732W
Centro de esquina para TV
y equipo de audio y video
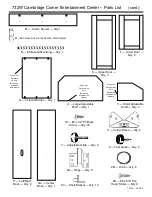
Lista de piezas
ANTES DE ENSAMBLAR, verifique que haya recibido todas las piezas que se listan
en la lista de piezas que se presenta a continuación.
Parte Descripción
Cantidad
A
Panel lateral izquierdo . . . . . . 1
B
Panel lateral derecho . . . . . . . . 1
CB
Estante inferior . . . . . . . . . . . . 1
CC
Estante central . . . . . . . . . . . . . 1
D
Moldura del estante central . . . 1
E
Base . . . . . . . . . . . . . . . . . . . . . 1
F
Pata izquierda . . . . . . . . . . . . . 1
G
Pata derecha . . . . . . . . . . . . . . 1
H
Corona . . . . . . . . . . . . . . . . . . . 1
I
Moldura izquierda de
la corona . . . . . . . . . . . . . . . . . 1
J
Moldura frontal
de la corona . . . . . . . . . . . . . . . 1
K
Moldura derecha
de la corona . . . . . . . . . . . . . . . 1
L
Parte superior . . . . . . . . . . . . . 1
M
Espaciador de la corona . . . . . 1
N
Moldura grabada en relieve . . 1
O
Divisor vertical . . . . . . . . . . . . 1
P
Panel posterior
izquierdo/derecho . . . . . . . . . . 2
Q
Panel posterior central superior 1
R
Panel posterior central inferior 1
S
Puerta superior . . . . . . . . . . . . 2
T
Puerta inferior . . . . . . . . . . . . . 2
U
Estante grande ajustable . . . . . 1
V
Estante corto ajustable . . . . . . 2
W
Tornillo Philtruss #6 x 1/2" . . 46
X
Abrazadera para esquina . . . . . 2
Y
Pata niveladora . . . . . . . . . . . . 2
Z
Tachuela de cabeza redonda . . 2
ZA
Bisagra . . . . . . . . . . . . . . . . . . . 8
ZB
Tirador . . . . . . . . . . . . . . . . . . . 4
ZC
Soporte para estante . . . . . . . 12
ZD
Tornillo de cabeza
troncocónica #8 x 5/8" . . . . . . 8
ZE
Tornillo de
latón #6 x 3/8" . . . . . . . . . . . . 12
Parte Descripción
Cantidad
Parte Descripción
Cantidad
ZF
Tornillo para metal
#8 x 1" . . . . . . . . . . . . . . . . . . . 4
ZG
Tornillo de cabeza plana
#6 x 5/8" . . . . . . . . . . . . . . . . 48
ZH
Tornillo negro de 1
5
/
8
" . . . . . . 5
ZI
Tornillo negro de 1¼" . . . . . . 12
ZJ
Tornillo negro de 2" . . . . . . . . 7
ZK
Conector de leva . . . . . . . . . . 16
ZL
Tuerca de sujeción para leva . 16
ZM Tornillo negro de cabeza
troncocónica (tipo 17)
#6 x 1¼" . . . . . . . . . . . . . . . . . 9
ZN
Cierre magnético . . . . . . . . . . . 2
ZO
Cierre magnético doble . . . . . . 1
ZP
Taquete . . . . . . . . . . . . . . . . . . 3
ZQ
Faldón para puerta . . . . . . . . . . . 1
ZR
Tapón de bloqueo . . . . . . . . . . 2
FELICITACIONES POR HABER SELECCIONADO UN MUEBLE DE MADERA WHITTIER. ESTE BELLO MUEBLE DE MADERA DURA SE CONVERTIRÁ EN
UNA HERMOSA NOVEDAD EN SU HOGAR. SIMPLEMENTE SIGA PASO A PASO LAS INSTRUCCIONES DE ARMADO.
NOTAS IMPORTANTES:
•
ANTES DE COMENZAR A ARMAR EL MUEBLE, LEA CUIDADOSAMENTE LAS INSTRUCCIONES.
• PARA REALZAR LA BELLEZA DEL MUEBLE, LE RECOMENDAMOS EFECTUAR UN LIJADO ADICIONAL
CON LIJA 220.
•
LIJE SIEMPRE EN LA MISMA DIRECCIÓN DE LA VETA DE LA MADERA, CUIDANDO DE NO LIJAR
DEMASIADO PROFUNDAMENTE (PODRÍA PERFORAR EL ENCHAPADO).
• Y ANTES DE PROCEDER CON EL ACABADO FINAL, LEA LAS SUGERENCIAS ADJUNTAS.
• PARA SELLAR LA MADERA, APLIQUE (COMO MÍNIMO) UNA CAPA DE POLIURETANO, BARNIZ O LACA A
TODOS LOS COSTADOS. ESTO IMPEDIRÁ QUE HAYA DEFORMACIONES POR HUMEDAD, LO CUAL PODRÍA
PROVOCAR QUE LA MADERA SE ARQUEE O SE HINCHE.
• GUARDE LOS PANELES: 1) EN SU CAJA, 2) EN UN SITIO SECO, 3) EN UN RANGO DE TEMPERATURAS
COMPRENDIDO ENTRE 40° Y 90° (NO EN UN PISO DE CEMENTO FRÍO QUE TAL VEZ ESTÉ HÚMEDO).
REVISE SU MOBILIARIO EN FORMA PERIÓDICA PARA DETECTAR UNIONES DESPEGADAS, TORNILLOS FLOJOS O CUALQUIER OTRO PROBLEMA QUE
PUDIERA AFECTAR LA ESTABILIDAD DEL MISMO. APRIETE LOS TORNILLOS O REPARE LAS PIEZAS SEGÚN CORRESPONDA.
ESTE DISEÑO ESTÁ SUJETO A CAMBIOS SIN PREVIO AVISO
No se suba, no se siente ni se pare
sobre este mueble.
No cargue en exceso los estantes de
este mueble.
No mueva este mueble mientras esté
lleno. Vacíelo antes de moverlo.
Antes de cargar o mover este mueble,
compruebe que todos los tornillos y
soportes estén apretados.


