Whittier Wood 5196AFGMS Assembly Instructions Download Page 3

5196AFGMS Ambierle Round Side


Table 

Assembly Instructions


5196AFGMS 

— Page 3 — 06/14 

Tools Required: Phillips Screwdriver, 9/16" or Adjustable Wrench, Rubber Mallet or Padded 
Hammer 

 
1. 

Turn the Top Assembly (A) upside-down on a clean, protected surface. Place two Legs (B) in 
adjacent corners of the Top Assembly (A), making sure the drilled corners of the legs face 
toward the Corner Blocks. Attach with 5/16" Flat Washers (J) and 3/8" x 2-1/2" Hex Bolts (K). 
See Figures 1 and 1a. 
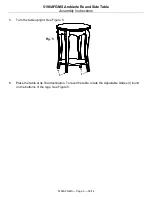
 

2. 

To attach the Shelf (C) align two of the pocket screw holes with the notches of the legs. Be sure 
the grain of the Shelf (C) is in line with the grain of the top. Place a third Leg (B) in one of the 
remaining corners and attach with a 5/16" Flat Washer (J) and 3/8" x 2-1/2" Hex Bolt (K).   See 
Figures 2 and 2a. 


Fig. 2 

x 1 

x 1  

Fig. 2a 

Fig. 1 

Fig. 1a 

x 2 

x 2  

Summary of Contents for 5196AFGMS

Page 1: ... dust is present even in trace amounts Drilling sawing sanding or machining wood products generates wood dust a substance known to the State of California to cause cancer Warning This product contains a chemical or substance known to the State of California to cause cancer birth defects or other reproductive harm California Health and Safety Code Section 25249 6 DESIGN SUBJECT TO CHANGE WITHOUT NO...

Page 2: ... to replace a part refer to the following letter and part name Part Description Quantity A Top Assembly 1 B Leg 4 C Shelf 1 D 8 x 1 1 4 Pan Head Screw 20 16 inserted E 8 x 1 3 4 Pan Head Screw inserted 8 F 8 Washer inserted 8 G 3 8 x 1 Insert Nut inserted 4 H 1 4 x 20mm Insert Nut inserted 4 I Adjustable Glide installed 4 J 5 16 Flat Washer 4 K 3 8 x 2 1 2 Hex Bolt 4 ...

Page 3: ...sure the drilled corners of the legs face toward the Corner Blocks Attach with 5 16 Flat Washers J and 3 8 x 2 1 2 Hex Bolts K See Figures 1 and 1a 2 To attach the Shelf C align two of the pocket screw holes with the notches of the legs Be sure the grain of the Shelf C is in line with the grain of the top Place a third Leg B in one of the remaining corners and attach with a 5 16 Flat Washer J and ...

Page 4: ...maining Leg B in the final corner and attach with a 5 16 Flat Washer J and 3 8 x 2 1 2 Hex Bolt K See Figures 3 and 3a 4 Using the pocket holes as guides secure the Shelf C to the Legs B with four 8 x 1 1 4 Pan Head Screws D See Figures 4 and 4a Fig 3 B J K x 1 x 1 Fig 3a K J Fig 4 D x 4 D Fig 4a ...

Page 5: ...le Assembly Instructions 5196AFGMS Page 5 06 14 5 Turn the table upright See Figure 5 6 Place the table at its final destination To level the table rotate the Adjustable Glides I found on the bottoms of the legs See Figure 5 Fig 5 I I ...

Reviews: