background image

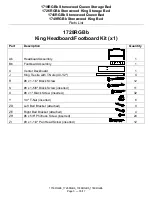
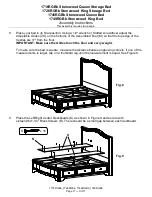
1716RGBb Stonewood Queen Storage Bed 

1726RGBb Stonewood King Storage Bed 

1746RGBb Stonewood Queen Bed 

1749RGBb Stonewood King Bed 
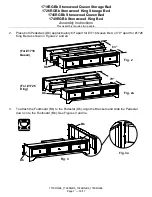
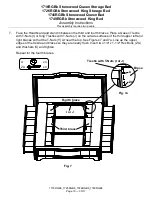
Parts List


1716RGBb_1726RGBb_1746RGBb_1749RGBb 

Page 4 — 03/17 


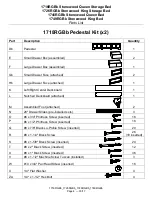
1718RGBb Pedestal Kit (x2) 


Part 

Description 

Quantity 

Db 

Pedestal 


Small Drawer Box (assembled) 


Large Drawer Box (assembled) 


Gb 

Small Drawer Face (attached) 


Hb 

Large Drawer Face (attached) 


Left/Right Center Deckboard 


Notched Deckboard (attached) 


Assembled Foot (attached) 


20" Drawer Slides (pre-installed sets) 


#6 x 3/4" Philtruss Screw (inserted) 


18 

#6 x 1/2" Philtruss Screw (inserted) 


18 

#8 x 7/8" Black Lo-Profile Screw (inserted) 


20 

#8 x 1-1/4" Black Screw 


26 

(18 inserted) 

#8 x 1-5/8" Black Screw (inserted) 


24 

#8 x 2" Black Screw (inserted) 


12 

#8 x 1" Black Screw (inserted) 


36 

#8 x 1-1/2" Machine Screw Tuscan (installed) 


#10 x 3/4" Pan Head Screw (inserted) 


16 

1/4" Flat Washer 


ZA 

1/4" x 1-1/2" Hex Bolt 


Summary of Contents for 1716RGBb

Page 1: ...www p65warnings ca gov furniture DESIGN SUBJECT TO CHANGE WITHOUT NOTICE CUSTOMER SERVICE If you ever have questions about your furniture please do not hesitate to contact us In the unlikely event yo...

Page 2: ...Bb Queen Headboard Footboard Kit x1 Part Description Quantity Ab Headboard Assembly 1 Bb Footboard Assembly 1 I Queen Trestle with T Nuts 24 3 8 4 S 8 x 1 5 8 Black Screw inserted 11 U 8 x 1 Black Scr...

Page 3: ...rd Footboard Kit x1 Part Description Quantity Ab Headboard Assembly 1 Bb Footboard Assembly 1 C Center Deckboard 1 J King Trestle with T Nuts 40 1 2 4 R 8 x 1 1 4 Black Screw 12 S 8 x 1 5 8 Black Scre...

Page 4: ...b Large Drawer Face attached 1 K Left Right Center Deckboard 1 L Notched Deckboard attached 1 M Assembled Foot attached 2 N 20 Drawer Slides pre installed sets 3 O 6 x 3 4 Philtruss Screw inserted 18...

Page 5: ...F Foot Bracket attached 4 ZG Adjustable Glide installed 4 1748RGBb Queen Rail Kit x1 1740RGBb King Rail Kit x1 Part Description Quantity 1748RGBb 1740RGBb R 8 x 1 1 4 Black Screw 10 10 S 8 x 1 5 8 Bla...

Page 6: ...crewdriver 1 2 7 16 open end or box end wrench and Tape measure Notes Steps 1 through 10 are for the Stonewood Queen Storage Bed 1716 and the Stonewood King Storage Bed 1726 Steps 11 through 17 are fo...

Page 7: ...716RGBb_1726RGBb_1746RGBb_1749RGBb Page 7 03 17 2 Place both Pedestals Db approximately 63 apart for 1716 Queen Bed or 79 apart for 1726 King Bed as shown in Figures 2 and 2a 3 To attach the Footboard...

Page 8: ...d King Bed Assembly Instructions This assembly requires two people 1716RGBb_1726RGBb_1746RGBb_1749RGBb Page 8 03 17 4 Repeat step three for the other side See Figures 4 and 4a 5 Align the Brackets on...

Page 9: ...braces Place a Queen Trestle with T Nuts I or King Trestles with T Nuts J on the outside surfaces of the first upper left and right braces so that the T Nuts Y sit near the top See Figure 6a Line up...

Page 10: ...he third and fourth braces Place a Queen Trestle with T Nuts I or King Trestles with T Nuts J on the outside surfaces of the third upper left and right braces so that the T Nuts Y sit near the top See...

Page 11: ...Glides ZG on the bottoms of the Assembled Feet M so that the top edge of the trestles are 17 from the floor IMPORTANT Make sure the Glides touch the floor and carry weight To make sure the bed is squ...

Page 12: ...0 is for the Stonewood King Storage Bed 1726 10 Place the Center Deckboard C as shown in Figure 10 and secure with twelve 8 x 1 1 4 Black Screws R If you need to adjust the Assembled Feet remove the C...

Page 13: ...en Trestles I that are packed with the Headboard Ab for the 1746 Stonewood Queen Bed and the Center Deckboard C and King Trestles J for the 1749 Stonewood King Bed from the back of the Headboard Ab an...

Page 14: ...g Bed Assembly Instructions This assembly requires two people 1716RGBb_1726RGBb_1746RGBb_1749RGBb Page 14 03 17 13 Repeat step twelve for the other side See Figures 13 and 13a 14 Align the Brackets on...

Page 15: ...to five Queen Slats ZK or King Slats ZL as shown in Figure 15 16 Move the bed assembly to its final position Position the Queen Slats ZK or the King Slats ZL on the bottom edges of the rails Attach wi...

Reviews: