background image

1613AUFb; 1619AUFb; 1625AUFb & 1631AUFb McKenzie Alder Cabinet 

Assembly Instructions


1613AUF_1619AUF_1625AUF_1631AUF — Page 5 — 09/20 


Bookcase Tipping Restraint Instructions 

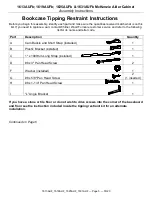
Before you begin this assembly, identify each part and make sure the quantities received match what is on this 

list. If you need to replace a part, contact Whittier Wood Furniture customer service and refer to the following 

list for its name and letter code. 


Part 

Description 

Quantity 

A   

Cam Buckle and Short Strap (installed) 


B   

Plastic Bracket (installed) 


C   

1" x 1000mm Long Strap (installed) 


D   

#8 x 3" Pan Head Screw 


Washer (installed) 


#8 x 5/8" Pan Head Screw 


2                 

(1 inserted) 

#8 x 1-1/4" Pan Head Screw 


“L” Angle Bracket 


If you have a stone or tile floor or do not wish to drive screws into the corner of the baseboard 

and floor see the instruction included inside the tipping restraint kit for an alternate 

installation. 


Continued on Page 6 


Summary of Contents for 1613AUF

Page 1: ... expose you to wood dust a substance known to the state of California to cause cancer Avoid inhaling wood dust or use a dust mask or other safeguards for personal protection For more information go to www p65warnings ca gov wood This product can expose you to chemicals including formaldehyde which are known to the State of California to cause cancer For more information go to www p65warnings ca go...

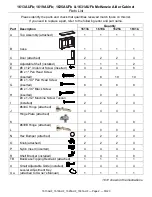
Page 2: ...ed 1 1 1 2 E 6 x 1 2 Undercut Screw inserted 4 4 4 8 F 8 x 1 Pan Head Screw inserted 8 8 10 10 G 8 x 1 1 4 Pan Head Screw inserted 8 8 8 8 H 8 x 1 1 4 Black Screw inserted 0 0 0 3 I 8 x 1 1 2 Machine Screw Tuscan installed 2 2 2 4 J 639C Hinge attached 4 4 4 4 K Hinge Plate attached 4 4 4 8 L 639B Hinge attached 0 0 0 4 N Hex Bumper attached 2 2 2 4 O Knob attached 2 2 2 4 P Nylon Insert inserted ...

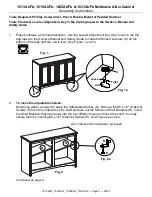
Page 3: ...Manual and Safety Guide to rotate the Slotted Levelers U on the bottom of the legs until the unit is level See Figure 1 and 1a 2 To move the adjustable shelves Determine where you want to place the Adjustable Shelves D Remove the 6 x 1 2 Undercut Screws E from the underside of the shelf and take out the Shelf and Shelf Brackets R Insert the Shelf Brackets flat side down into the four different hol...

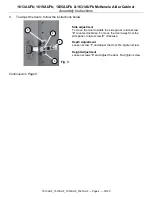
Page 4: ...w the instructions below Continued on Page 5 Fig 3 Side adjustment To move the door towards the side panel rotate screw 2 counter clockwise To move the door away from the side panel rotate screw 2 clockwise Depth Adjustment Loosen screw 1 and adjust the door Re tighten screw Height Adjustment Loosen screws 3 and adjust the door Re tighten screw 3 2 1 3 ...

Page 5: ...service and refer to the following list for its name and letter code Part Description Quantity A Cam Buckle and Short Strap installed 1 B Plastic Bracket installed 1 C 1 x 1000mm Long Strap installed 1 D 8 x 3 Pan Head Screw 2 F Washer installed 1 G 8 x 5 8 Pan Head Screw 2 1 inserted H 8 x 1 1 4 Pan Head Screw 1 I L Angle Bracket 1 If you have a stone or tile floor or do not wish to drive screws ...

Page 6: ...y driving 8 x 3 Pan Head Screws D through the holes in the Plastic Bracket B into the seam below the baseboard where it meets the floor See Figures 4 and 4a 5 Move the item back into position against the wall and reach underneath the bookcase to grasp the loop in the free end of the strap Pull the free end of the strap until portion between the Cam Buckle A and the bottom of the item is tight See ...

Page 7: ...the Assembly Instructions for detailed information on how to glue your specific product Use wood glue such as Elmer s Wood Glue Titebond Wood Glue or the equivalent Some instructions call for a slow drying glue Carefully read the label and instructions of the glue manufacturer Your unit may not need glue 1 We strongly recommend that you lay out all the parts and familiarize yourself with how they ...

Page 8: ...follow all label directions Stir your top coat gently do not shake Shaking the can creates bubbles that are hard to remove 2 All surfaces including the underside of table tops and inside drawers must be sealed with at least one layer of a top coat This will help minimize wood swelling shrinkage warping and cupping due to changes in moisture content or temperature 3 Apply a minimum of two coats whe...

Reviews: