Whittier Wood 1448GSPb Assembly Instructions Manual Download Page 6

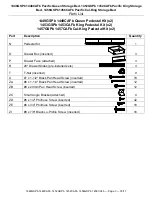
1448GSPb 1448CAFb Pacific Queen Storage Bed, 1452GSPb 1452CAFb Pacific King Storage 

Bed, 1456GSPb 1456CAFb Pacific Cal-King Storage Bed 

Assembly Instructions 

This assembly requires two people. 

1448GSPb,1448CAFb, 1452GSPb, 1452CAFb, 1456GSPb, 1456CAFb — Page 6 — 03/17 

 
5. 

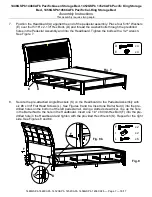
Spread a thin film of glue in the dowel holes at one end of the top cap of the bed. Insert two 
dowels (J) and gently tap with a rubber mallet. Quickly wipe away any excess glue. See Figures 
5 and 5a. 


6. 

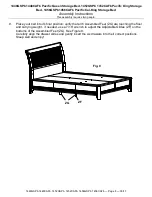
Position the Footboard (B) against the end of the pedestal assembly and insert the dowels (J) 
into the oval holes in the top cap of the footboard. Place four 5/16" Washers (E) over four  
5/16" x 2-1/4" Hex Bolts (D) and thread the washer/bolts through the predrilled holes in the 
Pedestal Assembly and into the Footboard. Tighten the bolts with a 1/2" wrench.  
See Figures 6, 6a and 6b. 


Fig. 6 

Top Cap 

x 4 

x 4  

Fig. 6a 

D  E 

Fig. 6a 

D E 

Fig. 5 

x 2 

Fig. 5a 

Top Cap 

Summary of Contents for 1448GSPb

Page 1: ...SERVICE If you ever have questions about your furniture please do not hesitate to contact us In the unlikely event you need a replacement part we can make those parts available through an authorized...

Page 2: ...ng letter and part name 1451GSPa 1451CAFa Queen Headboard Footboard Kit x1 1455GSPa 1455CAFa King Headboard Footboard Kit x1 1459GSPa 1459CAFa Cal King Headboard Footboard Kit x1 Part Description Quan...

Page 3: ...t x2 1457GSPb 1457CAFb Cal King Pedestal Kit x2 Part Description Quantity N Pedestal Kit 1 O Drawer Box inserted 3 P Drawer Face attached 3 R 20 Drawer Slides pre installed sets 3 T T Nut inserted 9 X...

Page 4: ...res 1 and 1a Note where each drawer came from to ensure correct re installation Positions are marked on the drawer bottoms 2 To protect your flooring and the surface of the unit place the Pedestal Kit...

Page 5: ...1456GSPb 1456CAFb Page 5 03 17 3 Rotate the Adjustable Glides with Hex Nut ZF so that the Assembled Feet ZG are 4 1 2 tall as shown in Figure 3a Attach the six Assembled Feet ZG as shown in Figure 3...

Page 6: ...els J and gently tap with a rubber mallet Quickly wipe away any excess glue See Figures 5 and 5a 6 Position the Footboard B against the end of the pedestal assembly and insert the dowels J into the ov...

Page 7: ...he Pedestal Assembly and into the Headboard Tighten the bolts with a 1 2 wrench See Figure 7 8 Secure the pre attached Angle Brackets K on the Headboard to the Pedestal Assembly with six 6 x 3 4 Flat...

Page 8: ...2GSPb 1452CAFb 1456GSPb 1456CAFb Page 8 03 17 9 Place your bed into its final position verify that all 6 Assembled Feet ZG are touching the floor and carrying weight if needed use a 7 16 wrench to adj...

Reviews: