


1317AFGAC McKenzie Queen
Platform Storage Bed — Parts List
1320AFGAC (x1)
1318AFGAC (x2)
To replace a part, please refer to the following list for its name and letter.
Before beginning assembly, check that the quantities of parts received match those listed below.
Page 2 — 1317AFGAC — 0
7
/08
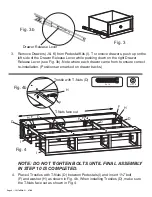
F — ¼"
x 1¾" Hex Bolt
— Qty. 16
G — ¼" x 2½" Hex Bolt
— Qty. 16
E — #8 x 1¼" Black Screw — Qty. 24
H — Washer — Qty. 32
N — #8 x 1½" Machine Screw
— Qty. 3
O — Knob — Qty. 3
I — Pedestal Kit — Qty.1
B —Footboard — Qty.1
C — Trestle Without T-Nuts — Qty.4
D — Trestle With T-Nuts — Qty.8
P — Deckboard — Qty.1
J — Small Drawer Box — Qty. 2
(pre-assembled)
K — Large Drawer Box — Qty. 1
(pre-assembled)
L — Small Drawer Face — Qty. 2
(pre-attached)
M — Large Drawer Face — Qty. 1
(pre-attached)
Q — Drawer Slides — Qty. 3
(pre-installed sets)
T — #8 x 2" Black Screw — Qt
U — Foot Assembly — Qty. 2
V — Leveler Bracket — Qty. 2
(pre-installed)
W — Adjustable Glide — Qty. 2
(pre-installed)
y. 6
A — Headboard — Qty.1


