Whittier Wood 1221AFLSOc Assembly Instructions Manual Download Page 4

1221AFLSOc; 1221AFDAOc 11-Drawer Prairie City Dresser 

Assembly Instructions


1221AFLSOc_1221AFDAOc 

— Page 4 — 03/14 

Tool Required: Phillips Screwdriver, Pencil. 

 
1. 

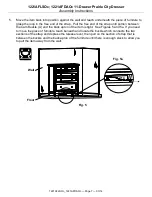
Open the Right Secret Storage Drawer (E) and remove the foam packaging. Remove the Tray 
(O) from the drawer and recycle the packaging. Return the Tray (O) to the drawer. See Figure 1. 


2. 

There are secret storage areas in the top two middle drawers. To access either of these storage 
areas, open the Center Upper Middle Drawer (G). Reach in until you find the Hinged Drawer 
Stop (ZF) that is attached to the bottom right side of the Left Secret Storage Drawer (D) or is 
attached to the bottom left side of the Right Secret Storage Drawer (E). Pull the Hinged Drawer 
Stop (ZF) forward and then pull drawer (D or E) out far enough so you can access the 
concealed storage space. To close the drawer, just push it shut. See Figures 2, 2a, 2b. 


Fig. 2a 

ZF 

Fig. 2 

Fig. 2b 

ZF 

Fig. 1 

Fig. 1a 


Summary of Contents for 1221AFLSOc

Page 1: ...kit was included with your piece of Whittier Wood Furniture When you receive your furniture be sure to find and properly install the tipping restraint s If you cannot locate the restraint s please co...

Page 2: ...Box inserted 1 E Right Secret Storage Drawer Box inserted 1 F Left Right Upper Middle Drawer Box inserted 2 G Center Upper Middle Drawer Box inserted 1 H Lower Middle Drawer Box inserted 2 I Large Bot...

Page 3: ...ZC 8 x 1 1 4 Black Screw inserted 5 ZD 8 x 2 Black Screw inserted 2 ZF Hinged Drawer Stop attached 2 ZG 5 16 x 3 4 Insert Nut inserted 1 ZH 1 4 x 20mm Insert Nut inserted 4 ZI 4 x 10mm Insert Nut inse...

Page 4: ...reas in the top two middle drawers To access either of these storage areas open the Center Upper Middle Drawer G Reach in until you find the Hinged Drawer Stop ZF that is attached to the bottom right...

Page 5: ...221AFDAOc Page 5 03 14 3 Place the unit at its final destination Rotate the Small Adjustable Glides ZQ found at the corners of the unit and the Adjustable Glide with Hex Nut V at the bottom of the Ass...

Page 6: ...not wish to drive screws into the corner of the baseboard and floor see the instruction included inside the tipping restraint kit for an alternate installation 4 Decide where you want to place the pie...

Page 7: ...d of the strap until portion between the Cam Buckle A and the back apron of the item is tight See Figures 5 and 5a If you need to move the piece of furniture reach beneath and locate the buckle which...

Reviews: