

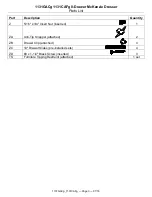


1131GACg 1131CAFg 8-Drawer McKenzie Dresser
Assembly Instructions
1131GACg_1131CAFg
— Page 6 — 07/18
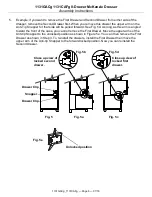
5.
Example; if you want to remove the First Drawer and Second Drawer from either side of the
dresser; remove the Second Drawer first. When you remove this drawer the upper arm on the
Anti-Tip Snapper for that side will be pulled forward. See Fig. 5d. As long as this arm is angled
toward the front of the case, you cannot remove the First Drawer. Move the upper arms of the
Anti-tip Snapper to the unlocked position as shown in Figure 5e. You can then remove the First
Drawer as shown in Step 3. To reinstall the drawers, install the First Drawer then move the
upper arm of the Anti-tip Snapper to the forward locked position. Now you can reinstall the
Second Drawer.
Fig. 5
Drawer Clip
Drawer Clip
Snapper
Close up view of
locked second
drawer.
Fig. 5a
Fig. 5b
Fig. 5d
Close up view of
locked first
drawer.
Fig. 5c
Fig. 5e
Unlocked position


