background image

3456AFCAFa Stayton Cocktail Table 

Assembly Instructions


3456AFCAFa 

— Page 6 — 04/14 

 
7. 

Turn the table upright and insert the Drawer. See Figure 7. 


8. 

The wheels allow the table to easily move away from or toward your seating. 


Fig. 7 

Fig. 8a 

Fig. 8 

Summary of Contents for Stayton 3456AFCAFa

Page 1: ...nces including wood dust is present even in trace amounts Drilling sawing sanding or machining wood products generates wood dust a substance known to the State of California to cause cancer Warning This product contains a chemical or substance known to the State of California to cause cancer birth defects or other reproductive harm California Health and Safety Code Section 25249 6 DESIGN SUBJECT T...

Page 2: ...nserted 1 F Drawer Face installed 1 G PVC Wheel installed 4 H Drawer Slides pre installed sets 1 I Axle Pin inserted 4 J 6 x 3 4 Philtruss Screw inserted 6 K 6 x 1 2 Philtruss Screw inserted 6 M 8 x 1 1 4 Pan Head Screw 34 30 inserted Na 8 x 1 1 2 Machine Screw Tuscan installed 4 O 8 Washer inserted 23 P 5 16 Flat Washer 4 Q 3 8 x 1 Insert Nut inserted 4 R 3 8 x 2 1 2 Hex Bolt 4 S 4 x 10mm Insert ...

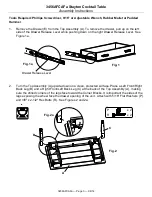
Page 3: ...t Drawer Release Lever See Figure 1a 2 Turn the Top Assembly A upside down on a clean protected surface Place a Left Front Right Back Leg B and a Right Front Left Back Leg C at the back of the Top Assembly A making sure the drilled corners of the legs face toward the Corner Blocks It is important the sides of the legs exposing the wheel face the drawer opening of the unit Attach with 5 16 Flat Was...

Page 4: ...ace the dowels into the dowel holes in the Legs See Figure 3 4 Using the dowels as guides place the remaining Left Front Right Back Leg B and Right Front Left Back Leg C in the remaining two corners making sure the drilled corners of the Legs face toward the Corner Blocks It is important the side of the leg exposing the wheel face toward the back of the unit See Figure 4 Fig 4 Fig 4a B C Fig 3 D ...

Page 5: ...op Assembly with 5 16 Flat Washers P and 3 8 x 2 1 2 Hex Bolts R See Figures 5 and 5a 6 Turn the unit onto its top and using the pocket holes as guides secure the Shelf Assembly D to the Legs B and C with four 8 x 1 1 4 Pan Head Screws M See Figures 6 and 6a Fig 6 M x 4 Fig 6a M Fig 5 Fig 5a P R x 2 x 2 P R ...

Page 6: ...n Cocktail Table Assembly Instructions 3456AFCAFa Page 6 04 14 7 Turn the table upright and insert the Drawer See Figure 7 8 The wheels allow the table to easily move away from or toward your seating Fig 7 Fig 8a Fig 8 ...

Reviews: