


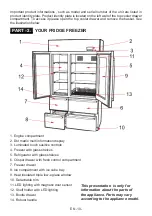


EN -18-
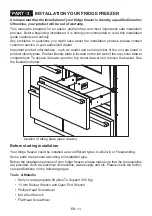
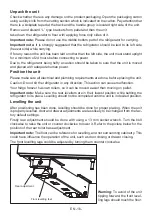
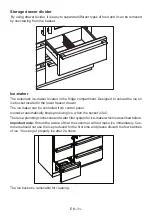
In built-in installation;
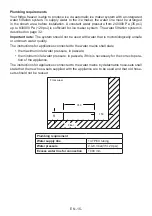
Fixing pin and the joints are used in Built-in version. The sequence of the assembly and
installation drawing are located below.
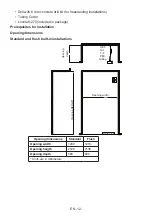
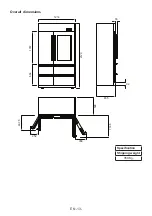
• Place the refrigerator in furniture which is built in special dimensions. The dimensions
can be found in page 9.
• Open the upper compartment cover.
• Put the fixed pins in appropriate holes and use the washers for tolerating gaps.
• Fasten the fixing pins to the furniture with using D4X20 Screws
Detail A
Fixing pin
Lag screw
Detail B
Lag screw
Fixing
pin
Important note:
Be sure the levelling is correct done before screwing.
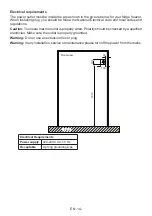
Built-in Installation
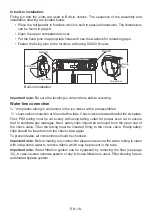
Water line connection
¼ ‘’ mm plastic tubing is connected to the ice maker with a preassembled
¼ ‘’ check valve connection at the end of the tube. Check valve is located behind the kick plate.
First, PEX tubing must be cut evenly with using tubing cutter for proper even cut to ensure
that to eliminate any leakages. Next, safety clips should be removed from the open end of
the check valve. Then the tubing must be inserted firmly to the check valve. Finally safety
clips should be inserted onto the check valve again.
To prevent leaks, all connections should be checked.
Important note:
Before making any connection please make sure the water tubing is clean
with using some water to remove debris which may be present in the tube.
Important note:
Water filtration system can be bypassed by removing the filter (see page
32); in case reverse osmosis system or any in-house filtration is used. Filter housing has an
automated bypass system.
Summary of Contents for WR 747 SS
Page 1: ...Fridge Freezer User manual WR 747 SS...
Page 43: ...5 4 10 1 1 2 2 3 3 4 4 5 5 6 6 7 7 45...
Page 44: ...E41 ZONE 4 E42 E43 1 2 E44 170 E50 No Frost 44...
Page 45: ...E01 E02 E11 E12 E13 1 2 3 E14 E15 E16 E17 E31 ZONE 3 E32 E33 1 2 E34 43...
Page 47: ...3 2 3 13 10 12 8 6 12 10 8 9 6 12 10 2 12 10 12 10 8 6 4 12 8 10 12 12 8 3 2 8 6 6 41...
Page 48: ...39 42 41 40 8 6 8 6 8 6 8 6 8 4 3 1 3 1 6 4 6 4 2 5 8 6 2 4 4 2 6 4 40...
Page 49: ...38 5 5 1 4 6 C 5 2 2 39...
Page 50: ...37 4 4 4 4 1 38...
Page 51: ...36 4 3 6 16 24 37...
Page 52: ...35 4 3 5 36...
Page 53: ...34 4 3 3 4 3 4 35...
Page 54: ...33 4 3 2 34...
Page 55: ...32 4 3 4 3 1 33...
Page 58: ...29 4 2 5 Sabbath Sabbath ON OFF 15 4 2 6 Fridge Zone OFF Fridge Zone ON OFF 15 30...
Page 60: ...27 4 2 4 2 1 15 24 C 16 C 2 C 8 C 12 28...
Page 61: ...26 4 4 1 1 2 LCD 3 4 5 6 7 8 9 10 11 LED 12 LED 13 14 27...
Page 62: ...25 50 5 3 3 26...
Page 63: ...24 il gov sviva www 3 2 3 3 220 240V 50Hz 25...
Page 64: ...23 3 3 1 R600a R600a 16 24...
Page 65: ...22 2 13 6 2 14 23...
Page 66: ...21 2 12 22...
Page 67: ...20 2 11 21...
Page 68: ...19 2 10 2 20...
Page 69: ...18 2 9 Loctite 270 120 19...
Page 70: ...17 2 8 18...
Page 71: ...16 2 7 1 4 1 4 PEX 37 17...
Page 72: ...15 2 6 2 L 8 D4X20 16...
Page 73: ...14 2 6 4 2 8 D4X20 4 L 2 M5X16 2 4 D4X35 4 2 6 1 L L M5 L 6 D4X35 15...
Page 74: ...13 2 5 13 14...
Page 75: ...12 2 3 L 24 2 4 13...
Page 76: ...11 2 2 2 240 000 Pa 35 psi 830 000 Pa 120 psi 37 PEX 1 4 2 4 8 3 35 120 psi 1 12...
Page 77: ...10 2 2 1 220 240V AC 50Hz 11...
Page 78: ...9 GT 850 350 10...
Page 79: ...8 2 2 1200 1216 2120 2136 580 600 9...
Page 80: ...7 2 1 400 13 M4 6 Loctite 270 8...
Page 81: ...6 2 7...
Page 82: ...5 1 304 LCD LED LED 6...
Page 83: ...50 220 240 16 5 50 2 15 90 75 3 5...
Page 84: ...CFC HFC WEEE 4...
Page 85: ...8 8 3 3 0 8 3 14 8 2000 3...
Page 86: ...R600a R600a 16 2...
Page 87: ...mA 30 OFF 1...
Page 88: ...52309147...


