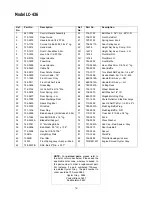
background image

12

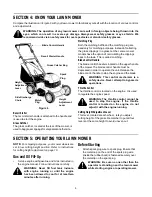
NOTE:  An unbalanced blade will cause excessive
vibration when rotating at high speeds and may cause
damage to the mower and/or personal injury.

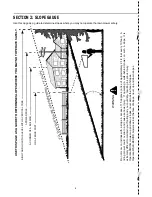
The blade can be tested by balancing it on a round 
shaft screwdriver. See Figure 14. Remove metal 
from the heavy side until it balances evenly. It is 
recommended that the blade always be removed 
from the adapter for the best test of balance.

Figure 14

Before reassembling the blade and the blade 
adapter to the unit, lubricate the engine crankshaft 
and the inner surface of the blade adapter with light 
oil (or engine oil). Also lubricate the bolt holes, bolts 
and inner surface of the nuts. 

Install the blade adapter on the crankshaft with the 
“star” away from the engine. Refer to  Figure 13. 
Place the blade with the side marked bottom (or 
with part number) facing away from the adapter. 

Align the blade bell support over the blade with the 
tabs in the holes of the blade and insert the hex 
bolt. Tighten the hex bolt to the torque listed in the 
“Blade Mounting Torque” section below.

Blade Mounting Torque

Center Bolt: 450 in. lbs. min., 600 in. lbs. max.

IMPORTANT:

To ensure safe operation, all nuts and 

bolts must be checked periodically for correct tightness.
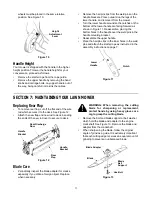
Deck Care

NOTE:  We do not recommend the use of pressure
washers or garden hose to clean your unit.These may
cause damage to electric components, spindles,
pulleys, bearings or the engine. The use of water will
shorten life of the mower and reduce its serviceability.  

The underside of the mower deck should be 
cleaned after each use to prevent a buildup of 
grass clippings, leaves, dirt or other matter. If this 
debris is allowed to accumulate, it will invite rust 
and corrosion, and may cause an uneven 
discharge of grass clippings at the next cutting.

The deck may be cleaned by tilting the mower and 
scraping clean with a suitable tool (make certain the 
spark plug wire is disconnected).
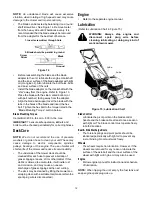
Engine

Refer to the separate engine manual.
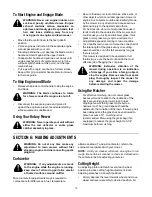
Lubrication

(Refer to Lubrication Chart in Figure 15.) 

WARNING: Always stop engine and
disconnect spark plug wire before
cleaning, lubricating or doing any kind of
work on lawn mower. 

Figure 15: Lubrication Chart

Blade Control

Lubricate the pivot points on the blade control 
handle and the brake cable at least once a season 
with light oil. The blade control must operate freely 
in both directions.

Rear & Side Discharge Doors

The torsion springs and pivot points should be 
lubricated periodically with light oil to prevent any 
rust or binding. Door must work freely.

Wheels

The wheels require no lubrication. However, if the 
wheels are removed for any reason, lubricate the 
surface of the axle bolt and the inner surface of the 
wheel with light oil. Engine oil may also be used.

Engine

Follow engine manual for instruction and schedule 
of lubrication.

NOTE: When tipping the unit, empty the fuel tank and
keep engine spark plug side up.

1. Insert screw driver through hole

2. Blade should be parallel to ground

Screw 

Driver

Ground

Blade

Lub

e

Lube

Lube

Lube

Lub

e

Summary of Contents for LC-436

Page 1: ...vered or grass covered land unless the engine s exhaust system is equipped with a spark arrester meeting applicable local or state laws if any If a spark arrester is used it should be maintained in effective working order by the operator In the State of California the above is required by law Section 4442 of the California Public Resources Code Other states may have similar laws Federal laws apply...

Page 2: ...rized dealer You can locate the model number by standing at the operating position and looking down at the rear of the mower deck A sample model plate is explained below For future reference please copy the model number and the serial number of the equipment in the space below CALLING CUSTOMER SUPPORT If you have difficulty assembling this product or have any questions regarding the controls opera...

Page 3: ...e area Wear sturdy rough soled work shoes and close fitting slacks and shirts Shirts and pants that cover the arms and legs and steel toed shoes are recommended Do not wear loose fitting clothes or jewelry They can be caught in moving parts Never operate a unit in bare feet sandals slippery or light weight e g canvas shoes Always wear safety glasses or safety goggles during operation or while perf...

Page 4: ...mowing activity Never assume that children will remain where you last saw them Keep children out of the mowing area and under the watchful care of a responsible adult other than the operator Be alert and turn mower off if a child enters the area Before and while moving backwards look behind and down for small children or other objects Never allow children under age 14 to operate the mower Children...

Page 5: ...components and replace with manufacturer s recommended parts when necessary Mower blades are sharp and can cut Wrap the blade s or wear gloves and use extra caution when servicing them Do not change the engine governor setting or overspeed the engine Excessive engine speeds are dangerous Your Responsibility Restrict the use of this power machine to persons who read understand and follow the warnin...

Page 6: ... DETERMINE SLOPES WHERE YOU MAY NOT OPERATE SAFELY Do not mow on inclines with a slope in excess of 15 degrees a rise of approximately 2 1 2 feet every 10 feet A riding mower could overturn and cause serious injury If operating a walk behind mower on such a slope it is extremely difficult to maintain your footing and you could slip resulting in serious injury Operate RIDING mowers up and down slop...

Page 7: ...e the handle into the operating position Make certain the lower handle is seated securely into the handle mounting brackets Tighten the hand knobs on each side of the handle carriage bolts must be seated properly into the handle See Figure 2 Figure 2 NOTE Your mower is shipped with the handle in the higher height position If you wish to lower the height of the handle refer to the Adjustment Sectio...

Page 8: ... Figure 6 IMPORTANT Make sure cables are routed to the outside of the handle so they are not in the way when attaching the grass catcher Lift the rear discharge door on the mower Place the hooks on the grass catcher into the slots in the handle bracket assemblies See Figure 7 Release the rear discharge door To remove the grass catcher lift the rear discharge door on the mower Lift the grass catche...

Page 9: ...evice Never attempt to bypass its operations Throttle Control The throttle control is located on the engine It is used to regulate the engine speed WARNING The throttle control cannot be used to stop the engine If the throttle control is located on the engine do not adjust it with the engine running Cutting Height Adjustment Lever This lever located at each wheel lets you adjust cutting height of ...

Page 10: ...ut more than one third of the total length of the grass at any one cutting Lawn should be cut in the fall season as long as there is growth This mower is designed to be operated at full throttle to give you the best cut and do the most effective job of bagging the cut grass WARNING Extensive vibration of the mower during operation is an indication of damage If you strike a foreign object stop the ...

Page 11: ... the assembly instructions on page 7 Figure 11 SECTION 7 MAINTAINING YOUR LAWN MOWER Replacing Rear Flap To remove rear flap cut off the flat end of the wire rod which secures it to the deck See Figure 12 Attach the new flap and new rod to deck bending the ends of the new rod over to secure to deck Figure 12 Blade Care Periodically inspect the blade adapter for cracks especially if you strike a fo...

Page 12: ...use of water will shorten life of the mower and reduce its serviceability The underside of the mower deck should be cleaned after each use to prevent a buildup of grass clippings leaves dirt or other matter If this debris is allowed to accumulate it will invite rust and corrosion and may cause an uneven discharge of grass clippings at the next cutting The deck may be cleaned by tilting the mower a...

Page 13: ...e 7 Clean adjust gap or replace 8 Refer to the engine manual 9 Wait for a while and crank the engine Engine runs erratic 1 Unit running in START position 2 Spark plug wire loose 3 Blocked fuel line or stale fuel 4 Carburetor out of adjustment 1 Move throttle lever to FAST position 2 Connect and tighten spark plug wire Check spark plug for fouling 3 Clean fuel line fill tank with clean fresh gasoli...

Page 14: ...436 1 11 9 7 82 16 15 18 3 2 19 4 6 4 31 50 48 47 44 45 64 56 20 55 63 36 34 33 32 40 39 57 59 20 45 44 43 41 42 59 23 66 67 58 30 51 53 62 65 81 49 22 72 21 14 13 12 71 52 54 39 40 29 A A 83 45 46 76 80 45 79 76 76 79 80 76 46 77 59 77 17 ...

Page 15: ... 0190 Spring Lever Knob 48 732 0417A Rear Spring Lever 49 14578 Height Adj Assy Comp RH N I 14579 Height Adj Assy Comp LH 50 14765 Pivot Bar R H N I 14766 Pivot Bar L H 51 782 5002 Front Baffle 52 710 0654A Hex L Wash Scr 3 8 16 x 1 Lg 53 782 5003 Rear Baffle 54 710 1017 Torx Mach AB Tap Scr 1 4 x 62 55 710 0896 HexIndWash Scr 1 4 14 625 56 682 0516A Handle Brkt Ass y RH 57 682 0515A Handle Brkt A...

Page 16: ... these items b Routine maintenance items such as lubricants filters blade sharpening and tune ups or adjustments such as brake adjustments clutch adjustments or deck adjustments and normal deterioration of the exterior finish due to use or exposure c Log splitter pumps valves and cylinders have a sepa rate one year warranty d White Outdoor Co does not extend any warranty for products sold or expor...

Reviews: