background image

Operation

1. 

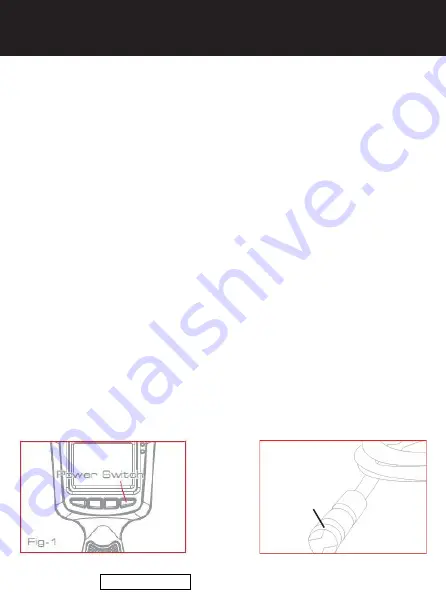
Press the power switch to turn the camera on (refer to 
Fig-1). The power indicator will illuminate and the LCD will 
become viewable.

2. 

If the image on the LCD is unclear, try adjusting either the 
brightness, contrast or mirror controls on the monitor.

LEDs Brightness Control:

 The 6 levels of LED brightness

can be adjusted by pressing the LEDs Brightness Control 
button (refer to Fig-2).

LCD Contrast Control:

 The 8 levels of LCD contrast may 

be adjusted by pressing the LCD Contrast Control button.

3. 

To rotate the orientation of the image displayed on the 
LCD by 90 degrees, press the Mirror button. There are four 
(4) possible image orientations that you can toggle through 
by pressing this button.

4. 

When in use, the tube should easily maneuver itself into 
position. Do not apply excessive force (refer to Fig-3).

5. 

The accessories included with the unit can be used to 
retrieve small items like dropped rings, screws or grabbing 
wires (refer to Fig-4).

OPERATION

5

Fig 2

LEDs
Provide Illumination

Downloaded from 

ManualsNet.com

 search engine

Summary of Contents for WIC-5000

Page 1: ...USER GUIDE Wireless Inspection Camera WIC 5000 Downloaded from ManualsNet com search engine...

Page 2: ...deo out capabilities Please read the user guide carefully before using this product This product is designed as a remote inspection device appropriate for use in surveying pipes or other hard to reach...

Page 3: ...d Note Your warranty period begins at the time of purchase The warranty is validated only by dated store receipt Please record the serial numbers located on the back on the monitor and bottom of the h...

Page 4: ...ra Battery Compartment Handle LED Brightness Control Power ON Indicator Low Battery Indicator Power ON OFF Control Image Rotate Control Contrast Control Getting Familiar with WIC 5000 Video Out Port D...

Page 5: ...the camera tube to the handheld unit make sure that the keyed ends are properly aligned Once they are lined up finger tighten the knob to hold the connector in place Keyed end plugs into socket Instal...

Page 6: ...levels of LCD contrast may be adjusted by pressing the LCD Contrast Control button 3 To rotate the orientation of the image displayed on the LCD by 90 degrees press the Mirror button There are four 4...

Page 7: ...he risk of electric shock and damage Only the lens and tube are water resistant when the unit is fully assembled Video Out Insert the video cable into the Video Out jack on the side of the unit Insert...

Page 8: ...h other objects Some countries have regulations concerning battery disposal Please follow all applicable regulations FCC Information This device complies with part 15 of the FCC Rules Operation is sub...

Page 9: ...ply press the image orientation button or move the camera tube to properly orient the image What is the maximum depth the waterproof camera can be submerged Approximately 12 feet the camera extension...

Page 10: ...er 9mm Waterproof Capacity IP67 for lens tube only LCD Screen Type 2 36 TFT LCD Effective Pixels 480 x 234 Video System NTSC Consumption Current Max 150mA Dimensions H x W x D 1 77 H x 9 84 W x 3 46 D...

Page 11: ...e to work or any other incidental or consequential damages including personal injury DO NOT RETURN ITEM TO STORE WHERE PURCHASED FOR WARRANTY INFORMATION CONTACT WHISTLER CUSTOMER SERVICE AT 1 800 531...

Page 12: ...the problem e g device will not power ON A copy of your dated proof of purchase or bill of sale 3 Be certain your unit is returned with its serial number Units without serial numbers are not covered...

Page 13: ...fee you will be contacted by a Whistler technical service specialist who will outline options available to you IMPORTANT When returning your unit for service be certain to include a daytime telephone...

Page 14: ...Free 800 531 0004 TEL 479 273 6012 FX 479 273 2927 www whistlergroup com CUSTOMER RETURN CENTER 1412 South 1st St Rogers AR 72756 Consumer Service Tel 800 531 0004 Email info whistlergroup com P N 11B...

Reviews: