background image

OPERATIONS

6

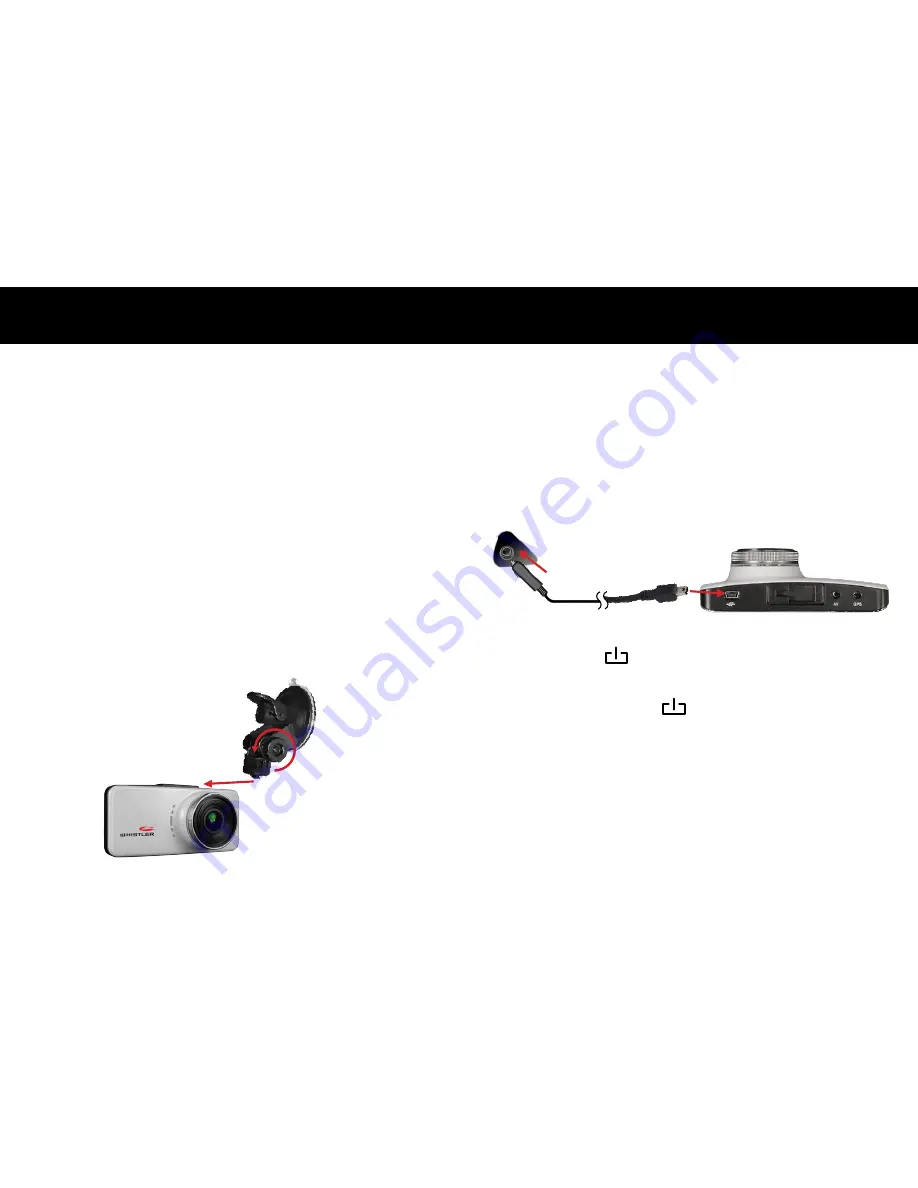
Installing the Windshield Bracket

The included windshield bracket securely places the DVR 

onto the vehicle’s windshield.

Follow the procedure below to secure the bracket:

1. 

Slide the 

BRACKET

 into the rail on the top of the DVR.

2. 

If applicable, remove protective film from the suction cup.

3. 

Clean the selected area of the windshield for mounting 

using a quality glass cleaner.

4. 

Press the bracket onto the windshield. To secure the   

suction cup press the locking tab toward the windshield.

5. 

Loosen the knob on the bracket to adjust the angle of the 

DVR. Tighten knob securely to secure the DVR’s position.

STEP 1

STEP 5

STEP 4

OPERATIONS

7

Power Connection in Vehicle

1. 

Plug the USB end of the vehicle power cord into the USB 

jack of the DVR.

2. 

Insert the other end of the power cord into the vehicle’s 

lighter socket/power port.

NOTE:

 Unit will automatically turn on and start recording 

when power is applied. It will turn off when power is removed.

Power ON/OFF
Power On:

  Press 

 to turn on DVR. Blue Status LED

illuminates.

Power Off:

 Press and hold 

 until the Whistler screen

appears.

NOTE:

 The D15VR will automatically power 

OFF

 after the 

low battery warning is displayed.

STEP 1

STEP 2

Summary of Contents for D15VR

Page 1: ...OWNER S MANUAL DVR Camera D15VR...

Page 2: ...our website at www whistlergroup com or call toll free 800 531 0004 8am to 5pm CT Monday through Friday to speak to a Customer Service Representative WINDSHIELD BRACKET Features FEATURE DESCRIPTION 3...

Page 3: ...3 Power Button Press to power ON OFF 4 UP Button Press UP to zoom in In Menu allows scrolling of menu items 5 MENU Button Press button to display menu settings 6 OK Record Button Press and hold to sta...

Page 4: ...ield 5 Loosen the knob on the bracket to adjust the angle of the DVR Tighten knob securely to secure the DVR s position STEP 1 STEP 5 STEP 4 OPERATIONS 7 Power Connection in Vehicle 1 Plug the USB end...

Page 5: ...Press OK again to stop Shooting Image 1 Take Picture Press button Camera icon will be displayed in upper left corner 2 Press OK to take an image SD Review 1 Press twice to enter review screen 2 Use o...

Page 6: ...additional drivers may be required and are not included Video Returns unit to Preview mode and charges the unit OPERATIONS 11 View DVR Screen on TV or Monitor Simply plug in a compatible Audio Video...

Page 7: ...ne Scenes with large contrast can influence the automatic exposure function of the D15VR Adjust Exposure setting in the Global menu settings to correct image Color is affected on cloudy or bright outs...

Page 8: ...are listed in MENU settings SPECIFICATIONS 15 Photo mode 12 megapixels Photo format JPEG Video output a v hdmi Video format PAL NTSC USB function 1 USB Disk 2 PC Camera temperature range 00 400 C hum...

Page 9: ...OFF 3 min 5 min 10 min Beep sound High Medium Low OFF Language English Simplified Chinese Traditional Chinese French German Japanese Korean Russian Spanish Portuguese TV mode NTSC PAL Light source fre...

Page 10: ...rning a unit for service under warranty please follow these instructions 1 Ship the unit in the original carton or in a suitable sturdy equivalent fully insured with return receipt requested to Whistl...

Page 11: ...ur Whistler product or require service during or after the warranty period please call Customer Service at 1 800 531 0004 Representatives are available to answer your questions Monday Friday from 8 00...

Reviews: