


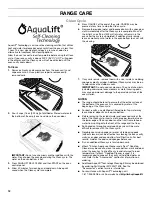

9
If the oven has the Convection Bake feature, the oven light is
controlled by a separate Oven Light switch on the console. If the
oven light is on when entering the Sabbath Mode, it will remain on
for the entire time Sabbath Mode is in use. For the oven light to be
off during the Sabbath Mode, the light bulb must be removed from
the oven prior to entering the Sabbath Mode. Not performing these
steps will cause the oven light to turn on when the oven door is
opened, resulting in the oven being not Sabbath compliant.
On the Holiday, the oven temperature can be changed once the
oven is in Sabbath Mode by pressing the “up” or “down” arrow
pads. The oven temperature will change 25°F (14°C) each time the
keypad is pressed. The display will not change, and there will be no
sounds during this adjustment.
To Bake Using Sabbath Mode:
1.
Press BAKE.
2.
Press the “up” or “down” arrow pads.
3.
Press START.
4.
Press and hold the TIMER keypad for 5 seconds. “SAb” will
flash in the display.
5.
Press START within 5 seconds to enter Sabbath Mode;
otherwise, the entire cycle cancels out. “SAb” will stop flashing
and remain on in the display. The oven is now in Sabbath Mode
and is Sabbath compliant.
Pressing the Cancel keypad at any time returns the oven to the
normal cooking mode (not Sabbath Mode compliant).
To set a Timed Bake using Sabbath Mode
(on some models):
1.
Press BAKE.
2.
Press the “up” or “down” arrow pads to enter a temperature
other than the one displayed.
3.
Press COOK TIME. The Cook Time oven indicator light will light
up.
4.
Press the “up” or “down” arrow pads to enter a cook time
length.
5.
Press START.
6.
Press and hold the TIMER keypad for 5 seconds. “SAb” will
flash in the display.
7.
Press START within 5 seconds to enter Sabbath Mode;
otherwise, the entire cycle cancels out. “SAb” will stop flashing
and remain on in the display. The oven is now in Sabbath Mode
and is Sabbath compliant. The Bake, On and Cook Time
indicator lights will be displayed.
When the set cook time ends, the oven will shut off automatically
and the indicator lights will turn off, indicating the end of the cycle.
Pressing the Cancel keypad at any time returns the oven to the
normal cooking mode (not Sabbath Mode compliant).
To set a Delayed Timed Bake using Sabbath Mode
(on some models):
1.
Press BAKE.
2.
Press the “up” or “down” arrow pads to enter a temperature
other than the one displayed.
3.
Press COOK TIME. The Cook Time oven indicator light will light
up.
4.
Press the “up” or “down” arrow pads to enter a cook time
length.
5.
Press START TIME. The Start Time indicator light will light up.
6.
Press the “up” or “down” arrow pads to enter a start time.
7.
Press START.
8.
Press and hold the TIMER keypad for 5 seconds. “SAb” will
flash in the display.
9.
Press START within 5 seconds to enter Sabbath Mode;
otherwise, the entire cycle cancels out. “SAb” will stop flashing
and remain on in the display. The oven is now in Sabbath Mode
and is Sabbath compliant. The On and Delay indicator lights
will be displayed.
When the start time is reached the Bake, On and Cook Time
indicator lights will automatically turn on. When the set cook time
ends, the oven will shut off automatically and the indicator lights
will turn off, indicating the end of the cycle.
Pressing the Cancel keypad at any time returns the oven to the
normal cooking mode (not Sabbath Mode compliant).
Aluminum Foil
IMPORTANT:
To avoid permanent damage to the oven bottom
finish, do not line the oven bottom with any type of foil or liner.
For best cooking results, do not cover entire oven rack with foil
because air must be able to move freely.
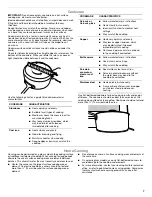
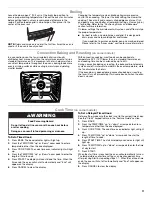
Positioning Racks and Bakeware
IMPORTANT:
To avoid permanent damage to the porcelain finish,
do not place food or bakeware directly on the oven door or bottom.
Bakeware
To cook food evenly, hot air must be able to circulate. Allow 2"
(5 cm) of space around bakeware and oven walls. Make sure that
no bakeware piece is directly over another.
Racks
■
Position racks before turning on the oven.
■
Do not move racks with bakeware on them.
■
Make sure racks are level.
To move a rack, pull it out to the stop position, raise the front edge,
and then lift out. Use the following illustration and charts as a
guide.
WARNING
Food Poisoning Hazard
Do not let food sit in oven more than one hour before
or after cooking.
Doing so can result in food poisoning or sickness.
7
6
5
4
3
2
1