10
Complete Installation
1. Connect all venting and ductwork necessary for the type of
installation (roof venting, wall venting or recirculation). See
“Venting Requirements” section.
2. Install turntable support and turntable.
3. Plug microwave oven into grounded 3 prong outlet.
4. Check the operation of microwave oven by placing 1 cup
(250 mL) of water on the turntable, and programming a cook
time of 1 minute at 100% power. Test vent fan and exhaust by
operating the vent fan.
5. If the microwave oven does not operate:
■
Check that a household fuse has not blown, or that a
circuit breaker has not tripped. Replace the fuse or reset
the circuit breaker. If the problem continues, call an
electrician.
■
Check that the power supply cord is plugged into a
grounded 3 prong outlet.
■
See the Use and Care Guide for troubleshooting
information.
Installation is now complete.
Save Installation Instructions for future use.
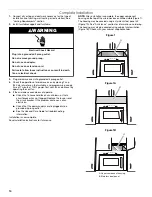
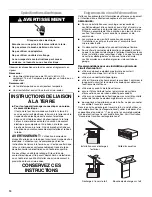
NOTE: After installation is complete, the upper component
housing on the top of the microwave oven will be visible (Figure 1).
The housing may be covered using a stainless steel panel kit
(Figure 1A). See “Assistance” section for information on ordering.
The housing may also be covered using cabinet customization
(Figure 1B). Check with your cabinet supplier/builder.
Figure 1
Figure 1A
Figure 1B
Electrical Shock Hazard
Plug into a grounded 3 prong outlet.
Do not remove ground prong.
Do not use an adapter.
Do not use an extension cord.
Failure to follow these instructions can result in death,
fire, or electrical shock.
WARNING
A. Upper component housing
B. Stainless steel panel
A
B
A
Summary of Contents for YUMV4084BS
Page 23: ...23 Notes ...


