background image

13

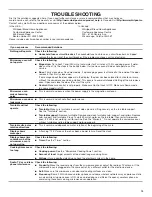
TROUBLESHOOTING

First try the solutions suggested here. If you need further assistance or more recommendations that may help you 

avoid a service call, refer to the warranty or visit 

http://www.whirlpool.com/product_help

. In Canada, visit 

http://www.whirlpool.ca

.

Contact us by mail with any questions or concerns at the address below:
In the U.S.A.:

Whirlpool Brand Home Appliances 

Customer eXperience Center 

553 Benson Road 

Benton Harbor, MI 49022-2692

In Canada:

Whirlpool Brand Home Appliances 

Customer eXperience Centre 

200 – 6750 Century Ave. 

Mississauga, Ontario L5N 0B7

Please include a daytime phone number in your correspondence.

If you experience

Recommended Solutions

Nothing will operate

Check the following:


n

Household fuse or circuit breaker:

 If a household fuse has blown or a circuit breaker has tripped, 

replace the fuse or reset the circuit breaker. If the problem continues, call an electrician.

Microwave oven will 

not operate

Check the following:


n

Magnetron: 

Try to heat 1 cup (250 mL) of cold water for 2 minutes at 100% cooking power. If water 

does not heat, try the steps in the bullets below. If microwave oven still does not operate, call for 

service.


n

Door: 

Firmly close door. On some models, if a packaging spacer is attached to the inside of the door, 

remove it, then firmly close door.
If a message about the door appears in the display, the door has been closed for 5 minutes or more 

without the microwave oven being started. This occurs to avoid unintended starting of the microwave 

oven. Open and close the door, then start the cycle.


n

Control: 

Make sure control is set properly. Make sure Control Lock is OFF. Make sure Demo mode 

(on some models) is OFF.

Microwave oven 

makes humming 

noise


n

This is normal and occurs when the power supply in the magnetron cycles on.

Microwave oven door 

looks wavy


n

This is normal and will not affect performance.

Turntable will not 

operate

Check the following:


n

Turntable: 

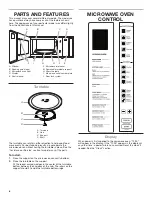
Make sure turntable is correct side up and is sitting securely on the turntable support. 

See the “Turntable” section.


n

Turntable support: 

Remove turntable. Remove and clean turntable hub, support, and rollers. Replace 

hub, support, and turntable. Place 1 cup (250 mL) of water on the turntable, then restart microwave 

oven. If it still is not working, call for service. See the “Warranty.”  Do not operate the microwave oven 

without turntable and turntable support working properly.

Turntable alternates 

rotation directions


n

This is normal and depends on motor rotation at the beginning of the cycle.

Display shows 

messages


n

A flashing “12:00” means there has been a power failure. Reset the clock.

Display shows time 

countdown, but the 

microwave oven is 

not operating

Check the following:


n

Timer: 

See the “Timer” section.

Cooking times seem 

too long

Check the following:


n

Cooking power: 

See the “Microwave Cooking Power” section.


n

Amount of food: 

Larger amounts of food need longer cooking times.


n

Voltage: 

Have a qualified electrician check the electrical system in the home.

Radio, TV, or cordless 

phone interference

Check the following:


n

Proximity:

 Move the receiver away from the microwave oven or adjust the radio or TV antenna. If the 

microwave oven is plugged into the same outlet, try a different outlet for the electronic device.


n

Soil:

 Make sure the microwave oven door and sealing surfaces are clean.


n

Frequency:

 Some 2.4 GHz based cordless phones and home wireless networks may experience static 

or noise while microwave oven is ON. Use a corded phone, a different frequency cordless phone, or 

avoid using these items during microwave oven operation.

Summary of Contents for WMC30311LD

Page 1: ...anada call 1 800 807 6777 or visit our website at www whirlpool ca HORNO DE MICROONDAS Manual de uso y cuidado Si tiene preguntas sobre características funcionamiento rendimiento piezas accesorios o servicio técnico llame al 1 800 253 1301 o visite nuestro sitio web en www whirlpool com En Canadá llame al 1 800 807 6777 o visite nuestro sitio web en www whirlpool ca W11510323A ...

Page 2: ... 15 INSTRUCCIONES DE INSTALACIÓN 17 Desempaque 17 Requisitos de ubicación 17 Requisitos eléctricos 17 PIEZAS Y CARACTERÍSTICAS 18 Bandeja giratoria 18 CONTROL DEL HORNO DE MICROONDAS 18 Pantalla 18 Start Inicio 19 Add 30 Seconds Agregar 30 segundos 19 Cancel Cancelar 19 Clock Reloj 19 Timer Temporizador 19 Tones Tonos 19 Control Lock Bloqueo de controles 19 USO DEL HORNO MICROONDAS 20 Característi...

Page 3: ...sealed containers for example closed glass jars are able to explode and should not be heated in the microwave oven Use the microwave oven only for its intended use as described in the manual Do not use corrosive chemicals or vapors in the microwave oven This type of oven is specifically designed to heat cook or dry food It is not designed for industrial or laboratory use As with any appliance clos...

Page 4: ...tainer Use extreme care when inserting a spoon or other utensil into the container This device complies with Part 18 of the FCC Rules This device complies with Industry Canada ICES 001 PRECAUTIONS TO AVOID POSSIBLE EXPOSURE TO EXCESSIVE MICROWAVE ENERGY a Do not attempt to operate this oven with the door open since open door operation can result in harmful exposure to microwave energy It is import...

Page 5: ...has cooled Electrical Requirements Observe all governing codes and ordinances Required n A 120 V 60 Hz AC only 15 or 20 A electrical supply with a fuse or circuit breaker Recommended n A time delay fuse or time delay circuit breaker n A separate circuit serving only this microwave oven Electrical Shock Hazard Plug into a grounded 3 prong outlet Do not remove ground prong Do not use an adapter Do n...

Page 6: ... oven cavity bottom 2 Place the turntable on the support Fit the raised curved wedges in the center of the turntable bottom between the 3 spokes of the hub The rollers on the support should fit inside the turntable bottom ridge MICROWAVE OVEN CONTROL Display When power is first supplied to the microwave oven 12 00 will appear in the display If the 12 00 appears in the display at any other time a p...

Page 7: ...ncel keypad is also used to lock and unlock the control panel See the Control Lock section Clock This is a 24 hour clock To Set The microwave oven must be OFF 1 Touch TIMER for 3 seconds to enter clock setting It will also appear every time the product is plugged into the power source or power is back after a power fail 2 Touch the button to enter the correct time of day 3 Touch START 30 sec to sa...

Page 8: ...cook more evenly than irregularly shaped food Starting Temperature Room temperature foods will heat faster than refrigerated foods and refrigerated foods will heat faster than frozen foods Composition and Density Foods high in fat and sugar will reach a higher temperature and will heat faster than other foods Heavy dense foods such as meat and potatoes require a longer cook time than the same size...

Page 9: ...d bakeware supplied with the microwave oven on some models aluminum foil for shielding and approved meat thermometers may be used with the following guidelines n To avoid damage to the microwave oven do not allow aluminum foil or metal to touch the inside cavity walls ceiling or floor n Always use the turntable n To avoid damage to the microwave oven do not allow contact with another metal object ...

Page 10: ...er the dish Stir and let stand 2 3 minutes after cooking To Use Cook Menu 1 Place food on the turntable and close the door 2 Touch the Cook Menu keypad repeatedly to choose menu and touch START 30 sec to confirm Touch the keypad again to change quantity See chart for available serving sizes 3 Touch START 30 sec The display will count down the cook time When the cycle ends End will appear in the di...

Page 11: ...Clean This automatic cleaning cycle will help you to clean the microwave oven cavity and to remove unpleasant odors Before starting the cycle 1 Put 250 mL water into a container see our re commendations in the below section Tips and suggestions 2 Place the container directly on the middle of the cavity To Start The Cycle 1 Press the Steam Clean button the cleaning cycle duration will be visible on...

Page 12: ...nlet Cover To avoid arcing and microwave oven damage the microwave inlet cover see the Parts and Features section should be kept clean n Wipe with wet cloth MICROWAVE OVEN DOOR AND EXTERIOR The area where the microwave oven door and frame touch when closed should be kept clean n Mild nonabrasive soaps and detergents Rinse with clean water and dry with soft lint free cloth n Glass cleaner and paper...

Page 13: ...ven makes humming noise n This is normal and occurs when the power supply in the magnetron cycles on Microwave oven door looks wavy n This is normal and will not affect performance Turntable will not operate Check the following n Turntable Make sure turntable is correct side up and is sitting securely on the turntable support See the Turntable section n Turntable support Remove turntable Remove an...

Page 14: ...rite to Whirlpool with any questions or concerns at Whirlpool Brand Home Appliances Customer eXperience Center 553 Benson Road Benton Harbor MI 49022 2692 Please include a daytime phone number in your correspondence In Canada Call the Whirlpool Customer eXperience Center toll free 1 800 807 6777 or visit our website at www whirlpool ca Our consultants provide assistance with n Scheduling of servic...

Page 15: ...ente según las instrucciones de instalación proporcionadas Algunos productos como los huevos enteros con cáscara y los contenedores cerrados por ejemplo los frascos de vidrio cerrados pueden explotar y por ese motivo no se deben calentar en el horno microondas Utilice el horno microondas solo para su uso previsto como se indica en este manual No utilice químicos corrosivos o vapores en el horno mi...

Page 16: ...a puerta y superficies de sellado d El horno no debe ser ajustado o reparado por nadie excepto personal de servicio calificado INSTRUCCIONES IMPORTANTES DE SEGURIDAD GUARDE ESTAS INSTRUCCIONES Los líquidos como el agua café o té se pueden sobrepasar del punto de ebullición sin que parezca que están hirviendo La ebullición o las burbujas visibles no se encuentran siempre presentes al retirar el con...

Page 17: ...nar correctamente una vez que se haya enfriado Requisitos eléctricos Respete todos los códigos y las ordenanzas vigentes Se necesita n Un suministro eléctrico de 120 V 60 Hz CA solamente de 15 o 20 A con fusible o disyuntor Se recomienda n Un fusible o un disyuntor retardador n Un circuito separado que preste servicio solamente a este horno de microondas ADVERTENCIA Peligro de Choque Eléctrico Con...

Page 18: ...deja giratoria sobre el soporte Las líneas curvas elevadas del centro de la parte inferior de la bandeja giratoria deben encajarse entre los 3 rayos del eje Los rodillos del soporte deben encajar dentro del canal debajo de la bandeja giratoria CONTROL DEL HORNO DE MICROONDAS Pantalla Cuando se suministre energía eléctrica al horno de microondas por primera vez aparecerá en la pantalla 12 00 Si apa...

Page 19: ...ear el panel de control Consulte la sección Bloqueo de controles Clock Reloj Este reloj es de 24 horas Para ajustar El horno de microondas debe estar apagado 1 Toque TIMER Temporizador por 3 segundos para ingresar a los ajustes del reloj También aparecerá cada vez que el producto se conecte a la fuente de energía o cuando esta regrese después de una falla 2 Toque el botón para introducir la hora d...

Page 20: ... calentarán con mayor rapidez que los refrigerados y los alimentos refrigerados se calentarán con mayor rapidez que los congelados Composición y densidad Los alimentos con alto contenido de grasa y de azúcar alcanzarán mayor temperatura y se calentarán con mayor rapidez que otros alimentos Los alimentos pesados y densos como la carne y papas necesitan un tiempo de cocción más prolongado que el mis...

Page 21: ...y los utensilios para hornear provistos con el horno de microondas en algunos modelos el papel de aluminio para protección y los termómetros para carne aprobados se pueden utilizar teniendo en cuenta las siguientes pautas n Para evitar daños al horno de microondas no permita que el papel de aluminio o el metal toquen las paredes el techo o el piso de la cavidad interior n Siempre use la bandeja gi...

Page 22: ... utilizar el menú de cocción 1 Ponga la comida en la bandeja giratoria y cierre la puerta 2 Toque el botón Cook Menu Menú de cocción repetidamente para elegir el menú y toque START 30 sec Inicio 30 seg para confirmar Toque nuevamente el botón para cambiar la cantidad Consulte la tabla para ver los tamaños disponibles de las porciones 3 Toque START 30 sec Inicio 30 seg La pantalla hará una cuenta r...

Page 23: ... la puerta y agite gire añada alimento luego cierre la puerta y oprima START 30 sec Inicio 30 seg para continuar con la cocción Steam Clean Limpieza con vapor Este ciclo de limpieza automático le ayudará a limpiar la cavidad del horno de microondas y eliminar los olores desagradables Antes de iniciar el ciclo 1 Ponga 250 ml de agua en un recipiente consulte nuestras recomendaciones en la sección C...

Page 24: ... que se produzcan arcos y el horno de microondas se dañe la cubierta de la entrada de microondas vea Piezas y características debe mantenerse limpia n Limpie con un paño húmedo PUERTA Y EXTERIOR DEL HORNO DE MICROONDAS Se debe mantener limpia la zona donde la puerta del horno de microondas hace contacto con el marco cuando está cerrada n Jabones y detergentes suaves no abrasivos Enjuague con agua ...

Page 25: ...n La puerta del horno de microondas parece ondulada n Esto es normal y no afecta el funcionamiento La bandeja giratoria no funciona Revise lo siguiente n Bandeja giratoria Cerciórese de que la bandeja giratoria tenga el lado correcto hacia arriba y que esté debidamente asentada en su soporte Consulte la sección Bandeja giratoria n Soporte de la bandeja giratoria Quite la bandeja giratoria Quite y ...

Page 26: ...as o dudas a Whirlpool Brand Home Appliances Customer eXperience Center 553 Benson Road Benton Harbor MI 49022 2692 Incluya en su correspondencia un número de teléfono en el que se le pueda localizar durante el día En Canadá Llame al Customer eXperience Center de Whirlpool sin costo al 1 800 807 6777 o visite nuestro sitio web en www whirlpool ca Nuestros consultores ofrecen ayuda con n Programaci...

Page 27: ...27 NOTAS ...

Page 28: ... 2021 All rights reserved Todos los derechos reservados 01 21 W11510323A ...

Reviews: