background image

7

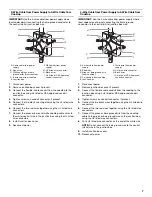
3-Wire Cable from Power Supply to 4-Wire Cable from 
Cooktop

IMPORTANT:

 Use the 3-wire cable from power supply where 

local codes permit connecting the frame-ground conductor to 
the neutral (white) junction box wire:

1.

Disconnect power.

2.

Remove junction box cover if present.

3.

Connect the flexible, cable conduit from the cooktop to the 
junction box using UL listed or CSA approved conduit 
connector.

4.

Tighten screws on conduit connector, if present.

5.

Connect the two black wires together using the UL listed wire 
connectors.

6.

Connect the two red wires together using the UL listed wire 
connectors.

7.

Connect the green or bare and white cooktop cable wires to 
the white (neutral) wire in the junction box using the UL listed 
wire connectors.

8.

Install junction box cover.

9.

Reconnect power.

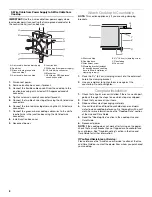
4-Wire Cable from Power Supply to 3-Wire Cable from 
Cooktop

IMPORTANT:

 Use the 4-wire cable from power supply where 

local codes do not permit connecting the frame-ground 
conductor to the neutral (white) junction box wire:

1.

Disconnect power

2.

Remove junction box cover if present.

3.

Connect the flexible cable conduit from the cooktop to the 
junction box using a UL listed or CSA approved conduit 
connector.

4.

Tighten screws on conduit connector, if present.

5.

Connect the two black wires together using the UL listed wire 
connectors.

6.

Connect the two red wires together using the UL listed wire 
connectors.

7.

Connect the green or bare ground wire from the cooktop 
cable to the green or bare ground wire (in the junction box) 
using the UL listed wire connectors.

8.

Put a UL listed wire connector on the end of the white wire.

NOTE:

 Do not connect the bare ground wire to the neutral 

(white) wire in the junction box.

9.

Install junction box cover.

10.

Reconnect power.

A. 3-wire cable from power 

supply

B. Red wires

C. White and green or bare 

ground wires (from cooktop)

D. 4-wire cable from cooktop

E. Junction box

F. White wire (from power 

supply)

G. UL listed wire connector

H. Black wires

I. UL listed or CSA approved 

conduit connector

B

C

D

E

F

H

A

G

I

A. 4-wire cable from power 

supply

B. Red wires

C. Green or bare ground wire 

(from cooktop)

D. 3-wire cable from cooktop

E. Junction box

F. White wire (from power 

supply)

G. UL listed wire connector

H. Black wires

I. UL listed or CSA approved 

conduit connector

A

B

C

D

E

F

H

G

I

Summary of Contents for W10353374B

Page 1: ... au plan de travail 16 Achever l installation 16 IMPORTANT Save for local electrical inspector s use IMPORTANT À conserver pour consultation par l inspecteur local des installations électriques W10353374B You can be killed or seriously injured if you don t immediately You can be killed or seriously injured if you don t follow All safety messages will tell you what the potential hazard is tell you ...

Page 2: ... countertop Ovens approved for this type of installation will have an approval label located on the top of the oven If you do not find this label contact your dealer to confirm that your oven is approved Refer to oven manufacturer s Installation Instructions for approval for built in undercounter use and proper cutout dimensions The cooktop should be installed away from strong draft areas such as ...

Page 3: ...only electrical supply is required on a separate 40 amp circuit fused on both sides of the line The model serial number rating plate is located on the metal cabinet underneath the cooktop See the following illustration NOTE A separate 30 amp circuit fused on both sides of the line can be used for models W5CE3024 and G9CE3065 A 30 76 2 cm on 30 models 36 91 4 cm on 36 models B Combustible area abov...

Page 4: ...ng existing wiring during installation 1 Using 2 or more people place the cooktop upside down on a covered surface using the foam end posts from the packaging Make sure that the knobs are not resting on the foam 2 Remove foam strip roll from the package containing literature The roll contains four 0 64 cm strips of foam Remove one strip at a time and apply foam strip adhesive side down around bott...

Page 5: ...out to avoid scratching the countertop 8 Loosen the screws and rotate the brackets so that they are perpendicular to the edge of the cooktop base and extend beyond its edge Securely tighten screws Installing Brackets After Placing Cooktop in Cutout 1 Using 2 or more people place cooktop right side up into the cutout NOTE Make sure that the front edge of the cooktop is parallel to the front edge of...

Page 6: ...n the junction box using the UL listed wire connectors 9 Install junction box cover 10 Reconnect power For cooktops with a 4 wire cable If your home has And you will be connecting to Go to Section 4 wire direct A fused disconnect or circuit breaker box 4 Wire Cable from Power Supply to 4 Wire Cable from Cooktop 3 wire direct A fused disconnect or circuit breaker box 3 Wire Cable from Power Supply ...

Page 7: ... box cover if present 3 Connect the flexible cable conduit from the cooktop to the junction box using a UL listed or CSA approved conduit connector 4 Tighten screws on conduit connector if present 5 Connect the two black wires together using the UL listed wire connectors 6 Connect the two red wires together using the UL listed wire connectors 7 Connect the green or bare ground wire from the cookto...

Page 8: ...s an extra part go back through the steps to see which step was skipped 2 Check that you have all your tools 3 Dispose of recycle all packaging materials 4 Use a mild solution of liquid household cleaner and warm water to clean cooktop before use Dry thoroughly with a soft cloth For more information see the Cooktop Care section of the Use and Care Guide 5 Read the Cooktop Use section in the cookto...

Page 9: ...ette contactez votre vendeur pour confirmer que la table de cuisson est bien approuvée La table de cuisson doit être installée sur un plan de travail qui soit d aplomb Les fours approuvés pour ce type d installation comportent une étiquette d approbation située sur le dessus du four Si vous ne trouvez pas cette étiquette contactez votre marchand pour confirmer que le four est bien approuvé Consult...

Page 10: ...C Profondeur du châssis 20 51 5 cm D Largeur du châssis Modèles de 30 76 2 cm 28 73 5 cm Largeur du châssis Modèles de 36 91 4 cm 34 87 5 cm E Hauteur de la plaque de cuisson 3 9 6 cm F Hauteur de la table de cuisson comprenant le conduit situé à l arrière de la table de cuisson côté droit 5 13 5 cm A B D F E C A 30 76 2 cm sur modèles de 30 36 91 4 cm sur modèles de 36 B Zone de matière combustib...

Page 11: ...ité nominale de la table de cuisson est de 120 240 volts Certains modèles comportent un conducteur neutre blanc La table de cuisson doit être raccordée directement au boîtier de connexion par l intermédiaire d un câble flexible à conducteur de cuivre avec blindage ou gaine non métallique Le câble blindé flexible sortant du boîtier de distribution fusible ou disjoncteur doit être raccordé directeme...

Page 12: ... utiliser de brides de fixation 1 À l aide d au moins 2 personnes placer la table de cuisson dans l ouverture en orientant la bonne surface vers le haut REMARQUE S assurer que le bord avant de la table de cuisson est parallèle au bord avant du plan de travail S il est nécessaire de repositionner la table de cuisson la soulever entièrement de l ouverture pour éviter de rayer le plan de travail Styl...

Page 13: ...rture pour éviter de rayer le plan de travail 8 Desserrer les vis et faire tourner les brides pour qu elles soient perpendiculaires au bord de la base de la table de cuisson et qu elles dépassent de son bord Bien serrer les vis Installation des brides après avoir positionné la table de cuisson dans l ouverture 1 À l aide d au moins 2 personnes placer la table de cuisson dans l ouverture en orienta...

Page 14: ...aller le couvercle du boîtier de connexion 10 Reconnecter la source de courant électrique Pour les tables de cuisson avec câble à 4 conducteurs Si le domicile comporte Point de distribution Voir la section suivante Direct 4 conducteurs Disjoncteur ou coupe circuit avec fusible Câble à 4 conducteurs depuis le point de distribution jusqu au câble à 4 conducteurs depuis la table de cuisson Direct 3 c...

Page 15: ...ver le couvercle du boîtier de connexion 3 Avec le connecteur de conduit homologation UL ou CSA connecter le conduit de câble flexible de la table de cuisson au boîtier de connexion 4 Serrer les vis du connecteur de conduit le cas échéant 5 Connecter ensemble les deux conducteurs noirs avec un connecteur de fils homologation UL 6 Connecter ensemble les deux conducteurs rouges avec les connecteurs ...

Page 16: ...Vérifier la présence de tous les outils 3 Éliminer recycler les matériaux d emballage 4 Avant d utiliser la table de cuisson utiliser une solution douce de nettoyant domestique et d eau tiède pour la nettoyer Sécher parfaitement avec un linge doux Pour plus de renseignements voir la section Entretien de la table de cuisson du Guide d utilisation et d entretien 5 Lire Utilisation de la table de cui...

Reviews: