background image

15

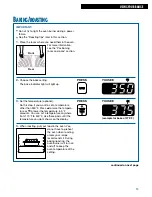
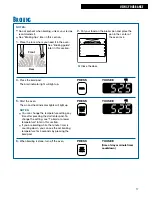
7.

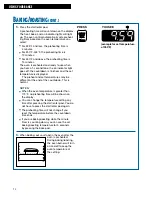
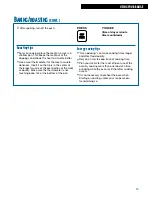
After cooking, turn off the oven.

Roasting tips

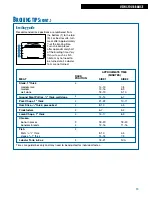
For even cooking, place the meat on a rack in a
shallow pan. This keeps the meat out of the
drippings and allows the heat to circulate better.

Use a meat thermometer for the most accurate
doneness. Insert it so the tip is in the center of
the largest muscle or thickest portion of the meat
or poultry. Make sure the thermometer is not
touching bone, fat, or the bottom of the pan.

B

AKING

/

ROASTING


(

CONT

.

)

USING YOUR RANGE

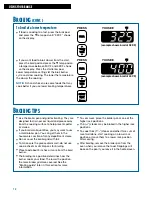
PRESS

YOU SEE

OFF

CANCEL

(time of day or minute
timer countdown)

Energy saving tips

“Oven peeking” can make cooking times longer
and affect food quality.

Rely on a timer to keep track of cooking time.

Plan your meals for the most efficient use of the
oven by cooking more than one food at a time,
or baking while the oven is still hot after cooking
a meal.

It is not necessary to preheat the oven when
broiling or roasting, unless your recipe recom-
mends doing so.

Summary of Contents for TGS325E W

Page 1: ...ge 7 Using the Self Cleaning Cycle 22 Caring for Your Range 25 Troubleshooting 30 Requesting Assistance or Service 32 Index 35 Warranty 36 1 800 253 1301 Call us with questions or comments Self Cleaning GasRange TO THE INSTALLER PLEASE LEAVE THIS INSTRUCTION BOOK WITH THE UNIT TO THE CONSUMER PLEASE READ AND KEEP THIS BOOK FOR FUTURE REFERENCE ...

Page 2: ...nd the sales slip together in a safe place for future reference Our Consumer Assistance Center number is toll free Model Number __________________________________ Serial Number ___________________________________ Purchase Date __________________________________ Dealer Name ____________________________________ Dealer Address __________________________________ Dealer Phone __________________________...

Page 3: ... word DANGER or WARNING These words mean wDANGER wWARNING All safety messages will identify the hazard tell you how to reduce the chance of injury and tell you what can happen if the instructions are not followed wWARNING Tip Over Hazard A child or adult can tip the range and be killed Connect anti tip bracket to rear range foot Reconnect the anti tip bracket if the range is moved See the installa...

Page 4: ... Maintenance Keep range area clear and free from combustible materials gasoline and other flammable vapors and liquids Storage in or on the Range Flammable materials should not be stored in an oven or near surface units Do Not Use Water on Grease Fires Smother fire or flame or use dry chemical or foam type extinguisher Use Only Dry Potholders Moist or damp potholders on hot surfaces may result in ...

Page 5: ...h to cause burns During and after use do not touch or let clothing or other flammable materials contact heating elements or interior surfaces of oven until they have had sufficient time to cool Other surfaces of the appliance may become hot enough to cause burns among these surfaces are oven vent openings and surfaces near these openings oven doors and windows of oven doors IMPORTANT SAFETY INSTRU...

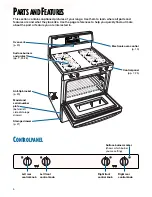
Page 6: ...rear control knob PARTSANDFEATURES This section contains captioned pictures of your range Use them to learn where all parts and features are and what they look like Use the page references to help you quickly find out more about the part or feature you are interested in Oven vent p 20 Surface burners and grates pp 7 25 28 Anti tip bracket p 20 Model and serial number plate behind left side of stor...

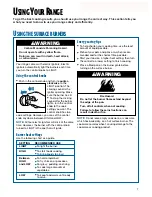
Page 7: ...rbon Monoxide Poisoning Hazard Do not operate with a yellow flame Doing so can result in death heart attack or convulsions Your range comes with electric ignitors Electric ignitors automatically light the burners each time you turn the control knobs to LIGHT Using the control knobs Push in the control knob and turn it counter clockwise to the LIGHT position The clicking sound is the ignitor sparki...

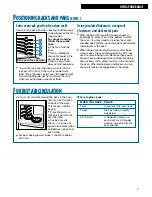
Page 8: ... a rack pull it out to the stop raise the front edge and lift it out Be sure the rack s is level Use pot holders or oven mitts to protect your hands if rack s must be moved while the oven is hot When baking roasting with 1 rack place the rack so the top of the food will be centered in the oven When baking roasting on 2 racks position racks in oven to allow good circulation of air around all the fo...

Page 9: ...d baking times so test for doneness before removing from the oven When using ovenproof glassware or dark bake ware reduce the oven temperature by 25 F but use the same baking time Because these pans absorb heat producing darker bottom browning and crispier crusts place the rack in the center of the oven When baking pies and bread you can use the temperature suggested in the recipe FORBESTAIRCIRCUL...

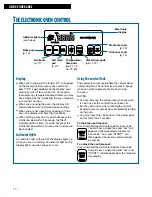
Page 10: ... will hear a single tone and Loc and START will disappear from the tempera ture display Temperature time pads pp 11 13 16 18 23 Broil pad p 17 Self clean pad p 23 Display When you first plug in the range PF will appear on the display until you press any command pad If PF again appears on the display your electricity was off for a while You will need to reprogram any temperature adjustments you may...

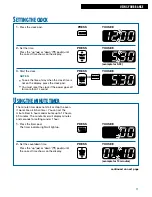
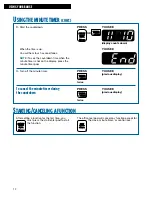
Page 11: ... OR PRESS YOU SEE CLOCK USINGTHEMINUTETIMER The minute timer does not start or stop the oven It works like a kitchen timer You can set the minute timer in hours and minutes up to 12 hours 59 minutes The minute timer will display minutes and seconds for settings under 1 hour 1 Press the timer pad The timer indicator light will light up 2 Set the countdown time Press the up s or down t pad s until t...

Page 12: ...he minute timer pad 4 Turn off the minute timer To cancel the minute timer during the countdown TIMER CANCEL PRESS YOU SEE previous display twice TIMER CANCEL PRESS YOU SEE previous display twice STARTING CANCELINGAFUNCTION After setting a function for the first time you must press the start enter pad to start the function The off cancel pad will cancel any function except for the clock minute tim...

Page 13: ...u want to set a temperature other than 350 F Press s to raise the tempera ture or t to lower the temperature in 5 F amounts You can set a temperature anywhere from 170 F to 500 F Use these pads until the temperature you want shows on the display 4 When roasting put your food in the oven You do not have to preheat the oven when roasting unless your recipe recommends it During baking roasting the ov...

Page 14: ...t temperatures may be different at the end of the countdown This is normal NOTES When the oven temperature is greater than 170 F no preheating time will be shown on the display You can change the temperature setting any time after pressing the start enter pad You do not have to press the start enter pad again The preheating time will not change if you reset the temperature before the countdown tim...

Page 15: ... the thermometer is not touching bone fat or the bottom of the pan BAKING ROASTING CONT USING YOUR RANGE PRESS YOU SEE OFF CANCEL time of day or minute timer countdown Energy saving tips Oven peeking can make cooking times longer and affect food quality Rely on a timer to keep track of cooking time Plan your meals for the most efficient use of the oven by cooking more than one food at a time or ba...

Page 16: ...y the displayed amount There is no sign in front of the number when increasing the temperature setting 3 Enter the adjustment NOTE The offset temperature resets to 00 if the power goes out for more than 1 second How to determine the amount of adjustment needed The chart at the right tells you how much to adjust the offset temperature to get the cooking results you want You can figure out cooking r...

Page 17: ...ure setting any time after pressing the start enter pad To change the setting see To broil at a lower temperature later in this section If you are broiling while the minute timer is counting down you can see the set broiling temperature for 5 seconds by pressing the broil pad 6 When broiling is done turn off the oven Rear Front 2 Put your food on the broiler pan and place the pan in the center of ...

Page 18: ...f you broil small quantities you may want to use a small broiler pan You can get them in the housewares section of many department stores Do not cover the broiler grid with foil To make sure the grease drains well do not use cookie sheets or similar pans for broiling Place food about 3 inches or more from the broil burner The broiling rack position determines how the burner cooks your food The low...

Page 19: ...E MINUTES SIDE 2 7 8 8 9 9 10 6 7 10 11 4 5 3 4 8 9 18 20 11 16 4 5 7 9 N A MEAT Steak 1 thick medium rare medium well done Ground Meat Patties 3 4 thick well done Pork Chops 1 thick Ham Slice 1 2 thick precooked Frankfurters Lamb Chops 1 thick Chicken bone in pieces boneless breasts Fish fillets 1 4 1 2 thick steaks 3 4 1 thick Lobster Tails 6 8 oz RACK POSITION 4 4 4 4 4 4 3 4 4 3 SIDE 1 14 15 1...

Page 20: ... Use pot holders when touching items left near oven vent Failure to do so can result in burns Oven vent USING YOUR RANGE Making sure the anti tip bracket is installed Slide range forward Look for the anti tip bracket securely attached to floor Slide range back so rear range foot is under anti tip bracket THEANTI TIPBRACKET The range will not tip during normal use However the range can tip if you a...

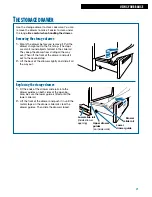
Page 21: ... lift the front of the drawer and pull it out to the second stop 2 Lift the back of the drawer slightly and slide it all the way out Replacing the storage drawer 1 Fit the ends of the drawer slide rails into the drawer guides on both sides of the opening Also be sure the lower guide is fitted onto the lower slide rail 2 Lift the front of the drawer and push it in until the metal stops on the drawe...

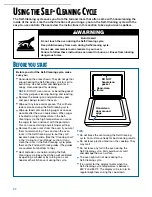
Page 22: ... possible after the oven cools down When sugar is heated to a high temperature in the Self Cleaning cycle the high temperature can cause the sugar to burn and react with the porcelain This can cause staining and etching or pitting Remove the oven racks from the oven if you want them to remain shiny You can clean the oven racks in the Self Cleaning cycle but they will become harder to slide See the...

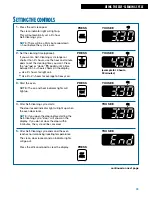
Page 23: ... soil 3 Start the oven NOTE The on and heat indicator lights will light up 4 After Self Cleaning cycle starts The door locked indicator light will light up when the oven door locks NOTE If you open the door before starting the Self Cleaning cycle door will show on the display If you do not close the door within 5 minutes the cycle will be canceled 5 After Self Cleaning cycle ends and the oven reac...

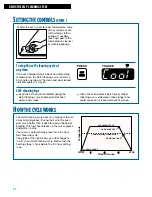
Page 24: ...L ON Clean the oven before it gets heavily soiled Cleaning a very soiled oven takes longer and could cause an increased amount of smoke HOWTHECYCLEWORKS The Self Cleaning cycle uses very high heat to burn away soil and grease During the cycle the oven gets much hotter than it does for normal baking or broiling This high heat breaks up the soil or grease and burns it away Your oven is automatically...

Page 25: ...ss cleaner Do not spray the cleaner directly on the panel Apply the cleaner to the paper towel Remove the grates Wash the surface with a sponge and warm soapy water or paper towel and spray glass cleaner Wipe with clean water and dry thoroughly Use a nonabrasive plastic scrubbing pad on heavily soiled areas Do not use steel wool abrasives or harsh cleansers They may damage the finish If you use so...

Page 26: ...d and warm soapy water Rinse and dry well Do not clean in the Self Cleaning cycle See Before you start in the Using the Self Cleaning Cycle section OR Wash the pan and grid in a dishwasher Wash with a steel wool pad and warm soapy water Rinse and dry well OR Leave the racks in the oven during the Self Cleaning cycle NOTE If you leave your racks in the oven during the Self Cleaning cycle they will ...

Page 27: ...ubbing pad See Cleaning chart earlier in this section for more information 1 2 wWARNING Carbon Monoxide Poisoning Hazard Do not operate with a yellow flame Doing so can result in death heart attack or convulsions 5 Check the burner flames once in a while for proper size and shape as shown A good flame is blue in color If flames lift away from ports are yellow or are noisy turn off the burner Allow...

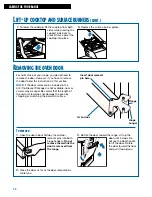
Page 28: ...r removal pins into both hinge hangers Do not remove them while the door is removed from the range 2 Close the door as far as the door removal pins will let you CARING FOR YOUR RANGE LIFT UPCOOKTOPANDSURFACEBURNERS CONT 8 Replace the surface burner grates 7 To lower the cooktop lift the cooktop from both sides while pressing the support rods back to unlock them Lower the cooktop into place REMOVIN...

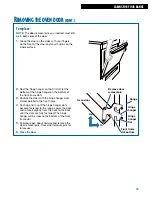
Page 29: ...frame slot 3 Position the door with the hinge hanger slots almost parallel to the front frame 4 Push up and in until the hinge hanger slots become fastened to the range Lower the door and rotate it slightly from the front to the back until the slots are fully fastened The hinge hanger will be close to the bottom of the front frame slot 5 Pull door open about halfway and remove the door removal pin...

Page 30: ...efer to the proper instructions The main or regulator gas shutoff valve is in the off position See the Installation Instructions The ignitor is broken Contact an authorized service technician to replace it You have blown a household fuse or tripped a circuit breaker The air gas mixture is incorrect Contact an authorized service technician to check the air gas mixture or see the Installation Instru...

Page 31: ...sed the oven door The flow of combustion and or ventilation air to the range is blocked Make sure nothing is blocking the middle front of the backguard The range is not level See the Installation Instructions COOKINGRESULTS WHENSELF CLEANINGYOUROVEN PROBLEM The display is showing PF F followed by a number shows on the display The indicator light s is flashing CAUSE There has been a power failure P...

Page 32: ...ized Whirlpool service company in your area you can also look in your telephone directory Yellow Pages REQUESTINGASSISTANCEORSERVICE To avoid unnecessary service calls please check the Troubleshooting section It may save you the cost of a service call If you still need help follow the instructions below IFYOUNEEDASSISTANCEORSERVICE IFYOUNEEDREPLACEMENTPARTS If you need to order replacement parts w...

Page 33: ...33 NOTES ...

Page 34: ...34 NOTES ...

Page 35: ...play 10 Indicator lights 10 Minute timer 11 Starting 12 FEATURES 6 LIFT UP COOKTOP 27 28 TOPIC PAGE MODEL AND SERIAL NUMBER 2 OVEN DOOR 28 29 OVEN TEMPERATURE Adjusting 16 Setting 13 17 OVEN VENT 20 PANS 9 PARTS 6 RACKS 8 9 ROASTING Pans 9 Racks 8 9 Setting cycle 13 Tips 15 SAFETY 3 5 SELF CLEANING CYCLE Before you start 22 How the cycle works 24 Setting the controls 23 Tips 24 SERVICE 32 STORAGE ...

Page 36: ... Troubleshooting section of this book After checking Troubleshooting additional help can be found by checking the Requesting Assistance or Service section or by calling the Whirlpool Consumer Assistance Center telephone number 1 800 253 1301 from anywhere in the U S A WHIRLPOOL WILL NOT PAY FOR A Service calls to 1 Correct the installation of your range 2 Instruct you how to use your range 3 Repla...

Reviews: