Type
Capacity
(Btu/h)
Power cord
Power connecting cable
Main power
supply (Note)
Split On/off
H05VV-F, 3G 1.0 mm²
H05RN-F, 3G 1.0 mm²
To indoor
H05VV-F, 3G 1.0 mm²
H05RN-F, 3G 1.0 mm²
To indoor
H05VV-F, 3G 1.5 mm²
H07RN-F, 3G 1.5 mm²
To indoor
H05VV-F
, 3G
2
.5 mm²
H07RN-F
,
4
G
2
.5 mm²
To indoor
23
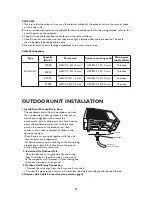
CAUTION:
1. Make sure that the colour of wires and the terminal number of the outdoor unit are the same as those
of the indoor unit.
2. Use an individual power circuit specifically for the air conditioner. As for the wiring method, refer to the
circuit diagram on the appliance.
3. Check that the cable specification conforms to the table as follows.
4. Check the wires and make sure that they are all tightly fastened after cable connection. The cable
should be tighly fastened by cable clamp.
5. Be sure to install an earth leakage circuit breaker in a wet or moist area.
Cable Specifications
OUTDOOR UNIT INSTALLATION
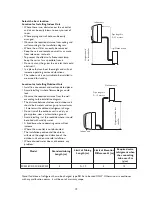
1. Install Drain Port and Drain Hose
The condensate drains from the outdoor unit when
the unit operates in heating mode. In order not to
disturb your neighbours and protect the
environment, install a drain port and a drain hose to
direct the condensate water. Just install the drain
port on the chassis of the outdoor unit, then
connect a drain hose to the port as shown in the
figure on the right .
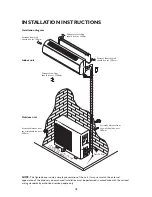
2. Install and Fix Outdoor Unit
Fix with bolts and nuts tightly on a flat and strong
floor. If installed on the wall or roof, make sure to
fix the supporter well to prevent it from shaking due
to serious vibration or strong wind.
3. Outdoor Unit Piping Connection
• Remove the valve caps from the 2-way and 3-way valve.
• Connect the pipes to the 2-way and 3-way valves separately according to the required torque.
4. Outdoor Unit Cable Connection (see previous page)
Chassis
Drain port
Drain hose
(prepare by user)
(Drain hose is not provided together with the unit,
user can purchase it separately.)
For better outdoor unit connecting to the drain piping,
please keep at least 2 inch above from the ground,
or the piping won't be connected.
SC009
SC012
SC018
SC022
Summary of Contents for SC009
Page 2: ......


